BeaconAir – Track your Pi
BeaconAir Software
I have already described the iBeacon scanner and the Philips Hue Python library phue. Thus, the two major pieces remaining are the main program loop and the RasPiConnect Local.py/control panel. The BeaconAir software block diagram is shown in Figure 7.
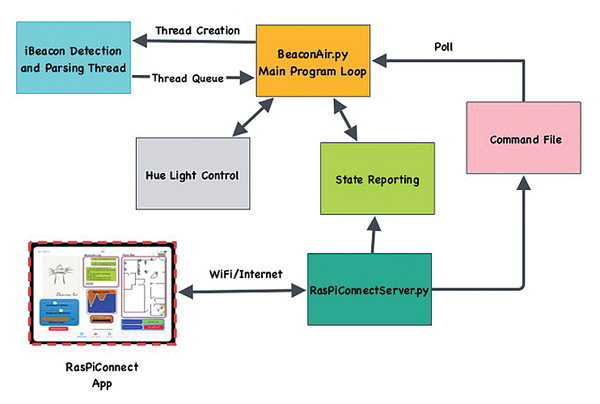 Figure 7: BeaconAir software architecture.
The main software (Listing 2) runs in a loop with a sleep period of 0.25 seconds at the end. It checks two sources. First, it checks a queue connected to the iBeacon scanning software running in a background thread (lines 1 and 2). An empty queue means no new iBeacon reports, so the software next checks to see whether any commands are waiting from the RasPiConnect control panel (line 37). If the queue has iBeacon results to deliver, the main loop processes the iBeacon information, sets various informational parameters, builds the new web page to deliver to RasPiConnect, and controls the lights. To make things clearer, I removed the debugging information. All calculations are in meters and converted to pixels for display.
Listing 2
BeaconAir
01   if (queueBLE.empty() == False):
02     result = queueBLE.get(False)
03
04     utils.processiBeaconList(result,currentiBeaconRSSI, currentiBeaconTimeStamp,rollingiBeaconRSSI)
05     utils.clearOldValues(10,currentiBeaconRSSI, currentiBeaconTimeStamp,rollingiBeaconRSSI)
06
07   # update position
08   if (utils.haveThreeGoodBeacons(rollingiBeaconRSSI) >= 3):
09     oldbeacons = beacons
10     beacons = utils.get3ClosestBeacons(rollingiBeaconRSSI)
11     if (cmp(oldbeacons, beacons) != 0):
12       bubblelog.writeToBubbleLog("closebeacons:%i,%i,%i" % (beacons[0], beacons[1], beacons[2]))
13     myPosition = utils.XgetXYFrom3Beacons(beacons[0],beacons[1],beacons[2], rollingiBeaconRSSI)
14
15     # calculate jitter in position
16     jitter = (((lastPosition[0] - myPosition[0])/lastPosition[0]) + ((lastPosition[1] - myPosition[1])/lastPosition[1]))/2.0
17     jitter = jitter * 100.0   # to get to percent
18     lastPosition = myPosition
19
20     f = open("/home/pi/BeaconAir/state/distancejitter.txt", "w")
21
22     f.write(str(jitter))
23     f.close()
24
25     lights.checkForLightTrigger(myPosition, LIGHT_DISTANCE_SENSITIVITY, LIGHT_BRIGHTNESS_SENSITIVITY, currentLightState)
26
27     # build webpage
28     webmap.buildWebMapToFile(myPosition, rollingiBeaconRSSI, currentLightState, DISPLAY_BEACON_ON, DISPLAY_LIGHTS_ON)
29
30     # build beacon count graph
31     iBeaconChart.iBeacondetect(rollingiBeaconRSSI)
32   else:
33     # lost position
34     myPosition = [-myPosition[0], -myPosition[1]]
35
36   # process commands from RasPiConnect
37   processCommand()
The program processes the incoming iBeacon list, fills the Beacon arrays, and clears out old values (lines 4 and 5). Next, it calculates the current BeaconAir physical position – but only if it finds more than three beacons (lines 8-13). I now have the latest calculated position, so I want to calculate the jitter in that position (lines 16-18). A big jitter value says that you are moving, that there are significant amounts of noise in the iBeacon reports, or both. Now I write out the jitter for RasPiConnect to read and send to the jitter graph on the control panel (lines 20-23).
Next, I calculate the distance from my position to all the lights and then turn on a light, change the brightness of a light, or turn a light off depending on the distance (line 25). Now I can build the web page for display on RasPiConnect (line 28). Finally, I update the current beacon count and build the graph for display on RasPiConnect (lines 31-34) that shows position, beacons, and lights (Figure 8).
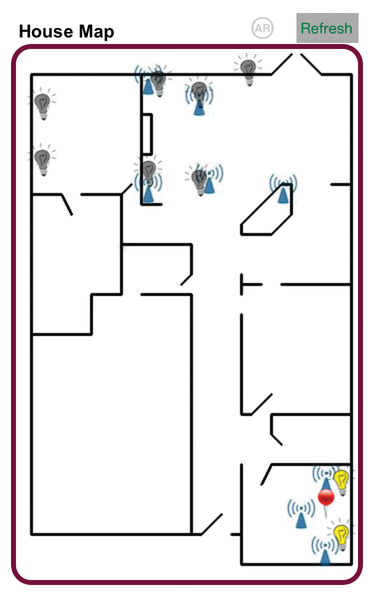 Figure 8: House map of beacons and lights.
When I started this project, I thought that building this live map was going to be the biggest problem. I looked at matplotlib on the Pi, but it was computationally expensive and complicated. Then, I looked at HTML drawing solutions and found that it was almost trivial to do. I used a Remote Webview in RasPiConnect for the control panel.
To make this work, I had to do the following steps:
- 1. Build a JPEG with the office or house plan. I took a picture of the house plans, used GIMP to draw the walls on the JPEG, and then remove the JPEG layer. Worked like a champ. Then, I had to measure a wall in meters, use GIMP to measure the same wall in pixels, and calculated a meters to pixels constant (0.0375 m/px in my case). I made the top of the JPEG 0,0, with x positive to the right and y positive down the left side.
- 2. Figure out the (x, y) position for each light and beacon and put it in the configuration file.
- 3. Run the software. The resulting HTML code is shown in Listing 3. I made my icons with transparent backgrounds (again using GIMP).
Listing 3
Building a Live Map
<html><head><title></title><style>body,html,iframe{margin:0;padding:0;}
</style></head><body><div style='position: relative; left: 0; top: 0;'>
<img src='http://example.example.com:9600/static/mainplanfull.png' style='position: relative; top: 0; left: 0;'/>
<img src='http://example.example.com:9600/static/iBeacon.png' style='position: absolute; top: 490px; left: 299px;'/>
<img src='http://example.example.com:9600/static/iBeacon.png' style='position: absolute; top: 19px; left: 122px;'/>
<img src='http://example.example.com:9600/static/iBeacon.png' style='position: absolute; top: 127px; left: 122px;'/>
<img src='http://example.example.com:9600/static/iBeacon.png' style='position: absolute; top: 40px; left: 173px;'/>
<img src='http://example.example.com:9600/static/iBeacon.png' style='position: absolute; top: 118px; left: 183px;'/>
<img src='http://example.example.com:9600/static/iBeacon.png' style='position: absolute; top: 128px; left: 257px;'/>
<img src='http://example.example.com:9600/static/iBeacon.png' style='position: absolute; top: 418px; left: 300px;'/>
<img src='http://example.example.com:9600/static/iBeacon.png' style='position: absolute; top: 453px; left: 275px;'/>
<img src='http://example.example.com:9600/static/OffLightBulb.png' style='position: absolute; top: 418px; left: 315px;'/>
<img src='http://example.example.com:9600/static/OffLightBulb.png' style='position: absolute; top: 473px; left: 315px;'/>
<img src='http://example.example.com:9600/static/OffLightBulb.png' style='position: absolute; top: 19px; left: 132px;'/>
<img src='http://example.example.com:9600/static/OffLightBulb.png' style='position: absolute; top: 30px; left: 173px;'/>
<img src='http://example.example.com:9600/static/OffLightBulb.png' style='position: absolute; top: 118px; left: 173px;'/>
<img src='http://example.example.com:9600/static/OffLightBulb.png' style='position: absolute; top: 109px; left: 122px;'/>
<img src='http://example.example.com:9600/static/OffLightBulb.png' style='position: absolute; top: 8px; left: 222px;'/>
<img src='http://example.example.com:9600/static/OffLightBulb.png' style='position: absolute; top: 42px; left: 16px;'/>
<img src='http://example.example.com:9600/static/OffLightBulb.png' style='position: absolute; top: 98px; left: 16px;'/>
<img src='http://example.example.com:9600/static/red-pin.png' style='position: absolute; top: 378px; left: 217px;'/>
</div></body></html>
BeaconAir Configuration File
The BeaconAir Configuration file (Listing 4) needs to be set up before the system can be used. It is located under config in the main directory. The three major parts of the configuration file are scaling factors (lines 1-5), beacon configuration (lines 7-15), light configuration (lines 17-25). You can get the Hue light number from the Philips app under the light overview, or you can write a short program (look at some phue examples) to get the dictionary from the Philips Hue bridge.
Listing 4
BeaconAir Configuration File
01 def pixelConv(pixels):
02         return pixels * 0.0375    # in meters
03
04 def meterToPixel(meters):
05         return int(meters / 0.0375)    # in pixels
06
07 # Beacon format:
08 #     BeaconNumber, LocalName, x, y, UDID, Major, Minor, Measured Power (from spec), x in px, y in px
09 # BeaconNumber is incremental from 0 up.  Don't skip a number
10 BeaconList=[]
11 BeaconCount = 0
12
13 Beacon = [BeaconCount,"Estimote #0 Beacon", pixelConv(314), pixelConv(507),  "b9407f30f5f8466eaff925556b57fe6d", 64507, 5414, -64, 314, 507]
14 BeaconList.append(Beacon)
15 BeaconCount += 1
16
17 #list of lights
18 #Light Format
19 #     LightNumber, LocalName, x, y, pixel x, pixel y, light on/off (1/0), huelightnumber
20
21 LightList=[]
22 LightCount = 0
23 Light = [LightCount, "Lab Left", pixelConv(330), pixelConv(435),330, 435,0, 2]
24 LightList.append(Light)
25 LightCount += 1
Buy this article as PDF
(incl. VAT)
Buy Raspberry Pi Geek
US / Canada
UK / Australia
Related content
-
Pi in the Palace

Welcome to the sixth issue of Raspberry Pi Geek magazine. In case you haven't done the math, six issues for a bimonthly magazine means we're celebrating our one year anniversary! We had a great year, and so did the amazing Raspberry Pi computer. It seems like we were just writing about the 2 millionth Raspberry Pi, and now the Foundation has announced the 3 millionth unit.
-
Connecting a weather station to your Arduino
After losing one weather station to tropical winds, the author reboots and designs a PCB that connects to an Arduino and monitors weather instruments.
-
Getting BLE to behave on the Pi

BLE is a convenient choice for wireless communication where WiFi and Internet connectivity aren't available, but getting it to work on a Raspberry Pi can be a minefield of compatibility problems. We look at the main concepts and debugging tools you will need to get the most out of BLE on your Pi.
-
WiFi and the Raspberry Pi

This SwitchDoc column looks at various uses for the inexpensive ESP8266 WiFi/processor combination.
-
The Switch Doc rebuilds his cat toy launcher with 3D printing

To explore the possibilities of 3D printing, we rebuild the cat toy launcher that debuted in Issue 5.
