Getting started with WebIOPi
Working with Sensors
WebIOPi can also handle various devices, including sensors. You can use this functionality to turn your Raspberry Pi into a web-based thermometer by connecting a temperature sensor to it and creating a simple WebIOPi app for reading sensor data. For this project, you need a DS18S20 temperature sensor and a 4.7K resistor.
Start by wiring both components as shown in Figure 4. Next, you have to enable the sensor in the WebIOPi configuration. To do this, run the
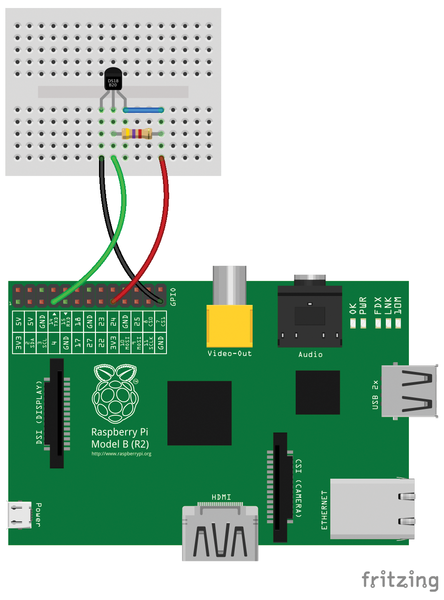 Figure 4: Temperature sensor wiring diagram.
sudo nano /etc/webiopi/config
command and uncomment the #temp2 = DS18B20 line (i.e., remove the # character) in the DEVICES section. Then, restart WebIOPi using the sudo /etc/init.d/webiopi restart command.
In the terminal, run the following commands to load the required kernel modules:
sudo modprobe w1-gpio
sudo modprobe w1-therm
cd /sys/bus/w1/devices/
ls
If the sensor has been detected and works properly, you should see the following output,
28-000005311dc9 w1_bus_master1
where 28-000005311dc9 is the sensor's serial number.
Next, point your browser to http://raspberrypi:8000/app/devices-monitor, and you should see the current temperature reading. Of course, the default page for monitoring sensors and devices is neither pretty nor particularly functional, so you might want to create your own web app for reading and displaying sensor data. The good news is that you don't have to start from scratch: In a thread on the official WebIOPi forum [3], you can find a clever web app that reads the temperature and displays it using a Google gauge widget (Figure 5). Listing 3 contains the entire code for you to study and tweak.
Listing 3
Display Temperature with Google Gauge
01 <html>
02         <head>
03         <script type="text/javascript" src="//www.google.com/jsapi"></script>
04         <script type="text/javascript" src="/webiopi.js"></script>
05         <script type="text/javascript">
06         webiopi().ready(function() {
07         tmp = new Temperature("temp2");{
08         setInterval(updateUI,1000);
09
10         }
11                 function updateUI() {
12                         tmp.getCelsius(temperatureCallback);
13                 }
14                 function temperatureCallback(tmp, data) {
15                         gaugeData.setValue(0, 0, data);
16                         gauge.draw(gaugeData, gaugeOptions);
17                 }
18         });
19         </script>
20         <script type="text/javascript">
21         google.load('visualization', '1', {packages: ['gauge']});
22         google.setOnLoadCallback(drawGauge);
23         var gaugeOptions = {min: 0, max: 110, yellowFrom: 50, yellowTo: 70,
24         redFrom: 70, redTo: 110, minorTicks: 5};
25         var gauge;
26         function drawGauge() {
27                 gaugeData = new google.visualization.DataTable();
28                 gaugeData.addColumn('number', 'Temp');
29                 gaugeData.addRows(1);
30                 gaugeData.setCell(0, 0, 0);
31                 gauge = new google.visualization.Gauge(document.getElementById('gauge_div'));{
32                 gauge.draw(gaugeData, gaugeOptions);
33                 }
34         }
35         </script>
36 </head>
37 <body>
38 <div id="gauge_div" style="width:560px; height: 280px;"></div>
39 </body>
40 </html>
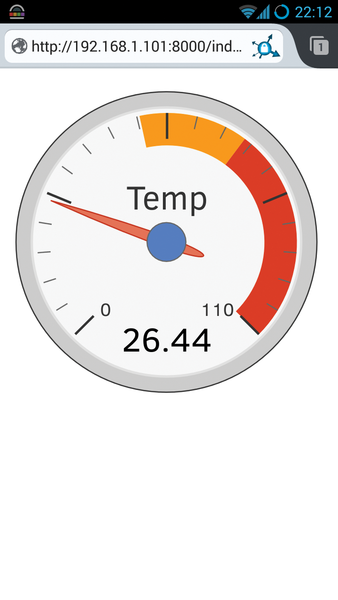 Figure 5: Web-based thermometer interface in action.
Using Python Macros with WebIOPi
WebIOPi-based apps are not limited to controlling the GPIO pins. The framework also makes it possible to integrate Python scripts (or macros in WebIOPi's terminology) into web apps. This functionality lets you build practically any web app you can think of. To learn the ropes, however, you might want to start with something simple, like a web app with a button that triggers a Python script on Raspberry Pi. Suppose you have a Python script that looks something like this:
#!/usr/bin/env python
import os
os.system('/home/pi/backup.sh')
As you may have figured out, this Python code runs the backup.sh shell script that performs a backup operation. First, you need to modify the Python script for use with WebIOPi by importing the webiopi Python library, adding the @webiopi.macro decorator, and rewriting the code as a function:
#!/usr/bin/env python
import os
import webiopi
@webiopi.macro
def RunBackup():os.system('/home/pi/backup.sh')
Save the modified script under the backup.py name in the /home/pi/project/scripts directory. Make the script executable using the
chmod +x /home/pi/project/scripts/backup.py
command, run the
sudo nano /etc/webiopi/config
command, and add the path to the script in the [SCRIPTS] section as follows:
myproject = /home/pi/project/scripts/backup.py
Restart WebIOPi using the sudo /etc/init.d/webiopi restart command. To make the original example web app in Listing 1 work with the Python macro, you need to replace the GPIO button with the macro button shown in Listing 4.
Listing 4
Define Macro Button
01 <script type="text/javascript">
02         webiopi().ready(function() {
03                 var button = webiopi().createMacroButton("macro", "Backup", "RunBackup");
04                 $("#controls").append(button);
05         });
06 </script>
The webiopi().createMacroButton routine, which defines a macro button, has three parameters: id ("macro"), label ("Backup"), and the macro identifier ("RunBackup"). Note that the macro identifier is the name of the function defined in the Python script. Next, load the web app in the browser and hit the Backup button to run the Python script on your Raspberry Pi.
« Previous 1 2 3 Next »
Buy this article as PDF
Pages: 6
(incl. VAT)
Buy Raspberry Pi Geek
US / Canada
UK / Australia
Related content
-
Pi in the Palace

Welcome to the sixth issue of Raspberry Pi Geek magazine. In case you haven't done the math, six issues for a bimonthly magazine means we're celebrating our one year anniversary! We had a great year, and so did the amazing Raspberry Pi computer. It seems like we were just writing about the 2 millionth Raspberry Pi, and now the Foundation has announced the 3 millionth unit.
-
PHP on Raspberry Pi

Getting started with PHP on Raspberry Pi is easy. We show how to build a simple PHP app to control an LED.
-
DIY body cam with a Raspberry Pi

Make your own body cam with a Raspberry Pi, a cannibalized webcam, a WiFi module, and some Python.
-
Android Pi

Your Android device can be a versatile companion for Raspberry Pi. We describe some useful apps to help you make this happen.
-
Roasting beans in a repurposed air popper

Transform an old air popcorn popper into a coffee bean roaster controlled by a Raspberry Pi and a slick user interface.
