Stormy Weather
After losing one weather station to tropical winds, the author reboots and designs a PCB that connects to an Arduino and monitors weather instruments.
Lead Image © vectorshots, 123RF.com
After losing one weather station to tropical winds, the author reboots and designs a PCB that connects to an Arduino and monitors weather instruments.
As usual with SwitchDoc Labs projects, the tale grew with the telling. I started out building a simple interface from the SparkFun Weather Station Meters [1] to interface to Project Curaçao.
The project then morphed into a substantial upgrade. Project Curaçao is a wind- and solar-powered Raspberry Pi and Arduino project located in the Caribbean on the island of Curaçao. (For more information about Project Curaçao, check out the wind power article in a previous issue of Raspberry Pi Geek magazine [2].)
Why am I using an Arduino and not a Raspberry Pi? Three reasons: In Project Curaçao, the Arduino is on 100 percent of the time, whereas the Raspberry Pi is off about eight hours a day (for power considerations). I need a computer available to measure the wind 24 hours a day. Second, the Arduino has several available hardware interrupts, 10-bit analog to digital converters (ADCs), and lots of spare GPIO pins (by the way, the Raspberry Pi B+ adds a number of new GPIO pins). Third, I wanted to run these sensors at 5V for noise and distance considerations, rather than at 3.3V on the Pi.
My problem with Project Curaçao (aside from the destruction of the wind turbine one week after it was put up the tower; Figure 1) was that I had a wind turbine, but I couldn't tell how fast the wind was blowing. I could measure the voltage from the wind turbine, but the voltage depended on how much current the charging system was taking instantaneously. That meant the voltage would vary all over the place as the battery charged and discharged.
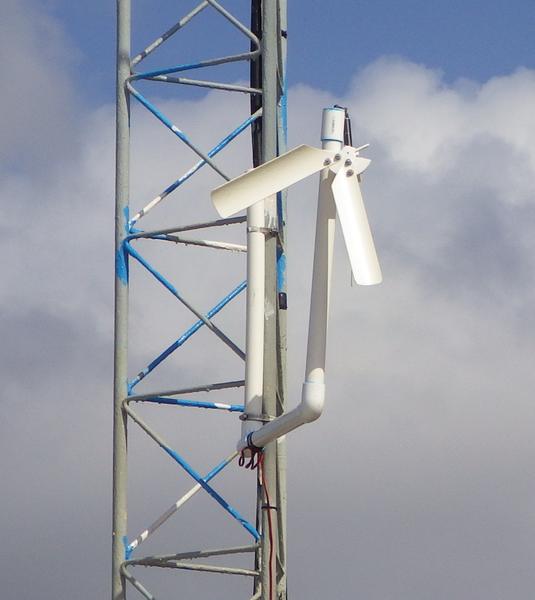 Figure 1: Destroyed wind turbine.
However, I knew the current into the battery and the voltage of the wind turbine, so I had the possibility of curve fitting some kind of solution to estimate the wind speed. I didn't think it would be too accurate unless I did a lot of characterization and data gathering. Of course, the voltage was zero after the turbine destroyed itself. I could measure that.
With all of this in mind, WeatherArduino was born: a printed circuit board (PCB) that is an interface between the SparkFun weather station meters and the Arduino. It is designed as a general interface for the weather instruments to the Arduino (and with a little work, the Raspberry Pi). Of course, I added some I2C bus components to address some other system issues.
The SparkFun unit consists of a wind anemometer, a rain bucket, and a wind direction gauge all connected to RJ11 connectors along with brackets, a mounting pipe, and screws (Figure 2). The anemometer measures wind speed by closing a contact as a magnet moves past a reed switch. A wind speed of 1.492mph (2.4km/h) causes the contact to close once per second. Counting the closings of the switch over a known time gives a measure of the average wind speed. Counting the shortest time between closings gives the highest wind gust in a given time. To count the number of clicks in a given sample time, I use a rising edge interrupt for the Arduino.
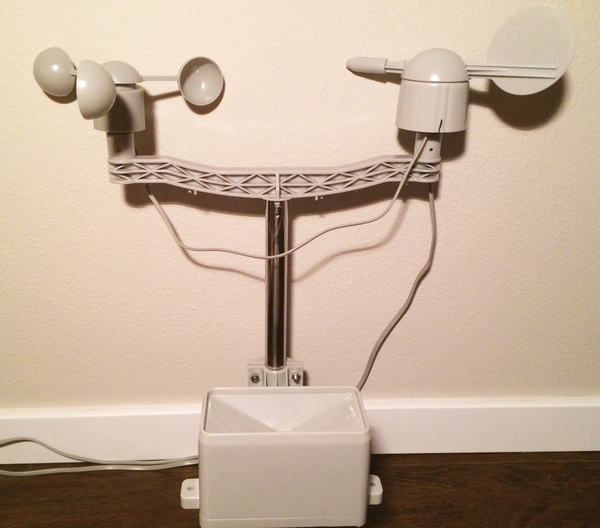 Figure 2: The SparkFun weather meter sensors.
The rain gauge measures the amount of rain via a self-emptying bucket. Each 0.011 inches (0.2794mm) of rain causes one momentary contact closure that is also connected to an additional rising edge interrupt on the Arduino.
The wind direction gauge is the most complex of the sensors. It has eight reed switches, each connected to a different resistor. The wind vane's magnet may close two switches at once, allowing the measurement of 16 different wind directions. However, in testing the unit, I never could make the device close two switches at once, so although it might be possible theoretically to measure 16 directions, I only get eight. The software takes 16 directions into account, just in case.
To measure resistance, I use a 10kohm resistor divider with one end tied to 5V (Figure 3). Then, I connect the middle of the divider to one of the pins of the Arduino ADC (I used A0), measure the voltage, and by referring to Table 1, convert to wind direction. All of this is done in the WeatherArduino library.
Table 1
Wind Direction Conversion Table
| Direction (deg) | Resistance (ohms x 103) | Voltage (VCC=5V, R=10kohms) |
|---|---|---|
| 0 |
33.0 |
3.84 |
| 22.5 |
6.57 |
1.98 |
| 45 |
8.2 |
2.25 |
| 67.5 |
0.891 |
0.41 |
| 90 |
1.0 |
0.45 |
| 112.5 |
0.688 |
0.32 |
| 135 |
2.2 |
0.90 |
| 157.5 |
1.41 |
0.62 |
| 180 |
3.9 |
1.40 |
| 202.5 |
3.14 |
1.19 |
| 225 |
16.0 |
3.08 |
| 247.5 |
14.12 |
2.93 |
| 270 |
120 |
4.62 |
| 292.5 |
42.12 |
4.04 |
| 315 |
64.9 |
4.34* |
| 337.5 |
21.88 |
3.43 |
| *The value for 315 degrees in the manufacturer's datasheet is wrong; 4.34V is correct. |
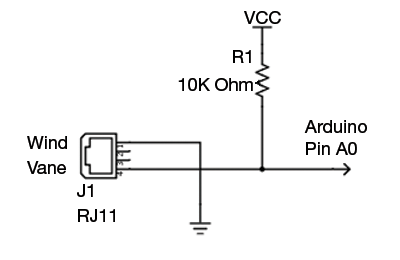 Figure 3: Resistor divider for measuring wind direction.
I use the 10-bit ADC included with the Arduino. Ten bits of resolution gives 5V/1024 bits = 0.005V/bit, which is enough to measure everything except the transition between 67.5 and 90 degrees. However, I never see 67.5 degrees (because only eight wind directions are recorded), so I just use a fuzzy search to pick out 90 degrees. The WeatherArduino PCB has provisions to hook up a 16-bit ADC to the I2C bus, but 10 bits works for this application; 16 bits gives 5V/65,536 bits = 0.00008V/bit, which can easily resolve all of the ambiguity in the wind conversion table. Every time I want a wind speed measurement, I call for a analog to digital measurement on Arduino port A0.
The WeatherArduino PCB has three additional spaces for devices, including:
US / Canada
UK / Australia

We describe the further saga of Project Curaçao, a Raspberry Pi-based weather station powered by wind and sun.
Issue: Raspberry Pi Geek 07
Article: WeatherArduino
Page: 62

Build a low-powered wireless system for your outdoor weather station using inexpensive hardware.

Add a lightning detector to your vulnerable projects via the I2C bus to protect them from electrical storms.

Got a special project for your Raspberry Pi that requires it to operate off the electrical grid? If solar power doesn't provide enough juice, add some wind to the mix with an inexpensive wind turbine.

Price $15.99
(incl. VAT)