At Your Fingertips
Typically, the Rasp Pi transfers video data via HDMI to a TV or screen. For mobile access, you can connect the tiny computer to a similarly small touchscreen instead.

Lead Image © realmccoy, 123RF.com
Typically, the Rasp Pi transfers video data via HDMI to a TV or screen. For mobile access, you can connect the tiny computer to a similarly small touchscreen instead.
One of the best features of the Rasp Pi is its graphics performance. Because of hardware acceleration, the Rasp Pi has gained areas of application that even much higher performance systems do not usually have. Not only is the graphical output good, but the small computer can silently work on its own as a headless server or control system.
Headless servers and control systems do not actually need a display screen. Sometimes, however, you might want to take a quick look at the current status or do a clean shutdown. These tasks can be performed remotely via SSH or a smartphone app, but they are easier to accomplish when a touchscreen has been connected. Likewise, other operations can benefit from real-life controls and the direct reporting of activities to the user.
A broad offering of touchscreens has become available for the Rasp Pi even for users who know nothing about soldering. For those who prefer a larger screen for something like a small jukebox, there is a 7-inch screen or larger. However, these screens usually need an additional board and their own power supply. Therefore, in this article, I focus on two smaller thin-film transistor (TFT) screens with a 2.8-inch format.
The Munich startup Pi3g [1] made just such a display screen available to us for testing. (See also the interview with Pi3g founder Maximilian Batz accompanying this article.) Pi3g offers the screen for US$ 70.68 (EUR 52) on its website. The second display screen comes from Watterott [2] and costs EUR 30.
Both screens have resistive displays that react to pressure instead of touch. This means that neither offers the comfort of modern smartphones, nor does either support multitouch. The resolution for each amounts to 320x240 pixels. When observed closely, the screen looks somewhat pixelated.
Together with the screen, Pi3g ships a small input stylus similar to the one that came with the first Palm models. The stylus makes using the screen much easier. An SD card that has been adapted to Raspbian is also included, because nothing runs without the driver (Figure 1). See the "Hunting for a Driver" box.
Hunting for a Driver
Both the Pi3g display and the Watterott display use a special framebuffer driver. The images provided include the applicable configuration together with the driver. The framebuffer of the display screen corresponds to the /dev/fb1 device. The first display device, /dev/fb0, operates the HDMI output that profits from the hardware acceleration of the GPU.
The mapping for fb1 to the first console (tty1) and from fb0 to the second (tty2) is achieved using the command-line parameters fbcon:map=10 from the cmdline.txt file. All consoles use the small display screen with fbcon:map=1. Only the first console displays boot messages.
The fbcp tool copies the content of /dev/fb0 every 25ms to /dev/fb1. This makes a fluid replay of video possible on the TFT screen using the standard Raspbian video player:
$ fbcp &
$ omxplayer video.mp4
$ killall fbcp
You will find additional fine points of the setup in the GitHub account of Watterott [4]. Their page also contains a number of links to technical information that may be of interest and is also applicable in a general sense to the screen from PiG3.
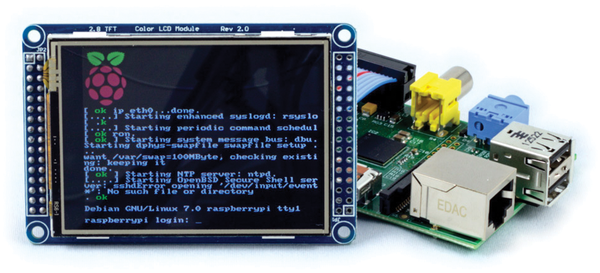 Figure 1: Pi3g delivers an input stylus and an SD card with an custom Raspbian image along with the display screen.
It is not possible to measure any additional power consumed by the display screen using simple measuring devices from a DIY store. However, usage can exceed the supply offered by a wobbly connection. A live view from something like a connected camera does not work because the rendering is transmitted via a CPU. At 10 percent, the amount of CPU used for driving the display screen is reasonable, and this also applies to the Watterott screen.
The Pi3g display appears a bit faster than the competition; however, this may result from serial scatter or perhaps a less than optimal configuration. This difference was only noticeable when playing videos in the absence of hardware acceleration. Note that the main task of the CPU is to reduce the video to a smaller format rather than display the results.
The TFT display screen can be connected via a short flat ribbon cable, which allows the hobbyist to mount the screen perpendicular to the computer. The cable is not a problem unless the user is seeking to achieve an especially compact setup. You can also swap out the cable without much problem.
Naturally, there are disadvantages to using your own Raspbian distribution for a piece of special hardware. Pi3g works hard to maintain its image, but it is more difficult to get their distribution updates than when working with the plain vanilla version. Once the kernel is updated, the display remains blank. To fix this, you need to enter the old kernel kernel_lcd.img again in the config.txt on the first partition of the SD card. You also will have to supplement the cmdline.txt file with the fbcon=map:1 entry. The source of the Pi3g kernel is available on GitHub for download [3].
The Watterott online shop primarily targets electronics hobbyists. Along with the Raspberry Pi and peripheral equipment, the shop offers single-drive computers. Surprisingly, a display screen that preceded the current 2.8-inch model is still available for purchase, and the shop offers larger screens as well.
Delivery from the shop was prompt (Figure 2). Unlike the Pi3G model, the Watterott screen does not need a cable. You simply plug it directly into the pin strip of the Raspberry Pi. The advantage here is that the Rasp Pi and the screen form a single unit that can be fitted with a housing – also available for purchase. The disadvantage is that you have less leeway in the assembly. First you will need to mount a Pi cam and then bend the cable with a sharp crease because the display screen covers up the camera connection.
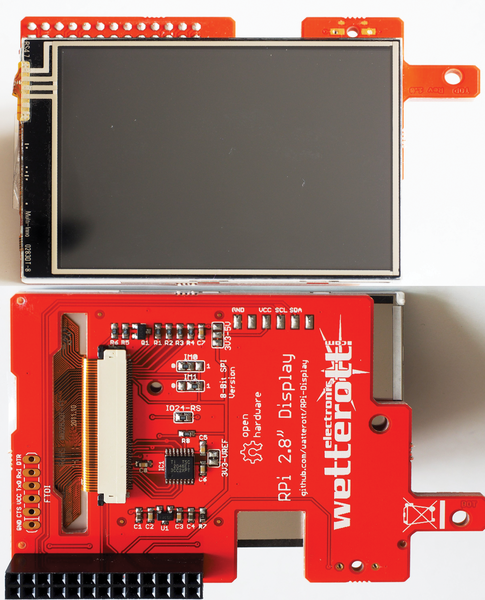 Figure 2: The LCD display screen from Watterott offers a connection strip on the reverse side that you can plug directly into the Rasp Pi.
Watterott adopts a more spartan approach than does Pi3g to including items with delivery of the screen. It has no preinstalled SD card, nor is the very useful input stylus included. On the other hand, you will pay significantly less. You can find the adapted Raspbian system and detailed documentation on GitHub [4]. The Watterott system has the same problems with updates that you will experience with Pi3g, and the solution is analog. See the "Hunting for a Driver" box.
The two displays differ in only very small ways in terms of technology. The Pi3g model uses a ILI9325 chipset with an ADS7843 touch controller. The Watterott model uses a ILI9341 chipset with an identical controller; however, the company could change feature details in the next round of production.
Pages: 6
US / Canada
UK / Australia

Display T. Box is a Raspberry Pi with a touch display in a compact case. The newest version of the Box comes with revisions that include a better touch screen and more speed.
The new Rasp Pi display provides a compact option for viewing screen output – and it comes at a Pi-like low price of only $60.

Use PiMenu to build a menu-based graphical interface optimized for small LCD touchscreens.

A digital information screen provides constantly updated information to viewers. All you will need to create one is a Raspberry Pi, the appropriate software, and a monitor.
Display T. Box combines a Raspberry Pi 2 with an integrated touchscreen. The result is a complete mini-PC that can be used as soon as you supply power.

Price $15.99
(incl. VAT)