The Switch Doc rebuilds his cat toy launcher with 3D printing
Introduction to OpenSCAD
OpenSCAD tutorials abound on the web. The key thing to understand about OpenSCAD is that you are writing code to build things based on primitive objects, such as:
- cubes
- spheres
- cylinders
- polyhedra
You can have modules and parameters, do math, size things exactly the way you want them, and position them exactly where you want them. For a programmer, it makes perfect sense.
Although the OpenSCAD script has many aspects, the most important operators I use in this example are:
difference()– takes the difference of one object from anotherunion()– combines objects into one objecttranslate()– moves an object (positions it)rotate()– rotates an object
A couple of comments about OpenSCAD code: You only use a semicolon to close the modifications to a shape. In other words, in the lines
translate([10,20,30])
rotate(90,[0,0,1])
cube([10,10,40.3]);
translate and rotate apply to the cube in the order they are listed. The semicolon at the end of the cube statement closes the statement. The hash mark (#) placed at the beginning of a number of statements tells OpenSCAD to show this block in the quick render mode that is used to see whether things are looking kind of right. The full render mode can take a long time to compute and does not show the blocks that are "differenced" out, as in the quick render mode.
Time to build the MouseAir V2 box.
MouseAir V2 Introduction
Raspberry Pi Geek Magazine published the definitive article on my MouseAir cat toy launcher in Raspberry Pi Geek Issue 5. I had so much response (including the response from the cat) to that article and project from a variety of sources, that I decided to do a redesign of MouseAir, incorporating what I had learned from the project. I aggressively redesigned to eliminate unneeded hardware and drive down the cost and size.
Figure 6 shows the differences in the designs of MouseAir V1 and MouseAir V2. The block diagram in Figure 7 shows the design for the new MouseAir V2.
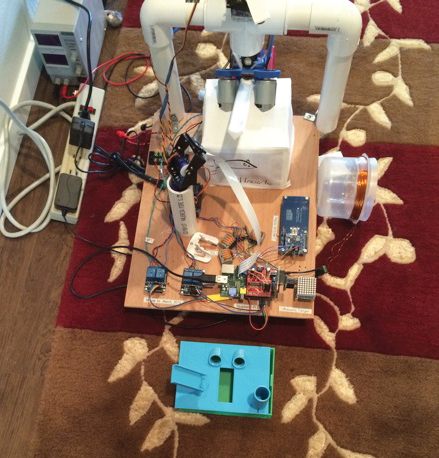 Figure 6: MouseAir V1 versus MouseAir V2.
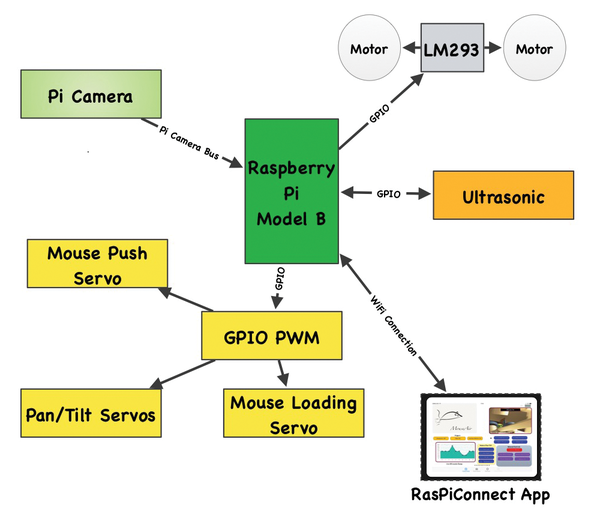 Figure 7: MouseAir V2 block diagram.
I cut the number of servos down from four to two (plus the optional pan and tilt servos for the camera), redesigned the motor control to eliminate the 12V power supply (cutting the range of the mouse throw from 10 to 2 meters in the process, but my cat is old anyway), removed the RFID hardware (which didn't work with the implanted chip in the cat), added software support for iBeacons (hang an iBeacon on the cat collar), and moved to a much less expensive ultrasonic detector. I also added support for the new Raspberry Pi B+ and built a MouseAir PCB board with lots of LEDs to show what is happening. Figure 8 peeks under the hood at the MouseAir V2 box.
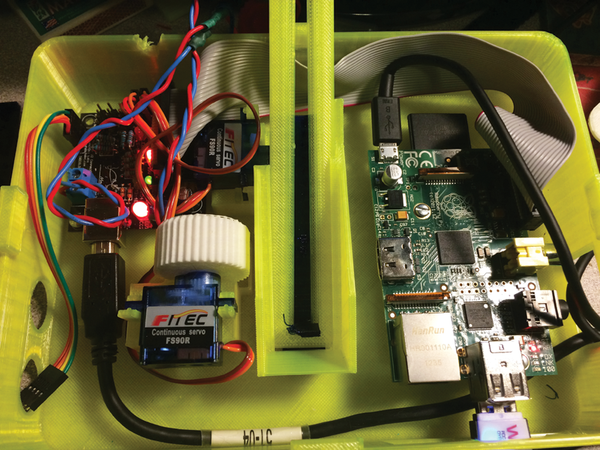 Figure 8: Inside the MouseAir V2 box.
Buy this article as PDF
(incl. VAT)
Buy Raspberry Pi Geek
US / Canada
UK / Australia
Related content
-
Managing solar power systems with SunAir boards

A successful solar power project requires data analysis and the ability to modify the system to take advantage of prevailing weather conditions.
-
Protect your electronics from lightning strikes

Add a lightning detector to your vulnerable projects via the I2C bus to protect them from electrical storms.
-
SunRover Part 4 – Adding a Pi Camera and Diagnostics System

A Raspberry Pi Camera module and a diagnostics system allows SunRover to see and check that all systems are go.
-
MouseAir launches toy mice for the amusement of cats

In a valiant effort to entertain a certain black cat, the author creates a weapon of mass distraction. In the process, you learn how to use servomotors, solenoids, RFID readers, and more with the Raspberry Pi.
-
3D Slash CAD software works on a Raspberry Pi

Historically, Linux has not had many CAD offerings. Now 3D Slash has stepped in to fill the void, and it even works well on a Raspberry Pi.
