The Switch Doc rebuilds his cat toy launcher with 3D printing
An OpenSCAD Module Example
Rather than go through the entire MouseAir design in detail, I will go through one of the modules: MouseLoadingBox (Listing 2). This module originally contained the box where the two racks from the rack and pinion were housed. In the Mouse conveyor belt system, it now just contains the stand and clips for the servomotor for the conveyor belt (Figure 13).
Listing 2
MouseLoadingBox
01 // mouse loading box
02 // jcs 6/23/2014
03 // SwitchDocLabs
04 //
05 include <write.scad>
06 Offset = 10;
07
08 module MouseLoadingBox()
09 {
10
11
12
13         translate([28,19,0])
14         rotate(180,[0,0,1])
15         union()
16         {
17
18
19                 // Servo stand
20
21                 translate([98,-2.5,0])
22                 rotate(90,[0,0,1])
23                 union()
24                 {
25                         // side block for servo
26                         #translate([-17,74, 0])
27                         cube([20,34.5,13.38+Offset]);
28
29                         // now the mounting tabs
30
31                         // left tabs
32                         translate([-10, 74.2+23+5, 13.38+Offset])
33                         cube([2,5,14.5]);
34
35
36                         translate([-5.6, 74.2+23+5, 13.38+Offset])
37                         cube([2,4,10]);
38
39                         // hook on top
40                         #translate([-5.6-2-0.5,74.2+23+5+3-1,25.38+0.5+Offset])
41                         cube([1.25,1,1]);
42
43
44                         // right tabs
45
46                         translate([-10, 74.2, 13.38+Offset])
47
48                         cube([2,4,14.5]);
49
50                         #translate([-5.6, 74.2, 13.38+Offset])
51                         cube([2,4,10]);
52
53                         // hook on top
54                         #translate([-5.6-2-0.5, 74.2+1+0.5,25.38+0.5+Offset])
55                         cube([1.25,1,1]);
56
57                 }
58                 // Version text
59
60                 #translate([10,-19,10])
61                 rotate(90,[1,0,0])
62                 write("LB-004",h=2,t=2,center=true);
63
64         } // main module union
65
66 }
67
68
69 // remove when adding to main box
70  MouseLoadingBox();
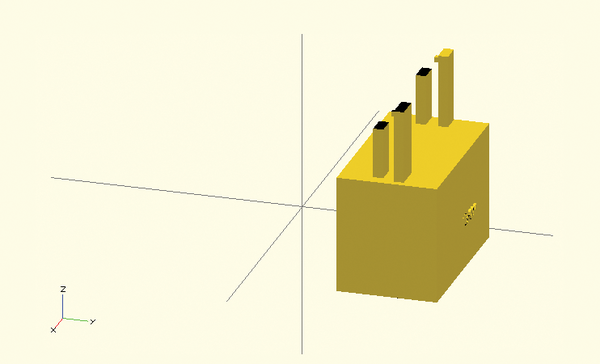 Figure 13: MouseAir loading servo stand.
The first section of Listing 2 contains an include and defines constants (lines 5-8). The library write.scad contains code to write text in an extruded format. Offset defines how far up to place the servo-holding tabs. It also contains the module definition. Note that I don't pass in any parameters, but I could if I wanted to customize the function.
Next, I translate and rotate the entire design so that it makes sense to me when I place it (lines 13 and 14). I make it apply to the entire design by putting it inside a union() (line 15), which combines all the shapes within the union block (lines 16-64).
Now I apply an additional translate/rotate (lines 21 and 22) and union() block (lines 24-57) to the design. Note that the parameters of this second translation and rotation could have been combined into the first, but there used to be more shapes between the two in the previous design, so this part of the code is really an artifact.
Next, I build the stand itself (lines 26 and 27); then, I build the left and right mounting tabs using cube and translate (lines 32-41; 46-55). Finally, I put the version information on the side of stand itself (lines 60-62). When your design includes a number of stands and blocks, it is really important to mark the design so you can trace it back to the right version of code.
Lastly, I put the call to the MouseLoadingBox in the code so the rendering engine has something to render (line 70). This call is commented out until you are ready to include the module in the larger design.
The MouseAir V2 3D Printer Design
The design comprises two major parts:
- The MouseAir bottom, which holds the PCB, the Raspberry Pi, the firing mechanism, and the loading/firing servomotors
- The MouseAir Top (Figure 14), which has the mounting holes for the motors and the top part of the conveyor belt and ramp that loads the mice into the firing mechanism.
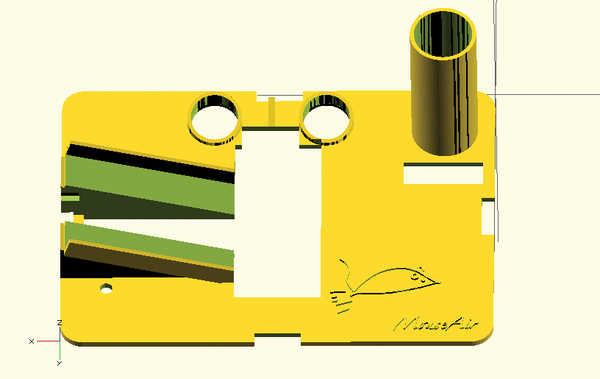 Figure 14: MouseAir V2 top design.
The OpenSCAD code for this design is less than 1,000 lines. Compare that to the controlling and display software, which has about 3,000 lines of Python.
Buy this article as PDF
(incl. VAT)
Buy Raspberry Pi Geek
US / Canada
UK / Australia
Related content
-
Managing solar power systems with SunAir boards

A successful solar power project requires data analysis and the ability to modify the system to take advantage of prevailing weather conditions.
-
Protect your electronics from lightning strikes

Add a lightning detector to your vulnerable projects via the I2C bus to protect them from electrical storms.
-
SunRover Part 4 – Adding a Pi Camera and Diagnostics System

A Raspberry Pi Camera module and a diagnostics system allows SunRover to see and check that all systems are go.
-
MouseAir launches toy mice for the amusement of cats

In a valiant effort to entertain a certain black cat, the author creates a weapon of mass distraction. In the process, you learn how to use servomotors, solenoids, RFID readers, and more with the Raspberry Pi.
-
3D Slash CAD software works on a Raspberry Pi

Historically, Linux has not had many CAD offerings. Now 3D Slash has stepped in to fill the void, and it even works well on a Raspberry Pi.
