Evolution of TV
The free and open source OSMC media center gives the Kodi home theater software an updated look and some slick features.

Lead Image © articular, 123RF.com
The free and open source OSMC media center gives the Kodi home theater software an updated look and some slick features.
Kodi, previously XBMC, has been experiencing a real boom since the appearance of single-board computers like the Raspberry Pi. Many users wouldn't want to do without their Kodi/Rasp Pi combination, a free alternative to Chromecast, Apple TV, and Amazon Fire TV. Lately, the Open Source Media Center (OSMC) distribution [1] brought Kodi to the Rasp Pi. It has a PC installation assistant, a Debian base, and numerous unique features, and it never forgets that a media center should focus on the TV.
The OpenELEC [2] Kodi distribution enjoys an excellent reputation among Rasp Pi users for speed, reliability, and high performance. However, the foundation has been optimized for multimedia tasks, so it can only function as a media center. As a result, the user running OpenELEC would need to get an additional Rasp Pi for other uses.
Other media center distributions that sat on traditional distributions lent themselves to multiple uses. The forerunners in this category include Raspbmc [3] and Xbian [4], which have been discontinued. As was the case with Xbian, the OSMC developers also rely on Debian for a foundation. Specifically, they use the current Debian 8.1 Jessie. This means that OSMC is suitable for use as a media center, a small file or print server, and, in fact, almost any project you might try with the Raspberry Pi. However, this does not make OSMC more complicated than other media centers; in fact, OSMC does a better job of handling many details.
As is customary with Raspberry Pi projects, OSMC offers image files for copying to an SD memory card on Rasp Pi models 1 and 2 (RPi1/RPi2) [5]. An installation assistant [6] helps users who may feel unsure of themselves when writing images with tools like Win32 Disk Imager or using dd at the command line. This assistant, which runs on Linux, Mac OS X, and Windows, downloads OSMC from the Internet and writes the image to USB sticks or memory cards in a card reader (Figure 1).
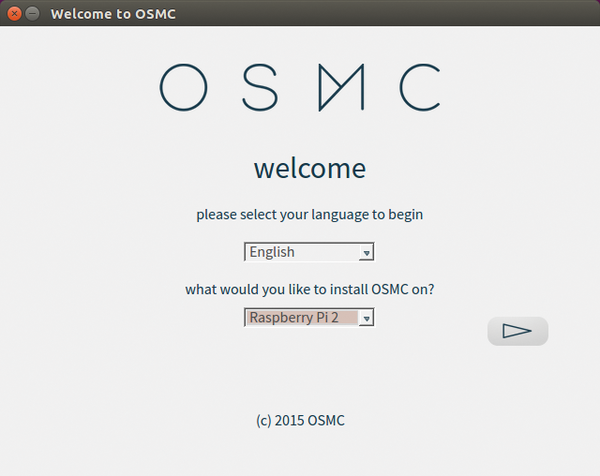 Figure 1: The OSMC installer prepares the installation medium for the Raspberry Pi and other devices.
On initial bootup of the memory card that has been prepared by the assistant, OSMC automatically optimizes itself. For instance, it allocates the remaining memory on the SD card and asks for the desired localization via a small setup routine. Additionally, you will need to consent to the end user licensing agreement and indicate whether you want to subscribe to the OSMC newsletter.
Finally, you land directly in the Kodi media center. The independent theme designed by OSMC (Figure 2) has been cleaned up of any visual frills. However, you might encounter difficulties operating the program because the contrast between colors used to distinguish among menu selections is weak. Moreover, the dialogs have an unorthodox arrangement. (See also the "Navigation" box.)
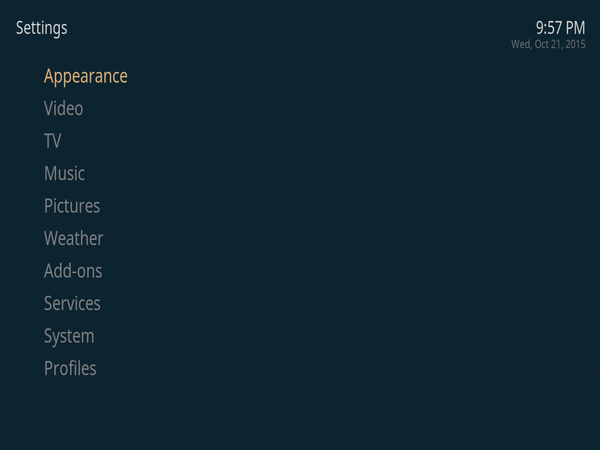 Figure 2: OSMC has an independent theme not found in other Kodi distributions.
Unlike Kodi, OSMC does not organize the main menu horizontally in the middle of the screen. Instead, OSMC puts the menu in a sidebar on the left edge of the display screen. This is where you find the customary media center entries such as Movies, Videos, and Music as well as Settings. The entry My OSMC is new (Figure 3) and includes things like Pi Config, for working on Raspberry Pi-specific configuration [7], and an App Store for installing useful developer extensions and programs such as the Tvheadend server, a BitTorrent client, and an integrated update routine.
 Figure 3: OSMC collects a number of functions and tools under the My OSMC menu option.
The options Enter MPG2 License and Enter WVC1 License are especially important and appear under the My OSMC | Pi Config | GPU Mem & Codec menu. These options are used to enter any license keys you obtain for the MPEG-2 and VC-1 codecs [8] needed to play some videos [9]. Equally useful is the max_usb_current item for increasing the strength of the electrical power that goes to the USB ports so that it is possible to run a 2.5-inch external hard disk without the need for an additional power supply (Figure 4). These options in other distros might require working in a text editor and frequent consultations with documentation.
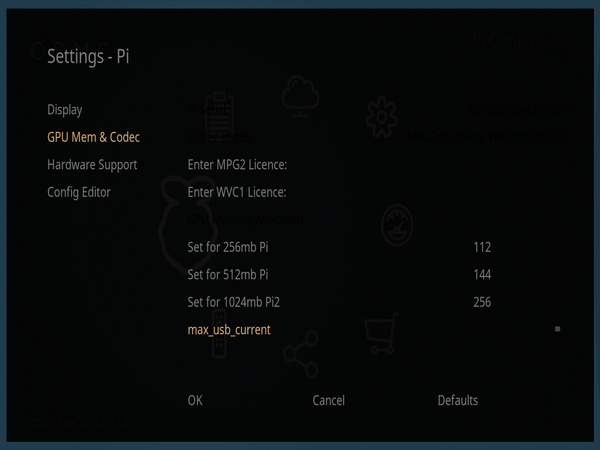 Figure 4: With so many possible ways to configure OSMC, you will be glad it comes with a graphical interface for customizing the Rasp Pi configuration.
OSMC also makes it easier to overclock the Rasp Pi, unlike other Kodi distros. All you need to do in OSMC to speed up the Pi is open My OSMC | Overclock and click on Turbo. An alternative approach is to enter your own clock rate values and voltage levels under Custom (Figure 5). You can find further details for each of these settings on the raspi-config web page [10].
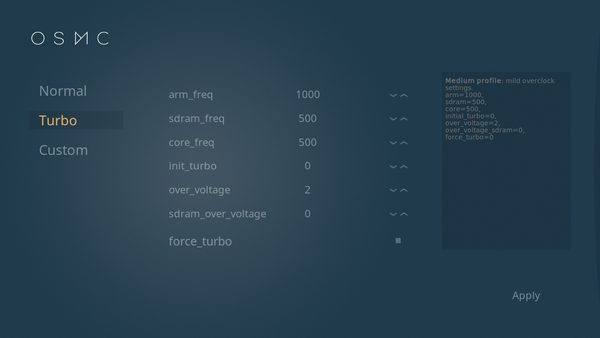 Figure 5: Even beginners can tease maximum performance out of their Rasp Pi.
If you want to use OSMC on a Raspberry Pi with a wireless connection to the Internet, you will find settings under Network | Wireless. If there is a compatible WiFi stick already inserted into the Rasp Pi, you can activate it via Enable Adapter. Then on the right, you can select from the list of wireless networks that have been located in the area (Figure 6). After the access data has been entered, OSMC automatically creates an Internet connection. If you are on the road traveling, a Tethering function lets you turn OSMC into a hotspot.
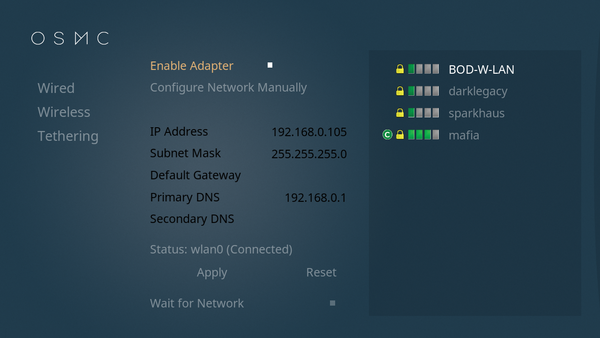 Figure 6: If you have a WiFi stick, you can create a WiFi connection from the interface or even activate tethering.
Pages: 6
US / Canada
UK / Australia
NOOBS 1.9.0
NOOBS 1.5.0 (New Out Of the Box Software) provides an easy way to install operating systems on your Rasp Pi.

NOOBS (New Out Of the Box Software) provides an easy way to install operating systems on your Rasp Pi.
NOOBS 1.4.1 and COZY
NOOBS 1.4.1

Price $15.99
(incl. VAT)