3D Slash CAD software works on a Raspberry Pi
Into the Cloud
Once started, the program has to be activated (Figure 2) and connected to the user's web account. The activation code is found on the 3D Slash home page, and it is entered into the appropriate program dialog.
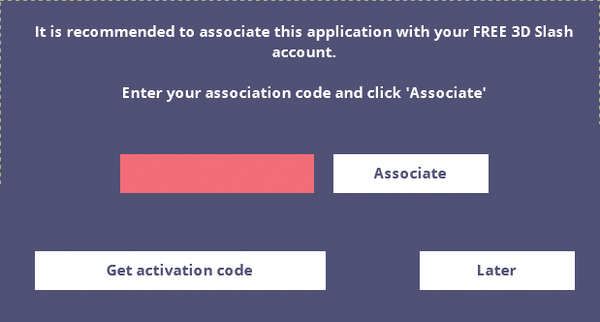 Figure 2: The user needs to activate 3D Slash with a code found on the project page. Activation connects the program to the user's online account. Once this is accomplished, the program is ready to use.
Connecting the program to the user account makes it possible for the user to synchronize models with the cloud via the settings dialog (Figure 3). This does not happen automatically, so the program will also work offline.
 Figure 3: The user specifies where and how the 3D model should be saved.
For users with a free account, models saved by a user who has a free account are automatically saved under the Creative Commons License BY-NC-SA. This means that anyone has the right to use the model as long as three conditions are met: Credit must be given to the original creator (BY), the work will not be used commercially (NC, non-commercial), and derivative works are placed under the same license (SA, share alike).
First Steps
Once 3D Slash boots, the user sees a clean interface (Figure 4) with several buttons to the top left and right. The somewhat unfortunate plus symbol to the far right leads to a settings dialog. The floppy disk and New buttons are self-explanatory.
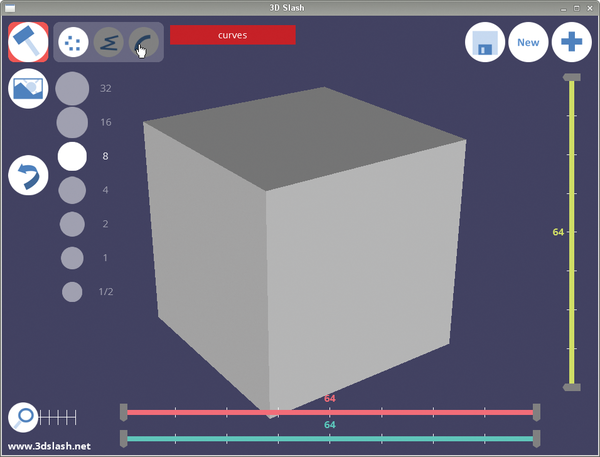 Figure 4: The 3D Slash interface is tidy with a simple layout.
The application displays a selection of tools at the upper left. Figure 4 shows the hammer. The mode currently used is found to the right of the tool display. A small info box pops up when the mouse cursor touches the field of a tool. The hammer chips away effectively at the cuboid, hacking off cubes according to the size selected. The lines and curves icons shorten this process. Instead of individual cubes, the user can highlight cubes along a line or curve with the mouse and then remove all affected cubes with a single click.
Switching tools is somewhat awkward and requires at least three mouse clicks. First the user has to click on the currently active tool at the upper left, which opens the tool selection (Figure 5). Next, the user clicks the desired tool. Then the user clicks ok to accept and return to the main window. Repeating the procedure quickly becomes tiresome, especially if the user switches between the tools frequently.
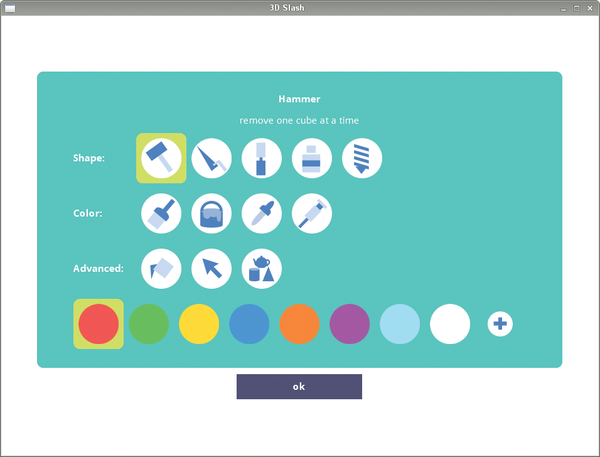 Figure 5: The 3D Slash toolbox offers all of the important functions, but switching from tool to tool requires three mouse clicks each time.
A missing toolbar familiar to other programs is a surprising omission. Also selecting cuboid size with a slider would be simple and save space. Restricting the cuboid size to powers of two makes representation easy, but creating objects in powers of 10, the basis of the metric system, becomes more difficult.
« Previous 1 2 3 Next »
Buy this article as PDF
Pages: 4
(incl. VAT)
Buy Raspberry Pi Geek
US / Canada
UK / Australia
Related content
-
Welcome
Just more than four years ago the first Raspberry Pi was released to overwhelming response. Many people had to wait for their first-generation Pi while production was ramped up to meet the demand. Now you have an entire array of Pis from which to choose, and demand is still so high that you might have to wait for your computer on backorder immediately after a new model is released. Moreover, the quad-core Raspberry Pi 3 has broadened the possibilities of what you can accomplish with the little nanocomputer.
-
Exploring RISC OS on the Raspberry Pi

Linux is great, but if you didn't want to experiment with new things, you wouldn't be hacking on a Raspberry Pi. Sometimes new things are old things: The venerable and much-loved RISC OS, which is older than Linux and was specifically designed to run on the ARM chipset, is finding a new audience with the rise of the Pi.
-
Create a customized, 3D-printed case for the Raspberry Pi

The standard Raspberry Pi cases sold in the marketplace do not include space for accessories and add-ons. A DIY case built using a 3D printing service offers a good solution, but some planning is in order.
-
First steps with Python programming

Take your first steps with Python programming and discover the turtle module for creating graphics.
-
Using a Raspberry Pi to synchronize data

The Raspberry Pi is not powerful enough to support fully mature network storage. In situations involving smaller amounts of data, however, the little computer shines as a flexible data hub.
