The Display-O-Tron three-line display screen
Basic Functions
The program in Listing 3 shows some of the basic display functions. Lines 28 to 31 write a message on the display. The addressing is accomplished with columns and lines. The display automatically wraps the long message from Line 29 to the next line.
Listing 3
Display Functions
001 #!/usr/bin/python
002
003 # Required libs ---------------------------
004 import time
005 import dothat.lcd as lcd
006 import dothat.backlight as backlight
007 import dothat.touch as touch
008
009 # Callback Buttons -------------------------
010 @touch.on(touch.LEFT)
011 def dialog_ja(channel, event):
012   lcd.clear()
013   lcd.set_cursor_position(0,0)  # 1.Line
014   backlight.rgb(0,255,0)
015   lcd.write("Start Reboot")
016
017 @touch.on(touch.RIGHT)
018 def dialog_nein(channel, event):
019   lcd.clear()
020   lcd.set_cursor_position(0,0)  # 1.Line
021   backlight.rgb(0,255,0)
022   lcd.write("No Reboot")
023
024 # LCD delete and write ----------------
025 def lcdwrite():
026   lcd.clear()
027   backlight.rgb(0,255,0)        # RGB, therefore green
028   lcd.set_cursor_position(0,0)  # Column,Line starting with 0
029   lcd.write("A message is too long - much too long")
030   lcd.set_cursor_position(0,2)  # Column,Line starting with 0
031   lcd.write("The Third Line")
032
033 # LED Bar Graph ---------------------------------
034 def graph():
035   lcd.clear()
036   lcd.set_cursor_position(0,0)  # 1.Line
037   lcd.write("LED Bar Graph ...")
038
039   lcd.set_cursor_position(0,1)  # 2.Line
040   lcd.write("1. and 6. LED")
041   backlight.graph_off()
042   backlight.graph_set_led_duty(0,1)
043   backlight.graph_set_led_state(0,1)  # 1. LED
044   backlight.graph_set_led_state(5,1)  # 6. LED
045   time.sleep(3)
046
047   lcd.set_cursor_position(0,1)  # 2.Line
048   lcd.write("Show 50% LCDs")
049   backlight.graph_off()
050   backlight.set_graph(0.5)
051
052 # Background --------------------------------
053 def messages():
054   lcd.clear()
055   lcd.set_cursor_position(0,0)  # 1.Line
056   backlight.rgb(0,255,0)
057   lcd.set_contrast(50)
058   lcd.write("Info message")
059   time.sleep(3)
060
061   lcd.set_cursor_position(0,0)  # 1.Line
062   backlight.rgb(255,180,0)
063   lcd.write("Warning")
064   time.sleep(3)
065   lcd.set_cursor_position(0,0)  # 1.Line
066   backlight.rgb(255,0,0)
067   lcd.write("error message")
068   time.sleep(3)
069
070 # Dialog -------------------------------------
071 def dialog():
072   # callbacks
073
074   lcd.clear()
075   lcd.set_cursor_position(0,0)  # 1.Line
076   backlight.rgb(255,0,0)
077   lcd.set_contrast(50)
078   lcd.write("Reboot?")
079   lcd.set_cursor_position(0,2)  # 3.Line
080   lcd.write("  Yes       No")
081   time.sleep(5)    # actual endless loop
082
083 # switch off ---------------------------------
084 def off():
085   backlight.off()
086   backlight.graph_off()
087   lcd.set_display_mode(False)
088
089 # Main program ------------------------------
090
091 lcdwrite()
092 time.sleep(3)
093
094 graph()
095 time.sleep(3)
096
097 messages()
098 time.sleep(3)
099
100 dialog()
101 off()
The Display-O-Tron includes an LED bar graph. The bar graph is ideally suited for indicating the CPU load, filesystem usage, and things like the number of connected devices. The back light also consists of six LEDs. You can use these LEDs to construct all of the colors in the 8-bit RGB color system. Lines 53 to 67 in Listing 3 show some of the possible applications. The samples for the library also contain a program that turns the display into a lighting console that alternates through all of the colors of the rainbow.
To use the buttons, you'll need to register a so-called callback function for each button (Listing 3 starting with Line 10 or Line 17). The Dot3K library automatically calls the designated functions as soon as the user touches the button. The example simulates a restart with a pre-switched yes/no dialog (Figure 2; Listing 3 starting with Line 71). An important feature of dialog-based applications is that the program has to run in a quasi-endless loop, since the library calls the button functions asynchronously.
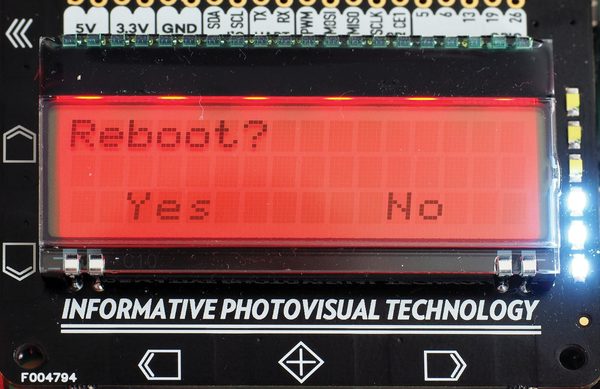 Figure 2: The user confirms the entry using the sensor fields underneath the display.
The Menu System
The Dot3K library includes an entire menu system. The user will find a detailed example of the menu system in the python/examples/dothat/advanced/menu.py file. The menus consist of an intricate map of (sub-) menus and commands (Listing 4). These "commands" are based on examples of special Python classes (Listing 5). You'll find these classes in the python/examples/plugins/ directory.
Listing 4
Menu System
menu = Menu(
  structure={
    'Commands': {
      'Reboot': GraphSysReboot(),
      'Shutdown': GraphSysShutdown()
    },
    'Clock': Clock(backlight),
    'Status': {
      'IP': IPAddress(),
      'CPU': GraphCPU(backlight),
      'Temp': GraphTemp()
    },
    'Settings': {
      'Display': {
        'Contrast': Contrast(lcd),
        'Backlight': Backlight(backlight)
      }
    }
  },
  lcd=lcd,
  input_handler=Text()
)
Listing 5
Python Class Example
class GraphSysShutdown(MenuOption):
  def __init__(self):
    self.last = self.millis()
    MenuOption.__init__(self)
  def redraw(self, menu):
    shutdown = "sudo shutdown -h now"
    now = self.millis()
    if now - self.last < 1000 * 5:
      return False
    a = run_cmd(shutdown)
    menu.write_row(0, 'RPI Shutdown')
    menu.write_row(1, '')
    menu.write_row(2, time.strftime('  %a %H:%M:%S  '))
The example program uses some Python modules that are not found in the Dot3K menu. The Pimoroni installer offers automatic installation. It makes more sense to perform a manual installation because the installation script for the examples, includes many additional packages that are not necessary. The user only needs the two packages python-psutil and wifi for the menu demo (Listing 6).
Listing 6
Packages for the Menu Demo
$ sudo apt-get install python-psutil
§ sudo pip install wifi
One tangible benefit to the menu system is that the user does not have to direct implementation of the button control. Instead you can concentrate solely on the specific use case. The available examples are suitable for use as source code. For instance, you will find an indicator for the current CPU load (Figure 3) and the date (Figure 4).
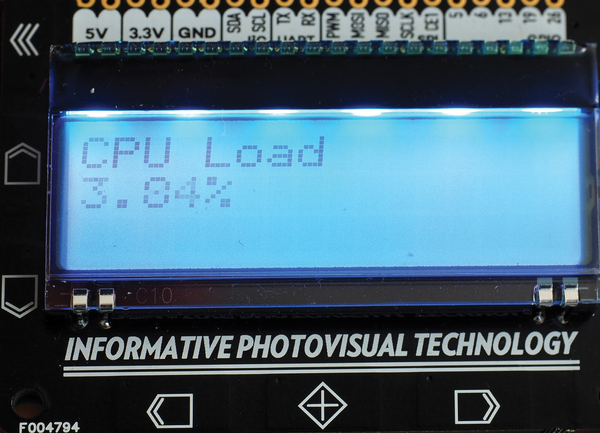 Figure 3: The examples delivered by the manufacturer show the current CPU load.
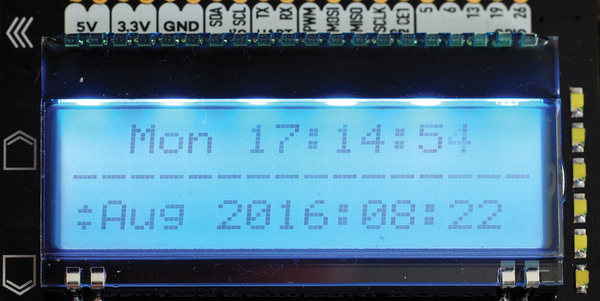 Figure 4: It does not take much effort to have the Raspberry Pi display the time and date.
« Previous 1 2 3 Next »
Buy this article as PDF
Pages: 6
(incl. VAT)
Buy Raspberry Pi Geek
US / Canada
UK / Australia
Related content
-
Backing up images with the Raspberry Pi

Users who like to take pictures while on the go also need a mobile back up medium in order to free up space on their digital camera's memory once its capacity is full. A Raspberry Pi is the perfect device to use as an image tank for backing up pictures.
-
September 2014 CamJam

News and more from the latest CamJam event in Cambridge.
-
Welcome
We are living with an embarrassment of choice. Small-board computers (SBCs) are getting smaller and faster, with many inexpensive options for the hobbyist and problem-solvers and more powerful, usually pricier, options for inventors, innovators, and CPU-guzzling consumers. New SBCs are entering the market continuously, it seems.
-
Raspberry Pi, libnotify, and Arduino LCD

Enable desktop notifications in Raspbian, and display the notifications on an external Arduino LCD display.
-
Graphical displays with Python and Pygame

As its name implies, Pygame is a set of Python modules designed to write games. However, many Pygame modules are useful for any number of projects. We introduce you to a few Pygame modules that you can use to create custom graphical displays for your project.
