Pi video recorder with MiniDVBLinux
Remote & Channels
The web interface itself will automatically recognize the freshly installed VDR system upon restart and run the Quick Start. At this point, you can restore a backup from an earlier VDR, set up Wifi access, and choose the system language.
After clicking on Save, you'll see a few more menu options under Setup. One of them lets you specify things like the type of remote control. Since the Raspberry Pi has been connected to the television via an HDMI cable, check the tick box besides Install CEC support. This makes it possible to control the VDR via your TV's remote control. Alternatively, you can select LIRC for an infrared remote control. This type of remote is often included with the purchase of a DVB receiver. If you don't choose any of these possibilities, you will need to control the VDR using a connected keyboard or a simulated remote control on the web interface.
CEC
The abbreviation CEC stands for Consumer Electronics Control [8]. It is the industry standard for control functions on components used in entertainment electronics. Most of the current TV devices support CEC although the manufacturer may refer to the standard by another name. In practice, the television transmits a key press from the TV remote control, over the HDMI cable and onto the Raspberry Pi. The LibCEC [9] captures the key press and forwards it on to the software.
The installer now pulls some packages needed by the system to support the remote control. Once the installation is complete, you will need to reboot the Raspberry Pi again by clicking on Reboot.
The next step is to select a list of channels from the Setup > TV. The selection you make will depend on the type of television reception. As described above, the types of reception include land based (DVB-T), cable connection (DVB-C) or Satellite (DVB-S). Unless you are in Germany, you will have to scan the airwaves for a list of channels. You can do this with the wirbelscan VDR plugin. Visit the Packages tab and scroll down the VDR Plugins panel until you see wirbelscan. Click on its checkbox and it will install automatically.
Once it's done, go back to the System tab and pick Setup > TV. You will see a new entry, Scan-Channellist. Us that to configure what system and region you want to scan and click Start. Let the process finish – you can follow the process on the TV.
Go back to Setup > TV and now pick Edit-Channellist. You will see your list of channels in the text box. Give the list a name, like My Channels and click Save. Go back to Setup > TV and use the Channel list drop down to select you channel list. Afterwards, your VDR will start receiving signals and you should see the video feed on the screen.
Your TV may display a message however telling you that the MPEG2-License key is missing. Whether or not you see this message depends on the source of the signal and the channel list. You need a key like this in order to view standard definition broadcasters that code their signals with MPEG. HD broadcasters on the other hand send their programs over the airwaves coded in H.264 which solves your key-related problem.
MPEG2 License
You can purchase the MPEG2 license key from the Raspberry Pi Foundation [6]. It costs 2.4 Pounds Sterling. You will need to enter your Raspberry Pi's serial number in the entry field on the online shop in order to purchase it (Figure 4).
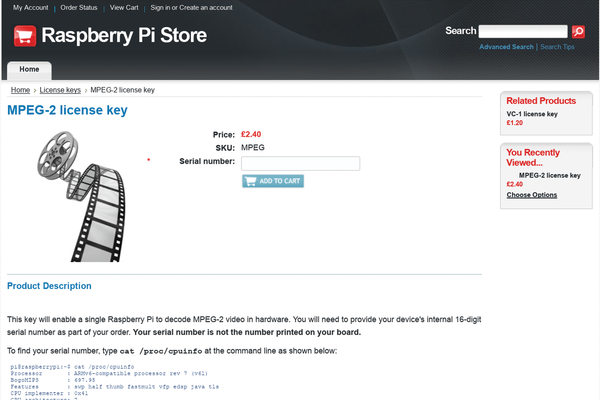 Figure 4: The Raspberry Pi has a hardware MPEG2 decoder that can only be activated by a key that you need to purchase.
If you operate the Raspberry Pi without a monitor and keyboard, as is usually the case with a VDR, you will have to connect to the VDR via SSH. Under Windows, you will need to download an additional program like PuTTy [5] to do this.
Under Linux and Mac OS X, you just need to type in ssh root@<IP-Address>. You will need to adapt the IP address to your LAN settings or you can use the hostname of the Raspberry Pi. The password required for the VDR login is usually mld500.
After this, you can find your serial number by running the command cat /proc/cpuinfo detect (Listing 1). Use this number when placing the order for the MPEG2 license key. You will receive the key via e-mail within three days. Usually it comes more quickly. We didn't even have to wait 24 hours. Often, delivery can take just a few minutes.
Listing 1
Output of cat /proc/cpuinfo
$ cat /proc/cpuinfo | grep Serial
Serial  : 0000000024fea507
Once the license key arrives, you can proceed by clicking on System and then Setup in the web interface. After completing a quick update, the Setup menu appears in the middle panel, containing about a dozen options to choose from. From here, choose Raspberry Pi and enter the license key in the field besides Add license key (Figure 5). In the Type of license key selection field underneath, select Decode MPEG-2. You'll be able to view SD broadcasts as soon as the Pi restarts.
 Figure 5: The customized key is generated for each Raspberry Pi and needs to be entered in the VDR software.
Buy this article as PDF
Pages: 7
(incl. VAT)
Buy Raspberry Pi Geek
US / Canada
UK / Australia
Related content
-
Using Raspberry Pi to control an electrical outlet

Raspberry Pi fills in for a remote control device, switching the power on and off at an electrical outlet.
-
Controlling your Pi with an infrared remote

A few tricks and some ready-made Linux tools will help you configure your Pi to respond to commands from the same kind of infrared remote control device you use with your TV.
-
Making a smart TV with XBMC and a Raspberry Pi

For just a small amount of money, you can turn any television set into a multi-use, smart TV by adding a Raspberry Pi and XBMC. In this article, we will help you start out with the XBMC media center.
-
Using the Raspberry Pi for a multimedia center on your boat

Due to its diminutive size and minimal power needs, the Raspberry Pi works well as a multimedia center on boats or in RVs.
-
Protect your electronics from lightning strikes

Add a lightning detector to your vulnerable projects via the I2C bus to protect them from electrical storms.
