Put It On
Kdenlive is an easy-to-use Linux video editor with a ton of features that let you create a short video for your Rasp Pi wearable.

Lead Image © Dennis Cox, 123RF.com
Kdenlive is an easy-to-use Linux video editor with a ton of features that let you create a short video for your Rasp Pi wearable.
Loyal readers may recall the Steampunk conference badge that I described a few issues back. It acts as a conversational icebreaker and promotional device when I speak at conferences. Version 1.0 had an Arduino Pro Mini and a 1.8-inch color LCD screen [1] in a Steampunk-themed frame that cycled through a few bit-mapped images.
Fast-forward to version 4.0. Now, the badge has evolved into a two-piece design sporting a Raspberry Pi 2 Model B (RPi2) [2], an Edimax WiFi adapter [3], remote access through SSH, and the capability to show 150MB videos easily at 30 frames per second. There's even a GPIO-controlled, pulsating "ozone tube" for enhanced attention-grabbing effect.
Being able to put a movie on the tiny screen leads to a new question: "Where do I get a video for my wearable conference badge?" Raspberry Pi Geek readers, of course, can create their own.
In this issue, I'll show how to make a quick movie using Kdenlive [4], which is a Linux-based non-linear video editor. I'll also look at how to get it on the RPi2 badge and how to run it once it's there. The concepts apply to developing footage for various kinds of video-capable, wearable computing devices, not just my "Steampunk Conference Personality Identification Apparatus" (Figure 1).
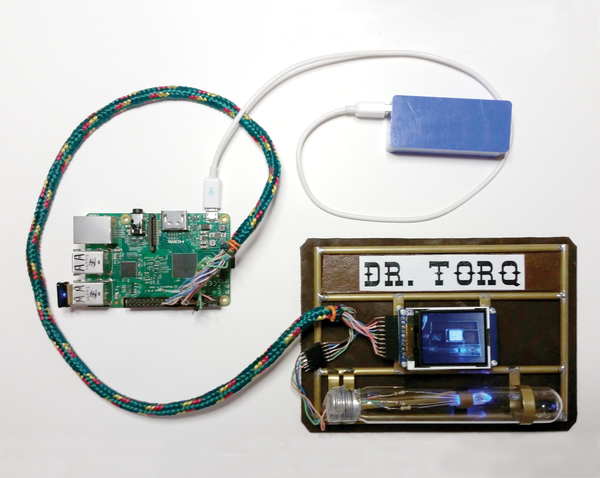 Figure 1: Steampunk Conference Personality Identification Apparatus.
The finished video is about 25 seconds long, takes up about 1.9MB of disk space, and simply runs in an infinite loop on the Pi-powered badge.
It's good to start with a minimum viable video (or MVV). You can always add refinements after the basic requirements are satisfied. Here's the outline for a Steampunk-themed video.
The title sequence is a short clip that opens and introduces my Dr. Torq brand to the viewer. The content clip entertains, educates, and/or markets my products and services to the viewer. Finally, the contact clip provides my contact information, so viewers can find me.
It made total sense to give the title sequence a strong 1880s feel. Sepia, old-film, scratches and dust filters were used for the effects and are explained in the video build section. As you might guess, the content clip contains the main message of the movie, such as a demo, animated scene, or whatever. The contact clip is similar to the title sequence, using text to show my name, phone number, email address, and so on.
Because the badge runs standalone, pinned to my lapel, without an attached full-sized monitor, keyboard, or mouse, I simply set it up to run the movie on boot up, with MPlayer [5] as the viewing program. MPlayer can render the video through a framebuffer (the tiny 1.8-inch color LCD screen), without even having to start the X Window System on the Pi.
The Linux notebook used for the video editing and Raspberry Pi badge are on the same LAN, and I used rcp to copy the video file between the machines.
Building the video is fairly straightforward, although quite a few steps are involved. To begin, install Kdenlive on your Linux notebook using apt-get or your favorite package manager; then, open the program (Figure 2):
sudo apt-get install kdenlive
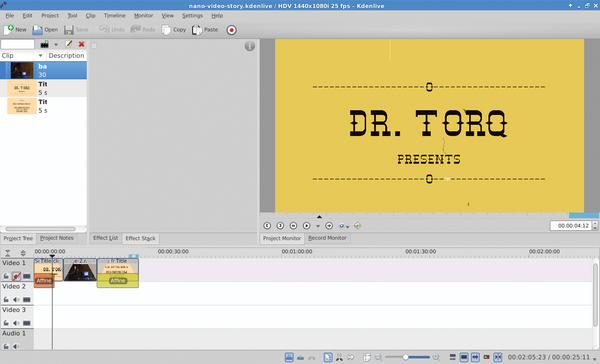 Figure 2: The main Kdenlive screen.
The first order of business is to add a title clip to the timeline. Click the little filmstrip with the green + sign button on the clip panel and select Add Title Clip. A new editing panel will appear as shown in Figure 3.
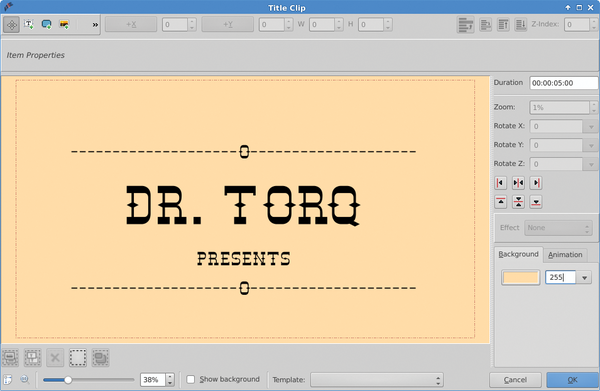 Figure 3: New editing panel.
Select Steampunk-style letters from the font drop-down. DesperadoFLF worked pretty well. Then, click the Add Text button at the top left to start typing text on the screen.
Looking at the graphic, you'll see that I used hyphens and a selection of upper- and lowercase characters to develop a simple title page. The editing panel is pretty basic. Text centering is done with the buttons on the right-hand side. You can also set the length of the clip in the Duration box.
If you don't like the look or size of the text, you can change it using the Font and Font Size drop-down boxes. I chose a sort of beige color for an old-timey flavor. Click the background tab at lower right corner and pick your color. The opacity should also be changed to 255, or else you won't be able to see the text or the background color when reviewing the clips. Click the OK button to save your title clip and return to the main Kdenlive window.
Once you're happy with your title clip's content, look, and feel, you can drag it down to the Video 1 timeline. Place it at 00:00:00 seconds. Next, I imported a content clip into Kdenlive again using the Add Clip drop-down box. Once it's on the clip panel, you can drag it down and place it at the end of the title sequence clip in the timeline. Next, you can add another title clip for the contact information, using the same text creation process as the title sequence and place it after the content clip.
Because the badge doesn't currently employ audio output capabilities, I turned the audio track off using the little speaker button at the left side of the Video 1 timeline. This reduces render time and file size.
I only added the old-timey Steampunk effects to the title sequence clip. Kdenlive has a huge number of filters and transitions, so feel free to develop your own themes.
Select the title sequence clip on the timeline, then right-click and select Add Effect | Colour | Sepia. The Sepia effect will appear in the Effects Stack window, as shown in Figure 4. You can adjust the sliders associated with each filter to change the effects. Using the same technique, I also added Oldfilm, Scratchlines, and Dust filters to the title sequence clip. They reside under the Add Effect | Fun menu.
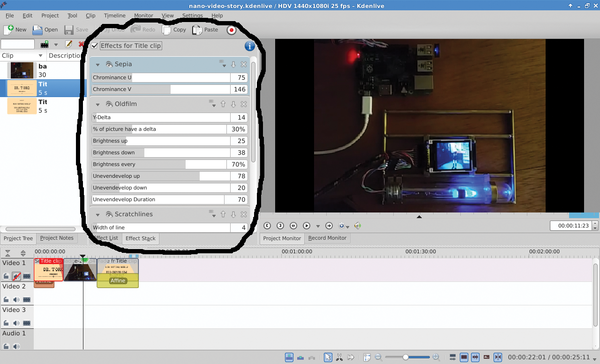 Figure 4: Special effects.
Use the Play button in the Project Monitor window to view the video at any time. You can move the timeline slider back and forth to select what you want to view. The same effects could be applied to the contact clip.
To get a smooth transition from the title clip to the imported clip, I used Add Effect | Fade | Fade To Black on the title clip. Likewise, I used Add Effect | Fade | Fade From Black to bring up the content clip. The same fade out/in process was applied between the content and contact clips.
Once everything looks good, you can click the Render button (red dot in white circle at the top) to output a .mp4 file. The Mobile Device profile worked well, because it creates decent-looking videos at a modest size in an MP4 format.
Name the file and place it in an appropriate directory. Next, click Render To File and sit back and wait. My 25-second video took about 30 seconds to render.
Pages: 4
US / Canada
UK / Australia

Get a tiny color display working on a Raspberry Pi, so you can show your own movies.

For just a small amount of money, you can turn any television set into a multi-use, smart TV by adding a Raspberry Pi and XBMC. In this article, we will help you start out with the XBMC media center.

You can give digital support to some pretty scary special effects for your next Halloween using the Raspberry Pi.

You'll need a little troubleshooting and some basic knowledge of HDMI if you plan to use your BeagleBone Black for multimedia applications.

Historically, Linux has not had many CAD offerings. Now 3D Slash has stepped in to fill the void, and it even works well on a Raspberry Pi.

Price $15.99
(incl. VAT)