Display T. Box is a Raspberry Pi with an integrated display
LXDE on a Mini-Display Screen
Raspbian automatically installs the simple Lightweight X11 Desktop Environment (LXDE) [3] as part of its basic configuration. Thus, it is particularly well suited for systems with weak performance like the Raspberry Pi. Once calibration is finished, you should start the desktop from the terminal via startx. Within a few minutes, the graphical interface will be ready to use (Figure 3). As is the case with most desktop environments, you should use the start menu at the bottom left to invoke programs that have been installed (Figure 4).
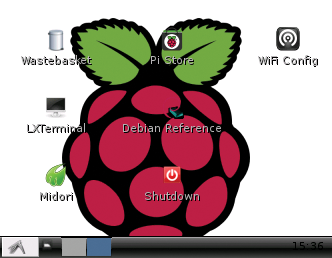 Figure 3: The 320x240-pixel display work just fine for displaying the raw LXDE desktop.
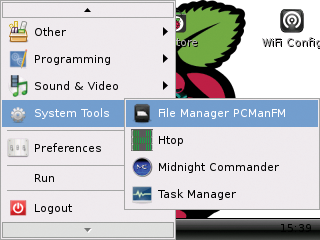 Figure 4: The Raspberry Pi desktop quickly runs out of space as the display screen fills up with content.
The display screen has a pixel resolution of only 320x240ppi, so you don't have much room for applications. Using applications like LibreOffice is practically impossible on such a small screen. Even the graphical network tool in LXDE and terminal applications like Midnight Commander are challenging, because most of the buttons sit outside the area that can be displayed on the screen (Figures 5 and 6).
 Figure 5: Many of the dialogs in the LXDE desktop environment and in other applications are too large to display properly on the screen.
 Figure 6: Terminal output consists either of broken lines or it disappears completely because of the limited display area.
Precision is a problem even when the touchscreen has been carefully calibrated. For example, pushing the stylus to the upper left corner causes the mouse cursor to deviate from the pressure point. Because the cursor only responds to pressure on the screen, this behavior can turn the input process into a game of chance. Therefore, the display screen is best used for applications that have been optimized with large buttons that do not require high precision.
Multiple Monitors
Given these problems, it is a good idea to attach an external monitor to the HDMI port if you want to display images properly on a Raspberry Pi equipped with a touchscreen. However, this is not possible with the Display T. Box when starting the X server. If necessary, an HDMI screen can be connected later. In the configuration described next, the external display screen is used as the primary output device on which the operating elements of the desktop environment appear. The built-in display serves as the second monitor.
To achieve this setup, you should create a backup copy of the configuration file /etc/X11/xorg.conf and then open the original with root rights in an editor (Listing 3). At the end of the file, you should modify the "ServerLayout" section according to Listing 4 by exchanging the entire section. Afterward, you should add the rest of the content of the listing starting with line 9 to the xorg.conf file. All of the new xorg.conf file content is available online [4] in the template xorg.conf-dualscreen, which you will need to copy into the Display T. Box /etc/X11/xorg.conf file.
Listing 3
Copying /etc/X11/xorg.conf
$ sudo cp /etc/X11/xorg.conf /etc/X11/xorg.conf_orig
$ sudo nano /etc/X11/xorg.conf
### Play back back up copy if necessary
$ sudo cp /etc/X11/xorg.conf_orig /etc/X11/xorg.conf
Listing 4
Edit /etc/X11/xorg.conf
01 [...]
02 Section "ServerLayout"
03   Identifier "default"
04   Screen 0 "screen0"
05   Screen 1 "screen" RightOf "screen0"
06   Option "Xinerama" "1"
07 EndSection
08
09 Section "Device"
10  Identifier "main"
11  driver "fbdev"
12  Option "fbdev" "/dev/fb0"
13 EndSection
14
15 Section "Monitor"
16  Identifier "monitor0"
17 EndSection
18
19 Section "Screen"
20  Identifier "screen0"
21  Device "main"
22  Monitor "monitor0"
23  Subsection "Display"
24  Depth 16
25  EndSubSection
26 EndSection
« Previous 1 2 3 Next »
Buy this article as PDF
Pages: 4
(incl. VAT)
Buy Raspberry Pi Geek
US / Canada
UK / Australia
Related content
-
Testing the new Raspberry Pi touchscreen display
The new Rasp Pi display provides a compact option for viewing screen output – and it comes at a Pi-like low price of only $60.
-
Display T. Box: The (second) third generation

Display T. Box is a Raspberry Pi with a touch display in a compact case. The newest version of the Box comes with revisions that include a better touch screen and more speed.
-
3D modeling on the Raspberry Pi with FreeCAD

FreeCAD makes 3D modeling on the Raspberry Pi easy, even for beginners. A service provider prints the product.
-
TFT touchscreens for the Raspberry Pi

Typically, the Rasp Pi transfers video data via HDMI to a TV or screen. For mobile access, you can connect the tiny computer to a similarly small touchscreen instead.
-
Using the Raspberry Pi to control digital information screens

A digital information screen provides constantly updated information to viewers. All you will need to create one is a Raspberry Pi, the appropriate software, and a monitor.
