Missiles Away!!!
Make a mobile missile launcher with a Raspberry Pi, a PiFace Digital module, a robot chassis, and a USB missile launcher.

Lead Image © Author, 123RF.com
Make a mobile missile launcher with a Raspberry Pi, a PiFace Digital module, a robot chassis, and a USB missile launcher.
In this project, we combined a number of elements we acquired for other projects to create a mobile missile launcher (Figure 1) that we control from a wireless keyboard. Please see the "Parts List" box for the components needed for the build.
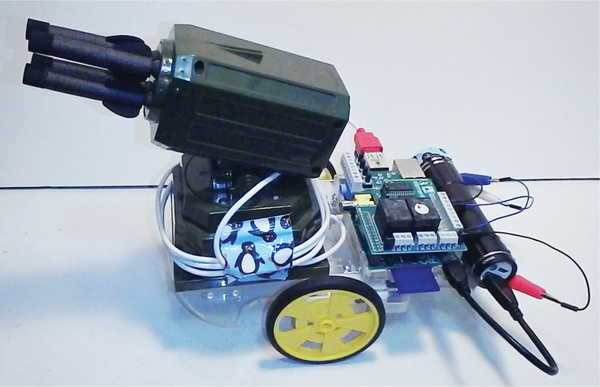 Figure 1: Mobile missile launcher. The launcher, Rasp Pi, PiFace Digital module, and battery are all mounted on the robot chassis.
Parts List
We found the missile launcher used in this project in the bargain bin at our local computer store for $9 [1], but you can get one online for around $30 [2].
The parts needed to build this project include:
The USB missile launcher we used came with Windows-based software, so we were able to play with it on our PC, too. We also found some Python code [5] that controls the missile launcher, which we modified for this project. Listing 1 is the Python test code that we used on our Raspberry Pi Model B [6]. This code aims the launcher left, right, up, and down using the l, r, u, and d keys and fires the soft foam missiles with the f key. We found that it is important to wait about three to four seconds between each missile firing.
Listing 1
missile1.py
01 ############################################################################
02 # Copyright 2011 PaperCut Software Int. Pty. Ltd. http://www.papercut.com/
03 # Modifications: 2015 Leah, Brooke, and Pete Metcalfe
04 #
05 #   Licensed under the Apache License, Version 2.0 (the "License");
06 #   you may not use this file except in compliance with the License.
07 #   You may obtain a copy of the License at
08 #
09 #       http://www.apache.org/licenses/LICENSE-2.0
10 #
11 #   Unless required by applicable law or agreed to in writing, software
12 #   distributed under the License is distributed on an "AS IS" BASIS,
13 #   WITHOUT WARRANTIES OR CONDITIONS OF ANY KIND, either express or implied.
14 #   See the License for the specific language governing permissions and
15 #   limitations under the License.
16 #
17 #  Author:  Chris Dance <chris.dance@papercut.com>
18 #  Version: 1.0 : 2011-08-15
19 ############################################################################
20
21 import sys
22 import time
23
24 device = usb.core.find(idVendor=0x2123, idProduct=0x1010)
25
26 # On Linux we need to detach usb HID first
27 try:
28   device.detach_kernel_driver(0)
29 except Exception, e:
30   pass # already unregistered
31
32 device.set_configuration()
33
34 endpoint = device[0][(0,0)][0]
35
36 down = 1 # down
37 up = 2 # up
38 left = 4 # rotate left
39 right = 8 # rotate right
40 fire = 16 # fire
41 stop = 32 # stop
42
43 #device.ctrl_transfer(0x21, 0x09, 0x0200, 0, [signal])
44
45 while True:
46
47         print('r = right, l = left, u = up, d = down, f = fire ')
48         key = raw_input ('enter key:')
49         if (key == 'l'):
50                 device.ctrl_transfer(0x21, 0x09, 0, 0, [0x02, left, 0x00,0x00,0x00,0x00,0x00,0x00])
51         if (key == 'u'):
52                  device.ctrl_transfer(0x21, 0x09, 0, 0, [0x02, up, 0x00,0x00,0x00,0x00,0x00,0x00])
53         if (key == 'r'):
54                 device.ctrl_transfer(0x21, 0x09, 0, 0, [0x02, right, 0x00,0x00,0x00,0x00,0x00,0x00])
55         if (key == 'd'):
56                 device.ctrl_transfer(0x21, 0x09, 0, 0, [0x02, down, 0x00,0x00,0x00,0x00,0x00,0x00])
57         if (key == 'f'):
58                device.ctrl_transfer(0x21, 0x09, 0, 0, [0x02, fire, 0x00,0x00,0x00,0x00,0x00,0x00])
59                time.sleep(4)
60         time.sleep(0.25)
61         device.ctrl_transfer(0x21, 0x09, 0, 0, [0x02, stop, 0x00,0x00,0x00,0x00,0x00,0x00])
A PiFace Digital module controls the motors on the car chassis. The chassis came with two motors that were small enough to be powered directly from the PiFace module. To install the Python PiFace Digital library, enter:
sudo apt-get install python3-pifacedigital-emulator
The PiFace Digital module has a software emulator that you can use to ensure the hardware and software are working correctly. To test the outputs, you need to select Enable | Output Control from the emulator's menu (Figure 2).
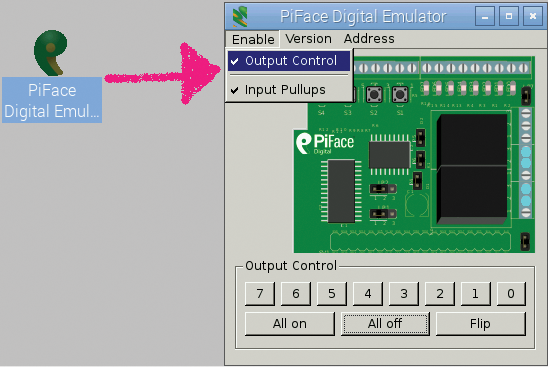 Figure 2: PiFace Digital emulator.
For the motor wiring (Figures 3 and 4), we used:
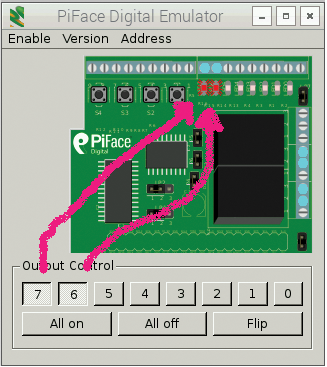 Figure 3: PiFace Digital emulator testing motor outputs 6 and 7.
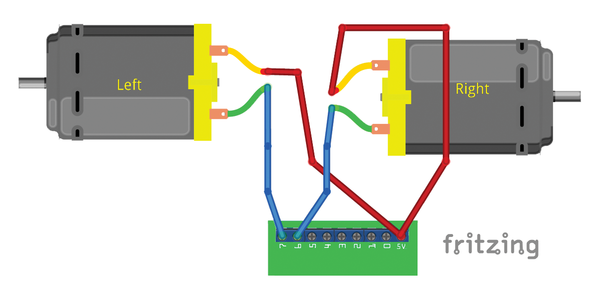 Figure 4: Fritzing diagram shows connections between PiFace Digital module and the motors.
In the emulator, we ensured that both motors ran in the same direction. If one of the motors is spinning in the wrong direction, just switch its connections.
Next, we wrote a small test program to ensure that we could get both motors to run with the Python PiFace library (Listing 2).
Listing 2
piface_m.py
01 import pifacedigitalio as p
02 import time
03
04 p.init()
05 # Run both motors
06 p.digital_write(7, 1)
07 p.digital_write(6, 1)
08
09 time.sleep(3)
10
11 # Stop both motors
12 p.digital_write(7, 0)
13 p.digital_write(6, 0)
Pages: 6
US / Canada
UK / Australia

We create a micro web server on an Arduino and a Raspberry Pi, and then use a PSP web browser to control an airboat.
The long winter nights are upon us in the northern hemisphere, so you won't find a better time than now to start a project with your favorite nanocomputer – and maybe even your favorite people.

Connect the littleBits Arduino module to a Raspberry Pi and you open a world of projects and a world of fun.

Create super easy Pi programs to turn on lights, speak to you, or control motors.

A successful solar power project requires data analysis and the ability to modify the system to take advantage of prevailing weather conditions.

Price $15.99
(incl. VAT)