Distributed software compilation for the Raspberry Pi
Compiling Panda3D
Finally, I come to the job I was aiming to do all along: get Panda3D working on the Rasp Pi. This is not a task for the faint of heart – at least without guidance. Setting up distcc to compile is only the first hurdle. If you manage to figure out all the dependencies and complete a compile, most likely Panda3D will be sluggish, many features (e.g., texturing) will be missing, and the program will crash if you nudge it even a little bit.
All of these symptoms are the result of a regular compile that tries to use OpenGL. However, when it doesn't find a GPU that supports OpenGL, Panda3D will fall back to using the CPU, which is a very suboptimal solution.
The trick is figuring out how to compile Panda3D to use OpenGL ES and the on-board Broadcom GPU. ES stands for Embedded Systems and is the subset of OpenGL used for games and graphic-intensive programs on smartphones and, yes, the Rasp Pi.
Fortunately, Thomas Egenhofer has done the legwork and published an excellent guide [6]. However, his guide needs a bit of updating and a few tweaks to work perfectly on a distributed compile.
The first task is to get the dependencies out of the way:
sudo apt-get install build-essential pkg-config python-dev libpng-dev libjpeg-dev libtiff-dev zlib1g-dev libssl-dev libx11-dev libgl1-mesa-dev libxrandr-dev libxxf86dga-dev libxcursor-dev bison flex libfreetype6-dev libvorbis-dev libeigen3-dev libopenal-dev libode-dev libbullet-dev libgtk2.0-dev
The Panda3D developers recommended this list themselves, except I have taken out one package specific to Nvidia. Rasp Pi doesn't come with a Nvidia GPU, so you won't need it; in fact, it would interfere with the correct working of Panda3D programs.
Next, you should download the latest stable version of Panda3D:
git clone https://github.com/panda3d/panda3d.git
Egenhofer has written a patch that tweaks all the scripts and source code files to adapt them to the Rasp Pi's architecture. Download it with:
wget http://home.arcor.de/positiveelectron/files/pandaprpi2.patch
The patch assumes Panda3D is in a directory called panda3d-master-org, but your directory is probably called simply panda3d. Rename it with:
mv panda3d/ panda3d-master-org
Now make sure you are in the directory that contains the panda3d-master-org directory (not in panda3d-master-org itself) and apply the patch with:
patch -s -p0 < pandaprpi2.patch
The output should be minimal – at most, a couple of lines mentioning what has been rejected, if anything. You can safely ignore the message.
With the source patched, Egenhofer then recommends setting some environment variables before starting the compile proper:
export LDFLAGS="-Wl,-allow-multiple-definition"
Finally, to get the compile going, he recommends using the following chain of commands, flags, and parameters:
python2.7 ./makepanda/makepanda.py --verbose --everything --installer --threads=4 --no-eigen --gles-incdir=/opt/vc/include --gles-libdir=/opt/vc/lib
Even using distcc, compiling Panda3D is a toughie and will take a while. Fortunately, using a quadcore i5, it takes minutes, not hours (Figure 2). If you access any of your nodes and, as root, have a look in /var/log/distcc (e.g., with tail):
tail -f /var/log/distcc
you will see each component pop up as it is compiled.
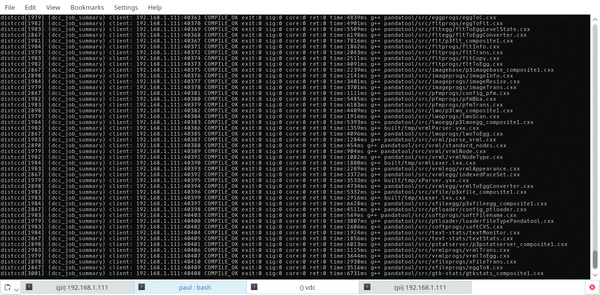 Figure 2: If you "follow" the distcc logfile on the compile node, the tasks scroll by as they occur.
The --installer flag used in the python2.7 command above ensures that, when the compile is done, you'll find a DEB package in your Panda3D directory. You can install it with
sudo dpkg -i panda3d<XXXXX>_armhf.deb
where <XXXXX> is the version number. Installing the DEB also takes a while, so be patient.
Using distcc on a quadcore i5 at 2.8GHz (a pretty old machine), the compile took about 22 minutes (Figure 3). Bearing in mind that my prior attempt to compile on the Rasp Pi only reached 30% after 24 hours before locking up the machine completely, that is a substantial boost! Egenhofer compiled using Raspbian within a virtual machine and managed to compile on a similar computer to mine in two hours. It seems pretty clear that distcc is the winner for both convenience and speed.
 Figure 3: Compiled in 22 minutes instead of over 6 hours. Not bad at all.
Testing
To make sure everything works, you can now try out some programs that come with Panda3D. If you look in the /usr/share/panda3d/samples directory, you'll see some projects you can play with. Most are directly executable, so to play a game of Panda3D-powered asteroids, for example, type
/usr/share/panda3d/samples/asteroids/main.py
in a terminal window (Figure 4).
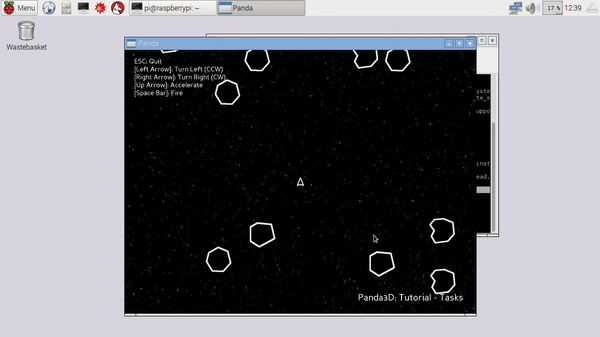 Figure 4: Playing a match of Panda-powered asteroids.
Some projects just show a blank window with the message: Video driver reports that Cg shaders are not supported. These projects use OpenGL-only extensions and cannot run with OpenGL ES.
The program I wrote for Raspberry Pi Geek #16 does work, though.
The program I wrote uses an Arduino 101 [7] to control an onscreen 3D model helicopter (rendered with Panda3D). You can download all the bits and pieces with:
git clone https://github.com/pbrown66/Arduino-101.git
Then, you need to upload the Arduino sketch gyro.ino, using a regular x86-based computer, to the Arduino 101, because the 101 is a rather new board and is only supported in the latest versions of the Arduino IDE, which is not yet available for the Rasp Pi.
Notwithstanding, the Python program copter.py works just fine from the Raspberry Pi, as you can see in Figure 5 and a YouTube demo [8].
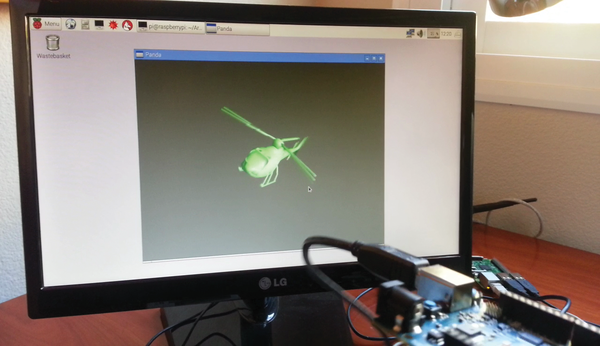 Figure 5: Making a Panda3D object twist and spin by waving around an Arduino 101 works on the Raspberry Pi!
« Previous 1 2 3 Next »
Buy this article as PDF
Pages: 8
(incl. VAT)
Buy Raspberry Pi Geek
US / Canada
UK / Australia
Related content
-
Exploring the new Arduino/Genuino 101

The Arduino 101 only costs $30, but it packs quite a bit more than your regular Arduino board. Learn about the 101's specs and how you can use its onboard gyroscope with a fun, 3D project.
-
Building Raspberry Pi programs on a traditional PC
The Raspberry Pi is a smart little machine, but you might find it easier to write programs on another computer then copy them to the Raspberry Pi afterwards.
-
Welcome
Just more than four years ago the first Raspberry Pi was released to overwhelming response. Many people had to wait for their first-generation Pi while production was ramped up to meet the demand. Now you have an entire array of Pis from which to choose, and demand is still so high that you might have to wait for your computer on backorder immediately after a new model is released. Moreover, the quad-core Raspberry Pi 3 has broadened the possibilities of what you can accomplish with the little nanocomputer.
-
Create amazing Pi apps without writing code

Create super easy Pi programs to turn on lights, speak to you, or control motors.
-
Graphical, Scratch-like programming languages for Arduino

Getting a handle on Arduino boards can be difficult. Luckily, quite a few block-based, Scratch-like programming environments are at hand that make the learning curve easier to climb.
