Make an Android phone app to control your littleBits projects
Android Program
To control our littleBits paddleboat, we also wrote an Android app using MIT's free App Inventor package [5], which is a web-based application the runs on Windows, Mac, and Linux.
To use App Inventor, you need a Google account, which is easy to create if you don't already have Gmail or a Google+ account, for example. (If you have an iOS device, check out the Kino App Inventor [6]; if you have a Windows phone, look at Windows Phone App Studio [7].)
In App Inventor, you work in two screens to create a phone app. The first screen is accessed by pressing the Designer button in upper right corner for layout and design functions; this is where you configure the look and feel of the application. For the second screen, click on Blocks, where you will program your app. App Inventor programming is similar to programming in Scratch.
In the Layout pallet of the Designer screen, you first need to insert a TableArrangement component defined to have five rows and three columns. From the User Interface pallet, drag Buttons, Labels, and a ListPicker into the table arrangement (see Figure 7).
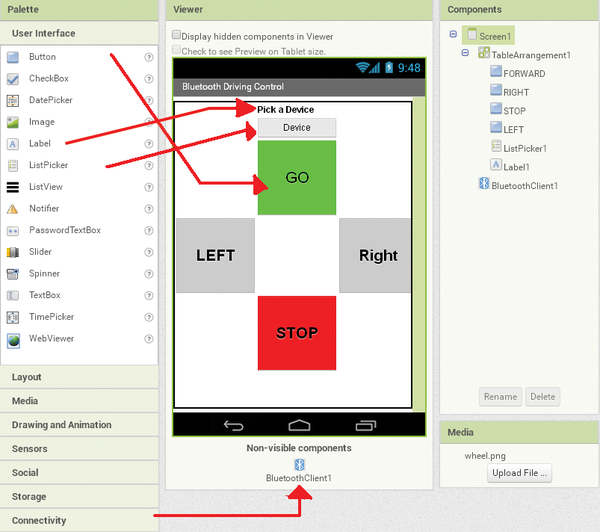 Figure 7: App Inventor Design screen.
In the Connectivity palette, drag and drop the BluetoothClient component. This item is listed as a non-visible component. To make the program more understandable, rename the buttons LEFT, RIGHT, STOP, and GO in the Components pane. The properties frame on the right-hand side of the screen is used to change things like the sizing, colors, and text of a component.
In the Blocks screen (Figure 8), first click on Screen1 in the Blocks pane and pull in the block when Screen1.Initalize … do. Clicking on the ListPicker1 element in the Blocks pane lets you pull in when ListPicker1.AfterPicking … do. After clicking on one of the Buttons, you can pull in four when <button>.Click … do blocks, then change the button names to LEFT, GO, RIGHT, and STOP
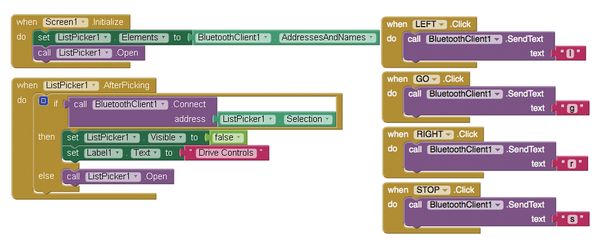 Figure 8: App Inventor screen with programming blocks.
The Screen1.Initalize block is called the first time the program is opened. To this block you need to add some blocks to load the ListPicker1.Elements and create entries for all the paired Bluetooth devices and to open the ListPicker on the phone. When the ListPicker is open you can select the Arduino Bluetooth Module (in our case, HC-06).
After you select the Bluetooth device the ListPicker1.AfterPicking block is called. Within this block you need to set the BluetoothClient1 to connect to the selected Bluetooth device, hide the ListPicker dialog so the main screen shows (Figure 9), and add an error loop to reopen the ListPicker if you have any problems connecting. Finally, the LEFT, RIGHT, GO and STOP.Click blocks send the required command letter to the Arduino program.
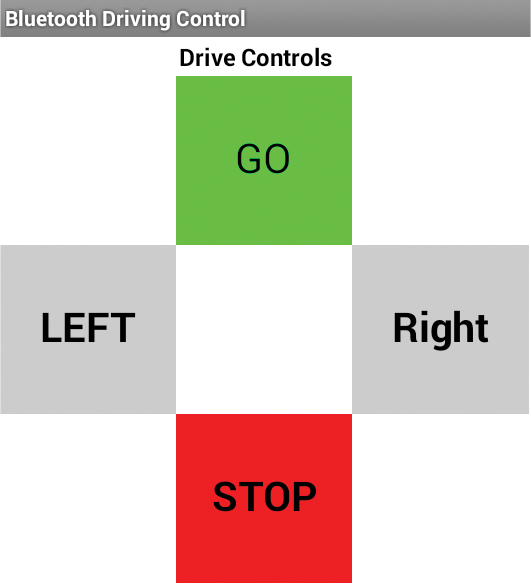 Figure 9: Bluetooth driving control app on the Android device.
Running the Program
To put your new app onto your Android device, you can either save it as an APK file (the native Andoid application file format), or you can download your app directly using a QR (Quick Response) code. You select the Build menu option for both methods (see Figure 10).
 Figure 10: Building your Android app.
If you save your app as an APK file, you can email it to your friends or move your application to a microSD card. The microSD card can then be moved to your phone. Your Android phone will recognize the APK file, and by clicking on the file, the app will be loaded. If you want to install your app with the QR code method, you'll need to install one of the many free QR code readers on your phone. We found that the QR code method was the fastest and simplest approach.
« Previous 1 2 3 4 Next »
Buy this article as PDF
Pages: 6
(incl. VAT)
Buy Raspberry Pi Geek
US / Canada
UK / Australia
Related content
-
Build cool stuff with littleBits, a Pi, and some Lego Bricks

Connect the littleBits Arduino module to a Raspberry Pi and you open a world of projects and a world of fun.
-
Control your littleBits projects with a homemade wireless remote
Make a custom handheld wireless remote control with littleBits Wireless Transmitter and Receiver bits and slider, knob, button, or toggle bits.
-
Create a remote control motorized robot arm

Use an Arduino Mega to manage a 4-motor robot arm and a 2-motor car chassis. The MIT App Inventor package was used to create an Android app that controlled-the robot.
-
New Products
What's new in the SBC, IoT, and maker realm
-
Power to You
Small-board computers (SBCs) are getting more and more powerful. The Raspberry Pi 3 (RPi3), which just came out in February of this year, is a case in point. This latest in the Rasp Pi line now has four cores running at 1200MHz with 1GB of RAM and on-board WiFi and Bluetooth. If you need even more power in a small computer, however, you are not left wanting. In this issue, we look at three SBCs with more cores, more memory, more ports, and more possibilities.
