Roasting beans in a repurposed air popper
Controlling the Heater
The fan and heater of the popper are powered with 120V AC power. A solid state AC relay [8] turned the heater on and off, as instructed by the Rasp Pi. When DC voltage is applied across terminals 3 and 4 of the AC relay (Figure 9), it connects terminals 1 and 2, allowing AC current to flow to the fan and heater assembly. At first, I connected one of the 3.3V GPIO pins to the input side of the relay, which failed to activate it. However, when I connected the Rasp Pi's 5V line, the relay worked fine, which means the GPIO pin cannot provide enough current to activate the relay, whereas the 5V supply does.
 Figure 9: Schematic for connecting the AC relay to the Rasp Pi.
The 5V supply cannot be controlled directly by the Rasp Pi, so I connected a transistor to a GPIO to control when the 5V supply is applied to the relay. As shown in Figure 9, GPIO19 is connected to the base pin of the transistor, with a current-limiting resistor in between to protect the transistor from damage. When the GPIO pin is set high, the transistor allows current to flow, activating the relay. The Python code in Listing 2 turns the heater on and off.
Listing 2
Controlling the Heater
01 # AC Relay Control Pin
02 AC_PIN = 19
03
04 import RPi.GPIO as GPIO
05
06 GPIO.setmode(GPIO.BCM)
07
08 # Setup AC Power Relay control pin
09 GPIO.setup(AC_PIN, GPIO.OUT)
10
11 # Turn heater on
12 def heat_on():
13     GPIO.output(AC_PIN, True)
14
15 # Turn heater off
16 def heat_off():
17     GPIO.output(AC_PIN, False)
Flame Simulator
On the front of ELF, a simulated flame flickers using LEDs placed behind a picture of a fire. When the heater is on, the flame flickers brightly, and when it is off, the flame flickers dimly. To achieve this effect, I used two yellow LEDs and two red LEDs (Figure 10). The red LEDs go at the bottom to simulate the base of a fire, and the yellow LEDs at the top simulate the edges of a fire. With the use of pulse width modulation (PWM), I achieved the flickering effect of a fire. When a device has only two states – on and off – and an intermediate state is desired, PWM frequently is used. For example, if an electric car only had no and full propulsion, intermediate speeds could be achieved by switching between the two states. Thus, even though LEDs can only be on or off, different light levels can be achieved by quickly switching between the two settings.
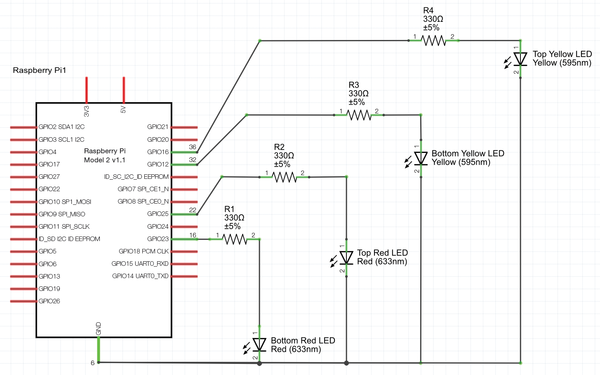 Figure 10: Red and yellow LEDs to simulate a flame.
Listing 3 shows the code for one LED when the heater was enabled. Every 0.1 seconds, the temperature is read from the thermocouple. If the measured temperature is below the set temperature, the heater is turned on. If above, the heater is turned off. When the heater is on, a random value between 20 and 100 is set as the duty cycle for the LED. The duty cycle determines the percentage of time needed to keep the LED on during a given PWM cycle. A random value is chosen to make the flame more lively and change the flame, even when the heater is on for long periods of time. The PWM cycle set to 22Hz determines the period of time used when calculating how long the LED stays on, based on the duty cycle. When a higher frequency is used, the flickering effect is less noticeable, and when a lower frequency is used, the light looks like it is blinking instead of flickering.
Listing 3
LED Control in heater.py
01 import random
02
03 # LED flame pins
04 LED_PIN_RED1 = 23
05
06 # LED PWM objects
07 led_red1 = None
08
09 # PWM Ranges
10 ON_MIN = 20
11 ON_MAX = 100
12 OFF_MIN = 1
13 RED_OFF_MAX = 1
14 YEL_OFF_MAX = 3
15
16 # PWM frequency (Hz)
17 PWM_FREQ = 22
18
19 import RPi.GPIO as GPIO
20
21 GPIO.setmode(GPIO.BCM)
22
23 # Setup red pin
24 GPIO.setup(LED_PIN_RED1, GPIO.OUT)
25 led_red1 = GPIO.PWM(LED_PIN_RED1, PWM_FREQ)
26 led_red1.start(0)
27
28 # Turn heater on
29 def heat_on():
30     red_dc = random.randint(ON_MIN, ON_MAX)
31     led_red1.ChangeDutyCycle( red_dc )
32
33 # Turn heater off
34 def heat_off():
35     red_dc = random.randint(OFF_MIN, RED_OFF_MAX)
36     led_red1.ChangeDutyCycle( red_dc )
A photo of a fire placed over the LEDs gives the impression of a real fire. The flame portion of the picture was cut out and replaced with wax paper, which is transparent enough to allow the LED light through but also cloud the light to make it appear warm and glowing instead of bright and direct (see Figure 2).
« Previous 1 2 3 Next »
Buy Raspberry Pi Geek
US / Canada
UK / Australia
Related content
-
GPIO Pinout – Rasp Pi 1 Model B+/Rasp Pi 2 Model B
40-pin GPIO
-
GPIO Pinout – Rasp Pi 1 Rev1 and Rev2
26-pin GPIO
-
Power to You
Small-board computers (SBCs) are getting more and more powerful. The Raspberry Pi 3 (RPi3), which just came out in February of this year, is a case in point. This latest in the Rasp Pi line now has four cores running at 1200MHz with 1GB of RAM and on-board WiFi and Bluetooth. If you need even more power in a small computer, however, you are not left wanting. In this issue, we look at three SBCs with more cores, more memory, more ports, and more possibilities.
-
Cayenne for Raspberry Pi

New to the whole Internet of Things (IoT) idea? The Cayenne platform provides a friendly gateway to the world of IoT. Built specifically for Raspberry Pi, this IoT platform can help you transform the little machine into a versatile IoT device and put it to some practical uses.
-
Building a Raspberry Pi greenhouse

A greenhouse environment has to be just right. The temperature can't climb too high or sink too low, and the plants need water. Why not put your Raspberry Pi to work as the gardener?
