Installing WiFi on the Raspberry Pi
Using Wicd-curses for Installation
As illustrated in the previous section, it is possible to manually create a WiFi connection on the Rasp Pi without using a graphical interface. This does not mean, however, that manual initiation is the only way to go. The package sources contain a small tool with a text-based interface that simplifies wireless configuration.
The user can install Wicd-curses directly from the package sources. You'll need to have an Internet connection:
$ sudo apt install wicd-curses
$ wicd-curses
If you are working via SSH on the Rasp Pi, it is a good idea to remember that Wicd can interrupt an Internet connection for no reason at all as soon as another connection is activated. Therefore it is a good idea to shut down active processes beforehand.
Before Wicd-curses can run, the user needs to adapt the program settings to the DHCP client. Otherwise the program will fail when it tries to retrieve an IP address from the router. To make the necessary changes, open the settings for Wicd-curses by pressing Shift+P and navigate to External Programs using the Right Arrow. This tab is easy to overlook (Figure 3). Select the dhclient option and save the setting using F10.
 Figure 3: Adapt the settings for Wicd-curses to the DHCP client before generating the connection.
If you are using the Rasp Pi via SSH, the function key only produces an action inside the SSH client and does not transmit the settings to the remote computer. If necessary, you can click on the blue surfaces in the key bar, almost as if they were buttons in a GUI, to save the configuration.
Now you can search for the desired wireless network from the list (Figure 4). Use the Right Arrow to open an entry in the list and view the settings (Figure 5). If the Rasp Pi is supposed to automatically generate a WiFi connection, activate the connect automatically with this network option and enter the WiFi password in the key field. Pressing F10 saves the access data and returns to the overview of the WiFi network.
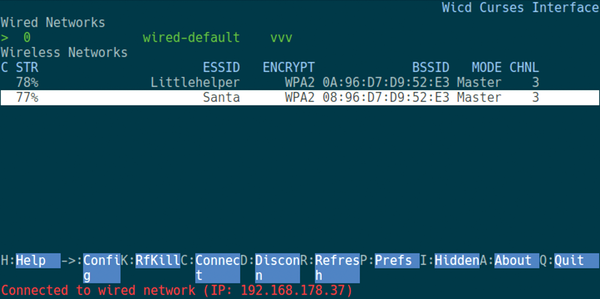 Figure 4: Wicd-curses acts as a terminal front end for the network manager Wicd; search for the desired network in the list.
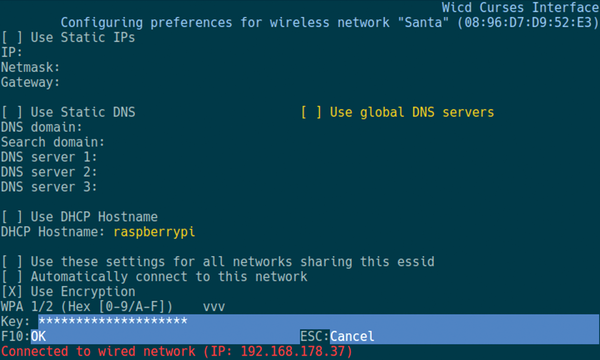 Figure 5: The user should enter the access data to the WiFi network to activate the automatic selection.
Next, generate the network connection by pressing Shift+C or simply Enter. At the lower edge of the terminal window, you will find information about the current process. If the option for automatic connection to the network is set correctly, the Rasp Pi will automatically create the WiFi connection in the future. You will not need to log onto the system.
Depending on where you live, you might want to open the Rasp Pi configuration tool with sudo raspi-config and adapt the country-specific settings under Internationalization Options | Change Wi-fi Country (Figure 6).
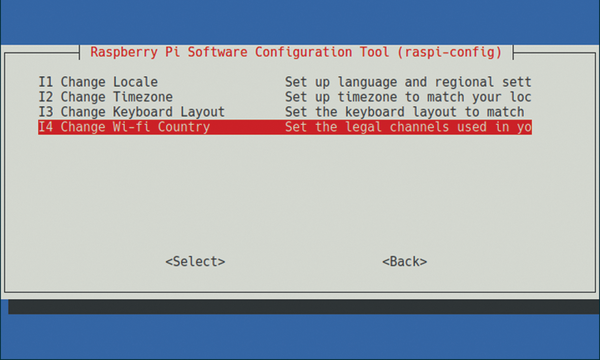 Figure 6: Use raspi-config to adapt the WiFi configuration to country-specific standards.
Conclusion
Manual configuration might seem outdated, but some users prefer to keep the Rasp Pi lightweight and avoid dependence on a desktop interface. Configuring via the graphical interface or via Wicd-curses can lead to problems if you decide to return to manual configuration later. Once your WiFi is configured, you typically won't need to make regular changes for network access.
Infos
- Download Raspbian: https://www.raspberrypi.org/downloads/raspbian/
« Previous 1 2 Next »
Buy this article as PDF
Pages: 6
(incl. VAT)
Buy Raspberry Pi Geek
US / Canada
UK / Australia
Related content
-
Cool Tools for the Raspberry Pi

Linux repositories are full of useful tools for the Raspberry Pi. We explore some network tools you might not have noticed.
-
Raspberry Pi 3 Model B in detail

The Raspberry Pi 3 changes the game with its fast, 64-bit CPU and support for WiFi and Bluetooth.
-
Creating a 3G hotspot with the Raspberry Pi

WiFi is available for free in so many public places that Internet access via a UMTS mobile cellular system would appear to be unnecessary. However, a Raspberry Pi with a UMTS stick can create a personal hotspot that creates independence from public WiFi networks.
-
Using upribox to protect online privacy

Online tracking and invasive advertising are annoying facts of life for many users. Upribox intercepts these activities and blocks them from getting to the user's end device.
-
DIY body cam with a Raspberry Pi

Make your own body cam with a Raspberry Pi, a cannibalized webcam, a WiFi module, and some Python.
