Red Alert
You can create Node-Red web pages to monitor network conditions like hard drive space, network, and CPU loads. Node-Red can also be used to read and set Pi GPIO pins using SNMP.

Alexander Pokusay, 123RF.com
You can create Node-Red web pages to monitor network conditions like hard drive space, network, and CPU loads. Node-Red can also be used to read and set Pi GPIO pins using SNMP.
There are some great full featured networking packages like Nagios [1] and MRTG [2] that can be installed on the Raspberry Pi. If, however, you are looking for something smaller to play with, then Node-Red might be the answer. Node-Red is a visual programming environment that allows you to create applications by dragging and dropping blocks (nodes) on the screen. Logic flows are then created by connecting wires between the different blocks (nodes). Node-Red also comes with Web Dashboards that allows you to view data or control the app from your smart phone.
In this article we will look at creating some smart phone dashboards that will monitor PCs and control Pi GPIO devices (Figure 1).
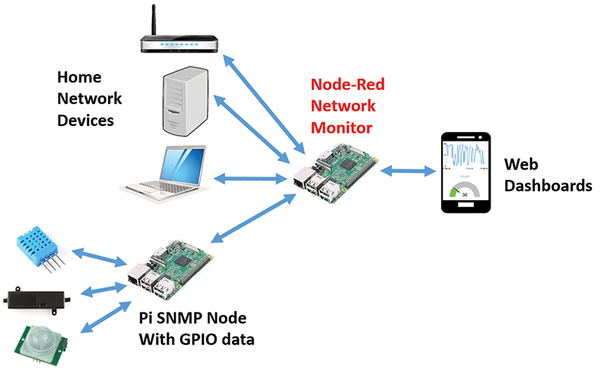 Figure 1: Node-Red smart phone network monitoring.
Simple Network Management Protocol (SNMP) [3] is the standard for communicating and monitoring of network devices. Common device information is grouped into MIBs, or Management Information Bases. Data items are called OIDs, or Object Identifiers. OIDs are referenced by either their MIB name or by their OID numeric name. So for example the SNMP device name object could be queried by either its MIB name of SNMPv2-MIB::sysName.0 or the object identifier number of: .1.3.6.1.2.1.1.5.0.
To install both the SNMP monitor and server enter:
sudo apt-get update
sudo apt-get install snmp snmpd snmp-mibs-downloader
To show meaningful MIB names, you will need to modify the SNMP config file. Open it with nano:
sudo nano /etc/snmp/snmp.conf
And comment out the first line:
# mibs
There are many configuration options in the SNMP server agent. For testing (not recommended in a real system) beginwith:
sudo nano /etc/snmp/snmpd.conf
Uncomment the agentAddress line so that all interfaces are open:
#  Listen for connections
#  on all interfaces
#  (both IPv4 *and* IPv6)
agentAddress udp:161,udp6:[::1]:161
In the ACCESS CONTROL section add a line to give read/write access to the public community:
#  ACCESS CONTROL
#
#  Set read/write access
#  to public anywhere
#
rwcommunity public
After saving the changes to snmpd.conf, the service needs to be restarted:
sudo service snmpd restart
There are a number of useful SNMP command line programs you can use. Table 1 lists a few.
Table 1
SNMP Command Line Programs
| Program | Function |
|---|---|
| snmpget |
gets a SNMP message for a specific OID |
| snmpset |
sets a SNMP OID (OID needs to be writeable) |
| snmpwalk |
gets multiple OID values in a MIB tree |
These commands usually have the following syntax:
command -c <community> -v <version> <node> <OID>
To test that SNMP is working, enter the following:
snmpwalk -c public -v 1localhost .1.3
If SNMP is working correctly you will see a very long list of SNMP objects (see Listing 1).
Listing 1
Output of snmpwalk
SNMPv2-MIB::sysDescr.0 = STRING: Linux raspberrypi 4.4.21-v7+ ...
SNMPv2-MIB::sysObjectID.0 = OID: NET-SNMP-MIB::netSnmpAgentOIDs.10
DISMAN-EVENT-MIB::sysUpTimeInstance = Timeticks: (319234) 0:53:12.34
SNMPv2-MIB::sysContact.0 = STRING: Me <me@example.org>
SNMPv2-MIB::sysName.0 = STRING: raspberrypi
SNMPv2-MIB::sysLocation.0 = STRING: Sitting on the Dock of the Bay
...
Node-Red has been pre-installed on Raspbian Jessie since November 2015. The base Node-Red installation includes support for the Pi's GPIOs. See the Node-Red website [4] for a full list of available libraries and installation directions.
Node-Red can be started in the Pi Terminal with:
node-red-start
To load the SNMP, Web Dashboards, and timer libraries enter the commands shown in Listing 2.
Listing 2
npm
sudo apt-get update
sudo apt-get install npm
cd $HOME/.node-red
npm install node-red-node-snmp
npm install node-red-dashboard
npm install node-red-contrib-bigtimer
Once Node-RED starts, you use a web browser to build applications. If you are working directly on your Pi, enter 127.0.0.1:1880 in the URL address box of your browser. Figure 2 shows the Node-RED development environment. Drop palettes from the left pane into the large flow window in the middle and wire them together in the correct order. Clicking the Deploy button in the upper right starts your program.
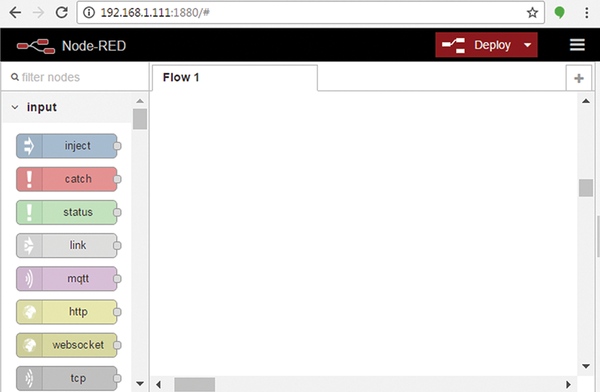 Figure 2: The Node-Red development environment.
Pages: 4
US / Canada
UK / Australia

Create super easy Pi programs to turn on lights, speak to you, or control motors.

Wire Lego Mindstorms

Blank RFID (Radio Frequency ID) cards along with a USB-based RFID card reader can offer an easy and low cost solution for your Pi security projects.

Price $15.99
(incl. VAT)