Using the Hover
Python Tests
The Hover software for the Raspberry Pi [3] can be downloaded with
$ git clone https://github.com/jonco91/hover_raspberrypi.git
It contains a library (Hover_library.py) that, according to the official documentation, has to be copied or linked into the directory that contains the Hover program you want to run. You can also copy it to a standard Python library directory, like /usr/lib/python2.7, and then it will be accessible by all Python scripts.
You can use a couple of example programs to check that everything is working correctly. The Hover_example.py script prints out the binary code and the name of the event of each gesture and tap the Hover detects. Run it with
$ sudo python Hover_example.py
and you should see output similar to that shown in Figure 6.
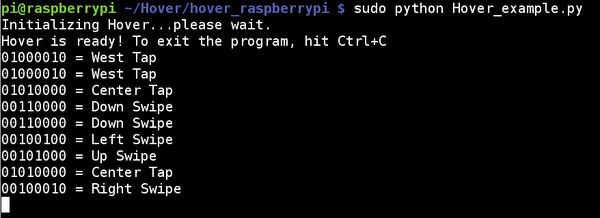 Figure 6: With Hover_example.py, you can check that the Hover understands your gestures.
A bit more interesting is the Hover drum machine. You can find it in the examples/ directory. Run it with
$ sudo python Hover_drum.py
and use your gestures to play back some geeky sounds. If your Pi is hooked up to a screen without sound (like a computer monitor), you can change the audio output with
$ amixer -c 0 cset numid=3 1
to the analog sound output (and away from the HDMI) and then hook up some headphones or speakers to the Pi to hear the drum machine. To change the audio output back to the HDMI, use:
$ amixer -c 0 cset numid=3 2
On a side note, the version that came with my download had an error: To correct it, open Hover_drum.py with your favorite text editor and change the line that says:
ahems = pygame.mixer.Sound('samples/ahem.wav')to the line:
ahems = pygame.mixer.Sound('samples/ahems.wav')Now the sound for the left swipe will work.
While you have Hover_drum.py open, take a look at the code and notice how easy it is to use the Hover with Python on the Pi. There really isn't very much to it. In fact, you can use Hover_drum.py to create a template (Listing 1) you can use in all your Hover-based programs.
Listing 1
A Hover Template
01 import time
02 from Hover_library import Hover
03 hover = Hover(address=0x42, ts=23, reset=24)
04
05 try:
06   while True:
07     if (hover.getStatus() == 0):
08       message = hover.getEvent()
09       type(message)
10       if (message == "01000010"):
11         # West tap
12         pass
13       elif (message == "01010000"):
14         # Center tap
15         pass
16       elif (message == "01001000"):
17         # East tap
18         pass
19       elif (message == "01000001"):
20         # South tap
21         pass
22       elif (message == "01000100"):
23         # North tap
24         pass
25       elif (message == "00100010"):
26         # Swipe right
27         pass
28       elif (message == "00100100"):
29         # Swipe left
30         pass
31       elif (message == "00110000"):
32         # Swipe down
33         pass
34       elif (message == "00101000"):
35         # Swipe up
36         pass
37
38       hover.setRelease()
39     time.sleep(0.0008)
40
41 except KeyboardInterrupt:
42   print "Exiting..."
43   hover.end()
44
45 except:
46   print "Something has gone wrong..."
47   hover.end()
Include this code into your program and substitute the comments (# West tap, # **Swipe down, etc.) for whatever you want your application to do, and your Hover-based project will just work.
Desktop Control
Making funny noises might be fun, but it's not very useful. Instead, you can use the Hover to control your desktop à la Minority Report. You're going to need several bits and pieces for this project. I've already covered the Hover, and you'll need the template in Listing 1. You'll also need some way to translate the Hover's input into key presses or mouse actions that the Raspbian LXDE desktop can understand, because the desktop responds to those, not information sent over the GPIOs. Finally, you're going to need to learn how the LXDE key bindings work and how to create your own.
The first thing to do is find a way to make Raspbian believe that signals coming from the Hover are key presses. You can do this in several ways, including the rather involved approach of writing a kernel module. Fortunately, you don't need to go so hard core; the Python developers have you covered with Python-uinput [4].
This module fits the ticket perfectly. Not only you can use it to write scripts that send key presses to the operating system, but it can also help you simulate a mouse. To install Python-uinput, you will first have to install pip, which is a Python-specific package manager:
$ sudo apt-get install python-pip
The Pip manager works much like Apt. Run
$ pip help
and you'll see a summary of the possible actions.
Before you install Python-uinput, you'll need the libudev development files, a dependency that will let you compile the Python module correctly:
$ sudo apt-get install libudev-dev
This library allows programs to access and manage devices, such as mice and keyboards, so it makes sense that it is a Python-uinput dependency.
Once libudev is installed, you can go ahead and install Python-uinput:
$ sudo pip install python-uinput
Before running any Python scripts that use the Python-uinput module, you will have to load the operating system's uinput kernel module into the kernel:
$ sudo modprobe uinput
As I showed earlier with the I2C modules, you can do this by hand each time after starting your Raspberry Pi, or you can add uinput on a separate line in the /etc/modules file and have Raspbian load the module automatically at boot time.
If you do the latter, your modules file should now look like Listing 2. You can now reboot and, by the time you reach the command line or desktop, the uinput module will be loaded and ready to use.
Listing 2
Modified modules File
01 # /etc/modules: kernel modules to load at boot time.
02 #
03 # This file contains the names of kernel modules that should be loaded
04 # at boot time, one per line. Lines beginning with "#" are ignored.
05 # Parameters can be specified after the module name.
06
07 snd-bcm2835
08 i2c-dev
09 i2c-bcm2708
10 uinput
As you can see in the examples on the Python-uinput homepage [4], usage is quite straightforward: You import the uinput module into your script, create a Device object with all the keys you need to simulate enclosed within a tuple (a list of variables or objects enclosed in [square brackets]), wait a bit, and then send them to the operating system using the emit_click() method.
Listing 3, for example, will send a P key press and an I key press (printing out pi on the active window) when run.
Listing 3
Print "pi" with Python-uinput
01 import time
02 import uinput
03
04 device = uinput.Device ([uinput.KEY_P, uinput.KEY_I,])
05
06 time.sleep(1)
07 device.emit_click(uinput.KEY_P)
08 device.emit_click(uinput.KEY_I)
If you want to send a combination of two or more keys, it's exactly the same, except you use the emit_combo() method with a tuple containing all the keys. To send Alt+Ctrl+Del, you'd use:
device.emit_combo([uinput.KEY_LEFTALT, \
  uinput.KEY_LEFTCTRL, uinput.KEY_DELETE])
To see a complete list of all keys and buttons (remember, uinput also does mice), look at the /usr/include/linux/input.h file on your Pi. When I say "complete" I mean very complete: You may freak out looking for your KEY_ZENKAKUHANKAKU key on your keyboard or the BTN_TOOL_AIRBRUSH button on your mouse.
Relax. Remember that Linux has to be ready for tons of architectures and peripherals. This includes non-Western keyboards and exotic devices used by designers. Look for things that sound familiar. If you want to use the function (F) keys, for example, you'll see that they follow the pattern KEY_F1, KEY_F2, and so on. Easy enough, right? Likewise for other keys. Even most of the more exotic key codes should be pretty clear. KEY_EJECTCD does what it says on the box, although, admittedly the KEY_COFEE is pretty mysterious. Not that you'll need either with your Pi.
Using uinput with the Hover is simple. When you run the program Hover_pi.py (Listing 4) with
Listing 4
Hover_pi.py
01 import time
02 from Hover_library import Hover
03 hover = Hover(address=0x42, ts=23, reset=24)
04
05 import uinput
06 device = uinput.Device ([uinput.KEY_P, uinput.KEY_I,])
07
08 try:
09   while True:
10     if (hover.getStatus() == 0):
11       message = hover.getEvent()
12       type(message)
13       if (message == "01000010"):
14         # West tap
15         pass
16       elif (message == "01010000"):
17         # Center tap
18         pass
19       elif (message == "01001000"):
20         # East tap
21         pass
22       elif (message == "01000001"):
23         # South tap
24         pass
25       elif (message == "01000100"):
26         # North tap
27         pass
28       elif (message == "00100010"):
29         # Swipe right
30         device.emit_click(uinput.KEY_P)
31       elif (message == "00100100"):
32         # Swipe left
33         device.emit_click(uinput.KEY_I)
34       elif (message == "00110000"):
35         # Swipe down
36         pass
37       elif (message == "00101000"):
38         # Swipe up
39         pass
40
41       hover.setRelease()
42     time.sleep(0.0008)   #sleep for 1ms
43
44 except KeyboardInterrupt:
45   print "Exiting..."
46   hover.end()
47
48 except:
49   print "Something has gone wrong..."
50   hover.end()
$ sudo python Hover_pi.py
it sends a P key press every time you swipe right and a I key press every time you swipe left.
« Previous 1 2 3 Next »
Buy this article as PDF
Pages: 8
(incl. VAT)
Buy Raspberry Pi Geek
US / Canada
UK / Australia
Related content
-
Innovations

I'm amazed at the energy and inventiveness of the Raspberry Pi Foundation. Almost every time we print one of these magazines, we have something new to talk about. This time we're featuring the new Raspberry Pi B+ model. The B+ adds power and convenience to the beloved Rasp Pi B.
-
Raspberry Pi IR remote

Turn a Raspberry Pi into an IR remote control for your DSLR, TV, or any other device with an IR port.
-
Build a complete game with Python and PyGame

We show how to use PyGame to implement a fully playable version of the classic "robots" game.
-
Add some security to your projects

Blank RFID (Radio Frequency ID) cards along with a USB-based RFID card reader can offer an easy and low cost solution for your Pi security projects.
-
SIMPL is as SIMPL does

The low-priced, small-footprint Rasp Pi and the open source, compact SIMPL messaging toolkit are a natural fit for application developers.
