Automate and monitor the physical systems in your home
Debug and Test
As we built the system, we tested it and debugged the designs from the Device Explorer screen. Device Explorer let you see and modify all the signals going in and out of your devices, and we used it to create test conditions and observe device behaviors.
In Device Explorer, each device is listed by name next to an expander. If you click on the expander, you see the device's signals and values. If you click on a signal, you see a dialog box with a single value field. Type in a value of your choice, and Device Explorer assigns that value to the signal.
In Figure 9, I've clicked on the four_way_switch switch_off signal to change its value from off to on. Testing devices is like testing with a simulator, but it's running the actual devices in the real system.
 Figure 9: Testing devices.
The next step is to "wire" the Virtual Wiring devices together. Any signal or terminal (Virtual Wiring device signals are also called "terminals") on a device can be wired to any other terminal on any other device. Once wired together, terminals all see the same values, just as when you wire real terminals together with real wires.
For example, I'll wire the house_water_valve_closed terminal of a programmable device to an output terminal on the Arduino. If the programmable device's house_water_valve_closed terminal goes on, the Arduino's terminal will see the on value.
On seeing an on value, the physical Arduino device turns its real output pin on. If you connect a real wire from the Arduino output pin to a water valve controller, your programmable device will turn on a valve.
Virtual Wires
Wiring is delineated on the Wires page. Two tables, each with all the device names and terminals, are shown as mirror images of each other. Next to each terminal name is a solid black dot, or terminal. If you click a terminal in the left table, you can drag a connection to a terminal on the right table. Figure 10 shows the Wires page with the three devices created so far. I've drawn a "virtual" wire between the programmable device's house_water_valve_closed and the Arduino terminal with the parameter of the same name.
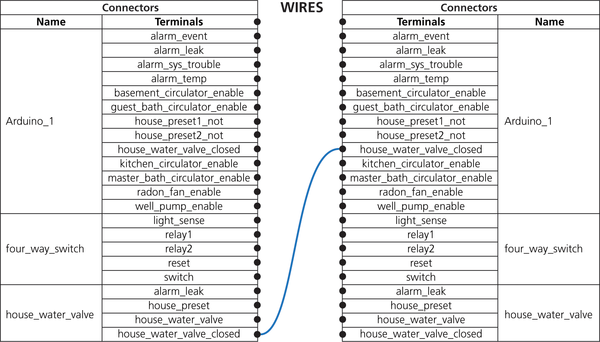 Figure 10: A programmable device wired to an Arduino terminal.
By now, you should have seen enough to understand how you'd go about creating your own devices and wiring them together. The procedures I've shown for creating devices (running scripts, inputting script parameters) are the same for all devices.
In the home automation system, we used some devices we haven't covered (email/texting devices, timers, alarm devices). To learn more about these devices (and many others we haven't mentioned), check out the device documentation [10].
Buy this article as PDF
(incl. VAT)
Buy Raspberry Pi Geek
US / Canada
UK / Australia
Related content
-
Automated plant watering with Arduino

House plants are fairly self-sufficient, but they do need certain care from people to survive. With a few Arduino sensors and a little programming, you can take the guesswork out of watering your plants.
-
Digital – Analog – Mechanical

As innovative companies consistently push the envelope of progress, antiquated hardware nearly two years old falls by the wayside. We take an old iPad, an Arduino Mega, and various other materials to create an in-dash climate control app.
-
Connecting a weather station to your Arduino
After losing one weather station to tropical winds, the author reboots and designs a PCB that connects to an Arduino and monitors weather instruments.
-
A new way of no-solder prototyping

The Grove system's standardized connector and multitude of devices allow quick and easy project prototyping with your favorite small-board computers.
-
Making your projects more reliable
A watchdog timer is a great way of improving reliability for little cost in small, inexpensive computers such as the Raspberry Pi and Arduino.
