Monitoring auto sensor data with the Raspberry Pi
CAN Under Linux
The Linux kernel already includes several drivers for the CAN bus. Via a uniform abstraction layer, these drivers can be used as network devices (Figure 5). The CAN subsystem demonstrates that it is not just private kernel hackers and IT companies that work on the Linux Kernel; that code was contributed to the Linux Kernel by Volkswagen Group Electronic Research.
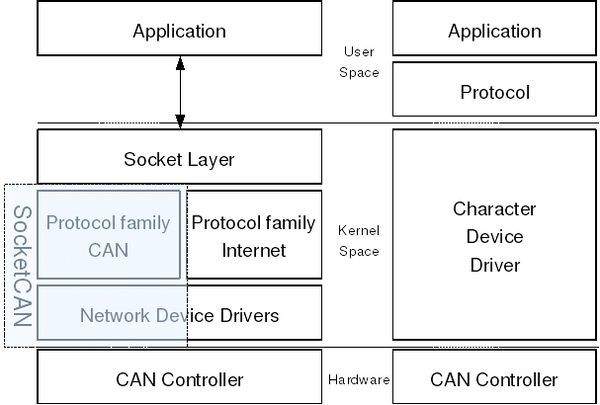 Figure 5: SocketCAN in the Linux Kernel. (Picture: Wikimedia Commons)
Although the Peak System driver used for the USB CAN adapter is contained in the Linux kernel [2], this is not the case with standard Raspbian. As a result, you have to compile the module yourself, something that is not easy to do. In the standard Raspbian image [3], a specially optimized kernel (3.6.11+) provided by the Raspberry Pi foundation performs this task, but there are neither appropriate kernel sources in the repository nor the accompanying headers.
Therefore, your first step should be to switch over to the standard Raspbian kernel (Listing 2, line 1) and enter the new kernel in the file /boot/config.txt with the command kernel=vmlinuz-3.6-trunk-rpi. Then, after a restart, the Pi is running a kernel, whereas the PCAN module is still missing (Listing 2, lines 2 and 3), but the kernel headers are now available and the driver can be compiled and installed (Listing 3). The module is now ready for use. You can either load it yourself with
Listing 2
Raspbian Kernel with Headers
$ sudo apt-get install linux-image-3.6-trunk-rpi linux-headers-3.6-trunk-rpi libpopt-dev
$ grep CAN_PEAK /boot/config-3.6-trunk-rpi
# CONFIG_CAN_PEAK_USB is not set
Listing 3
Installing the Peak Driver
# Download current Linux driver from PEAK (check their website for more info):
# http://www.peak-system.com/fileadmin/media/linux/#download
# Extract it and change into the directory. Then install it with:
$ make PCI=NO_PCI_SUPPORT USB=USB_SUPPORT
$ sudo make install
$ sudo depmod -a
sudo modprobe pcan
or you can plug in the CAN adapter and the module will automatically load. However, in the case of a kernel update, you should not forget to recompile and reinstall the CAN driver.
The PCAN driver automatically sets up the /etc/modprobe.d/pcan.conf file during installation. To increase the bit rate of the CAN Bus to 1Mbps in this module, you have to enter the desired rate when loading the module. For example, the command
options pcan bitrate=0x0014
automates the entry of the desired rate in this file. You can find values for additional rates in Table 2, which is taken from the PCAN source code. For other CAN modules, you can achieve the same result with the following command:
Table 2
PCAN Module Speeds
| Bitrate (kbps) | Module Option |
|---|---|
| 1000 |
0x0014 |
| 500 |
0x001C |
| 250 |
0x011C |
| 125 |
0x031C |
| 100 |
0x432F |
| 50 |
0x472F |
| 20 |
0x532F |
| 10 |
0x672F |
| 5 |
0x7F7F |
# ip link set can0 type can bitrate 1000000
The CAN utilities [4] found in user space are used to access the CAN network device. You install the utilities after downloading the source code with the command:
make; sudo make install
The candump tool is used to read from the CAN bus, as shown in Listing 1. On the CAN bus, one data packet consists of an 11-bit-long CAN ID followed by a length indicator with a value between 1 and 8, as well as the data. If necessary, you can even write messages to the CAN bus via cansend.
Connection to the Internet
A 3G data stick is used to create the Internet connection for transmitting data from the race car to a laptop. The Raspberry Pi automatically recognizes the stick as a storage device when it is inserted. Under Windows, this makes the installation process easier, but it does not help in Linux.
To switch over to network mode in Linux, you have to send a SCSI code to the stick. This is done using the sg_raw program from the sg3_utils package:
$ /usr/bin/sg_raw /dev/sr0 11 06 20 00 00 00 00 00 01 00
As an alternative, you could use the USB_ModeSwitch [5] program to make the switch. After the changeover, the stick remains in the new mode; however, it will not be possible to reach the Windows driver, so if you want to use the stick on a Windows computer, you have to copy the driver in advance.
In Linux, you can communicate with the UMTS stick via the /dev/ttyUSB0 device. The connection to the Internet is accomplished by means of wvdial. To automate the process, you can enter the lines from Listing 4 into /etc/network/interfaces.
Listing 4
Connecting to the Internet
auto ppp0
iface ppp0 inet wvdial
  provider <Providername>
The /etc/wvdial.conf file stores the provider-specific configuration. The file has plenty of space for several providers. As a result, it is possible to use country-specific SIM cards for Formula Student competitions and simply change the provider name in /etc/network/interfaces.
Now the Rasp Pi has an Internet connection via the UMTS stick. A simple redirect service has been programmed so that it is possible to determine the public IP address for the mini-PC. The Rasp Pi calls up an external website with wget that stores the IP address. Yet another website redirects the browser to the address of the Pi with the PHP command
header("Location:http://$ip/");which in turn contains the IP address in $ip. You can also use a public or self-programmed DynDNS service to accomplish the same thing. DynDNS is a way to modify name server entries dynamically to access computers with a frequently changing IP address.
The telemetry data appears on a website in a user-friendly form, supported by an Apache web server that runs on the Raspberry Pi. You can install the web server together with all of the necessary packages with the command:
$ sudo apt-get install apache2 php5-mysql libapache2-mod-php5 mysql-server
A plugin housing connected to both the CAN bus and the electrical supply protects all of the hardware components from water and dust. During bootup, the Rasp Pi has to load all programs and begin recording data without intervention, because it has no monitor or keyboard when installed in the car.
Buy this article as PDF
Pages: 8
(incl. VAT)
Buy Raspberry Pi Geek
US / Canada
UK / Australia
Related content
-
Use the Rasp Pi to log data from bicycles and motorcyles

University students take the Raspberry Pi to the streets, using it as a data logger for bicycles and motorcycles.
-
Geeks meet in Luxembourg for Pi and More 4

The fourth incarnation of the Pi and More conference brought Raspberry Pi fans together for a day of lectures, workshops, ideas, and experiences.
-
Event Report: Pi and More 3

From all over Germany, Raspberry Pi fans went to Trier in mid-June for "Pi and More 3." For a whole day, visitors of all ages enjoyed lectures and participated in hands-on workshops.
-
Colocation of Rasp Pi servers

A recent trend shows several data centers are offering professional hosting services for Raspberry Pis. What is this all about?
-
Using Legos to turn a Raspberry Pi into a mobile device

We show how to build a remote control for a toy car built out of Lego parts, a Rasp Pi, a game pad, and a Java program.
