An experiment in creating clusters and distributing loads with Raspberry Pis
If your project has exhausted the capabilities of a Raspberry Pi, it can be worth your while to connect several of these devices together to make a cluster. Doing so will create new resources and give you an opportunity to learn about techniques for building a computer cluster with a load balancer.
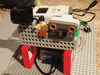
Typically, a cluster is a group of computers that act to guard against an outage or improve the performance of a service. The cluster in this example is made from four Rasp Pis. Three of the diminutive machines run locally with the GlusterFS [1] distributed filesystem (Figure 1), thus combining the read bandwidth of the three devices. The next step involves adding geo-replication with the fourth Raspberry Pi, which the other Rasp Pis can only reach over the Internet.
Each of the individual nodes receives a web server. Finally, a separate web server assumes the task of balancing the load to make the cluster resources available on the network.
[...]
Buy this article as PDF
Pages: 6
(incl. VAT)
Buy Raspberry Pi Geek
US / Canada
UK / Australia
Related content
-
Build it and you will learn: Building an RPi2 cluster

One of the best ways to get started in HPC is to build your own cluster. The new Raspberry Pi 2 is a great system for getting started with high-performance computing.
-
Building Rasp Pi into Mindstorms projects with BrickPi

BrickPi lets you build a Raspberry Pi into your Lego Mindstorms projects – you can even connect your Pi to Mindstorms sensors and motors.
-
Use an analog sensor as a video game controller

We put our Analog-to-Digital converter to work reading positions from an analog sensor (a potentiometer) and control a bat in a simple implementation of the classic Breakout game.
-
Build cool stuff with Lego and Pi
By combining your Lego Mindstorms NXT, a Raspberry Pi, and some stuff from around the house, you can make some cool projects.
-
Pi with Sugar and turtles as a learning tool
Despite its popularity elsewhere, the Raspberry Pi is first and foremost an educational tool designed with primary and secondary students in mind. We look at how teachers can make the Pi fulfill this role with the help of the Sugar Educational Desktop and turtle graphics.
