WiFi and the Raspberry Pi
The ESP8266
The ESP8266 is made by a privately held company in China called Espressif [1]. The chip was originally designed for connected lightbulbs, with functionality like the Philips Hue that I used in the BeaconAir project [2]; however, it soon got used in a variety of applications. Although the ESP8266 has huge functionality and a good price, the amount of current consumed by the chip makes battery-powered solutions problematic. With clever programming, however, it's possible in some applications.
The main features of the chip (a block diagram is shown in Figure 3) are:
- SDIO 2.0, SPI, UART, I2C
- Integrated RF switch, DCXO, and PMU
- Integrated RISC processor, on-chip memory and external memory interfaces
- Integrated MAC/baseband processors
- I2S interface for high-fidelity audio applications
- Fully integrated WiFi solution
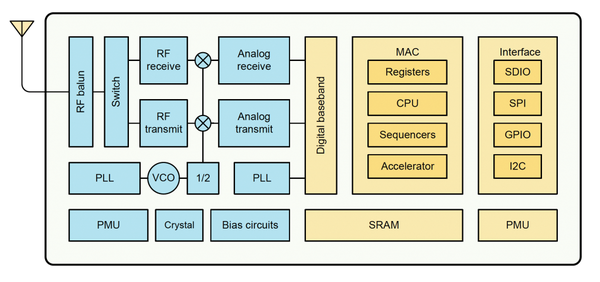 Figure 3: ESP8266 Block Diagram.
The Adafruit ESP8266 Huzzah
The Adafruit ESP8266 Huzzah board is a great $10 breakout for the ESP8266. It makes it much easier to use with the Raspberry Pi than the really cheap modules. Most of the low-cost modules are not breadboard friendly and don't have an onboard 3.3V regulator or level-shifting for signals. The Huzzah has all of those features.
The main features in the Huzzah that aren't part of the usual inexpensive (<$3.00 on eBay) ESP8266 board are:
- Reset button
- Second button that can put the chip into bootloading mode for programming
- Red LED under user control
- Level shifting on the UART and reset pin
- 3.3V out, 500mA regulator (The ESP8266 can use up to 270mA, so be aware!)
- Two diode-protected power inputs (one for a USB cable, another for a battery)
Additionally, two parallel, breadboard-friendly breakouts on either side give you access to:
- 1x Analog input (1.8V max)
- 9x GPIO (3.3V logic), which can also be used for I2C or SPI
- 2x UART pins
- 2x 3-12V power inputs, reset, enable, LDO-disable, 3.3V output
The breakout at the end of the board has an FTDI pinout. You will also need to buy a compatible FTDI cable to USB ($18 at Adafruit) to really get the most out of this breakout board. When you are done programming, you can unplug the cable. You then have to supply power and possibly a serial interface if you want to talk to the Raspberry Pi (Figure 4). The FTDI cable supplies both.
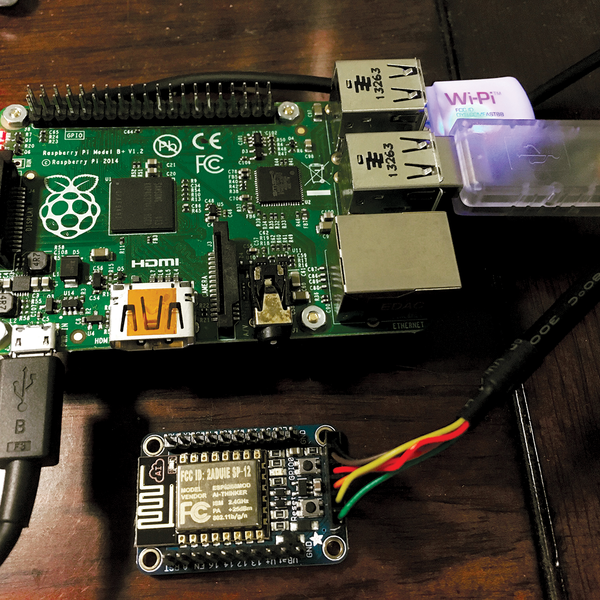 Figure 4: The ESP8266/Raspberry Pi 2 test setup.
Buy this article as PDF
(incl. VAT)
Buy Raspberry Pi Geek
US / Canada
UK / Australia
Related content
-
A solar-powered ESP8266 WiFi module joins the IoT

We take an inexpensive ESP8266 WiFi/processor combination and turn it into a solar-powered device.
-
Using the Microcontroller ESP8266 for automation tasks for the IoT

The ESP8266 Wifi chip can be used for measurement applications wherever the capabilities of the Raspberry Pi are woefully underutilized. In sleep mode, this microcontroller uses less than 3.3 milliwatts and costs only 6 Euro.
-
Capture temperature data with the ESP8266 and the LM75 Sensor

We use the ESP8266 chip which gathers temperature data from a sensor and then forwards it via REST to a Raspberry Pi, where it's stored in a database.
-
Control your Arduino and Pi projects with a PSP

We create a micro web server on an Arduino and a Raspberry Pi, and then use a PSP web browser to control an airboat.
-
Control Rasp Pi slide shows wirelessly

Take a Presentation Machine slide show clicker from wired to wireless.
