Create a customized, 3D-printed case for the Raspberry Pi
Compatible, Solid, and Ventilated
Finding the optimal way to attach the cover of the case to the lower part turned out to be non-trivial. Various options included small screws with self-cut threads, a bolt held in place with a nut, or a snap latch. Each of these methods comes with advantages and disadvantages, so I had to think about how often I would be opening and shutting the case. In this case, I used small pins that could be fit into slits.
The lower part of the case sits on small feet. Along with the holes pierced in the case, this insured proper ventilation. The brackets for the USB hub and the hard drive are made from separate boxes. They are attached to the case during assembly of the Ras Pi components.
Dimensions are precise to the millimeter as long as the user does not lose an overview of the various sizes and measurements. The measurements for available spacings are generous in this example. For instance, I allowed 10mm instead of 9.5mm for the height of the hard drive.
These precautions prevent issues that might arise if the printing process is imprecise and allow for the use of rubber or felt as cushioning. Additionally, it is easy to make small modifications to the model. If you would like to integrate a small display into your setup, all you need to do is cut the case top shown in Figure 6 accordingly. The design discussed here is publicly available on Tinkercad [7]. If you have an account with the service, you can simply clone, adapt, and modify.
Several alternative solutions could have been implemented into the design process. For example, a modular design would divide the case into three layers for the USB hub, hard drive, and Raspberry Pi, preventing any transitions. If the hard drive is not necessary, then the middle part can simply be done away with. The disadvantage of the design is that it requires gluing the parts together once they are printed.
Nifty Details and Retrofits
Up to now, I have described the theory behind the process from the perspective of a lay person. Now it is time to note that the design can cause problems during printing. A 3D printer does not like transitions, and the bottom plate of the design represents a big one, given the 2mm feet.
Therefore, during printing, additional material is used to fill in holes as a way of providing support, increasing the price of the job. Additionally, the final result will not be as clean as it would be without these structures, because they have to be removed once they have been printed.
The quality of the services provided by the printing service you have selected will be decisive at this point. Experience in finding the best printer for the design you have chosen plays an important role. Markus's Hub [8] of Munich, Germany, printed the case presented in this article. The service also provided considerable input.
The solution for the potential printing problems came in the form of a simple trick. The critical transitions in the interior for the hard drive, which is the green bar in Figure 5, and for the Raspberry Pi (yellow), were printed separately, after which they were glued in place inside the case. This saved considerably on the amount of material necessary and therefore the costs. Chamfers were used as supports (Figure 7).
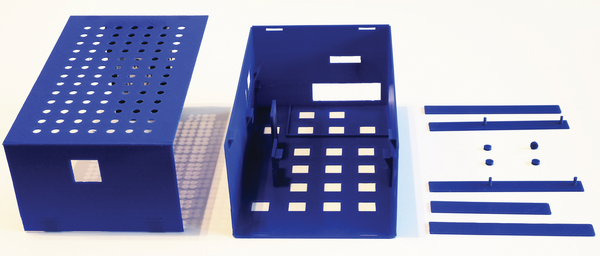 Figure 7: The individual parts of the case once they have been printed.
The real suspense begins with the delivery of the finished product. Will everything fit? Was the print job successful? The answer to the latter question will depend in part on the price paid to the print service. The greater the precision, the higher the fee. Luckily, this project didn't need much post processing. Some of the parts were a tad too long, but this was easy to remedy using a sharp knife.
Don't forget about the need for two small holes to view the Rasp Pi LEDs. If you forget this detail, as I did, it is easy to rectify the oversight with a small drill, which easily penetrates the thin material. Because of the thin material, it would not be appropriate to describe the 1mm-thick case as stable. However it does manage to meet the qualifications for functionality.
All in all, the result was good. The Raspberry Pi together with USB hub and hard drive disappear into an attractive, compact case. Thanks to a WiFi dongle docked directly on the Pi, only the power cable for the active hub sticks outside of the case (Figure 8).
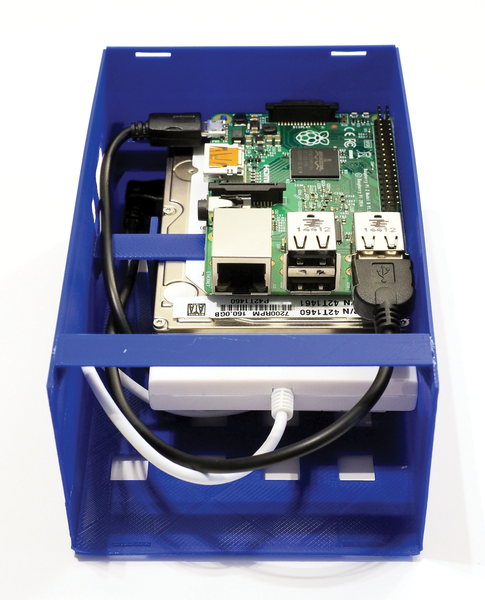 Figure 8: A roomy case for the components.
Buy this article as PDF
Pages: 6
(incl. VAT)
Buy Raspberry Pi Geek
US / Canada
UK / Australia
Related content
-
Turn a Rasp Pi into a print server with TurboPrint
Although the Raspberry Pi works well as a small printer server, the choice of drivers for the ARM processor is limited: ZEDOnet TurboPrint to the rescue!
-
3D modeling on the Raspberry Pi with FreeCAD

FreeCAD makes 3D modeling on the Raspberry Pi easy, even for beginners. A service provider prints the product.
-
The Switch Doc rebuilds his cat toy launcher with 3D printing

To explore the possibilities of 3D printing, we rebuild the cat toy launcher that debuted in Issue 5.
-
3D Slash CAD software works on a Raspberry Pi

Historically, Linux has not had many CAD offerings. Now 3D Slash has stepped in to fill the void, and it even works well on a Raspberry Pi.
-
Automating CUPS with shell commands
A Raspberry Pi is an ideal print server on a small network with the CUPS printing system controlled by a fully automated shell script.
