3D modeling on the Raspberry Pi with FreeCAD
Turning a Block into a Shell
The next step involves creating a shell from the solid shape by first switching to Draw Style | Shaded and highlighting the top surface. Next, switch into the Sketcher workbench and choose Create a new or edit the selected sketch button. Using the appropriate tools, you sketch a rectangle with rounded corners on the surface. (Figure 4) The outer measurements of this rectangle should be somewhat smaller than the display. A frame for the case that sits flush with the touchscreen will result from this sketch.
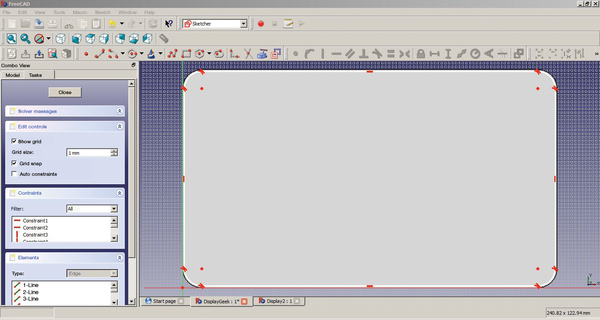 Figure 4: The sketch edit mode lets you sketch surfaces that are later used to remove material from the solid construction object.
The Close the editing of the sketch button is used to quit sketch mode. Next you should highlight the sketch and switch back into the Part Design workbench. There, choose Part Design | Pocket from the menu and give it a depth of 1mm. You now have a slightly sunken top surface surrounded by a frame. This new surface is then highlighted when modeling the remainder of the shell, and you can repeat the Sketcher and Part Design steps as needed to get the correct shape (Figure 5). Similarly, go through the same steps for creating slots in the case for switches, USB ports, and power connectors.
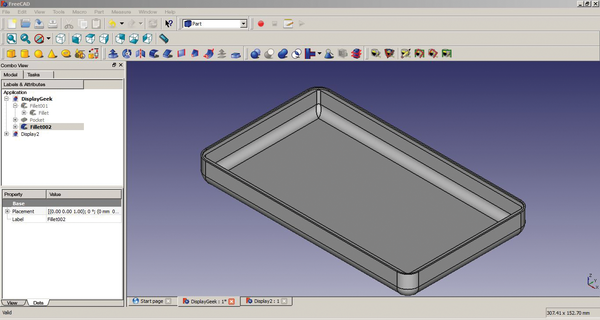 Figure 5: The shell as it looks without slots for the connections and board brackets.
To make the supports for the board and display, create a cylinder in the Part workbench. The cylinder can be copied as many times as necessary and moved around on the base surface. For the screw holes needed to attach the display screen, choose the appropriate surface, switch into Sketcher, and draw the hole as a circle. In Part Design mode, these circles are then modeled into the desired screw hole with Part Design | Pocket and a Type of Through all (Figure 6). As a final step, you can create blind holes on the reverse side so that the heads of the screws disappear, allowing the DIY tablet to lie flat on a table.
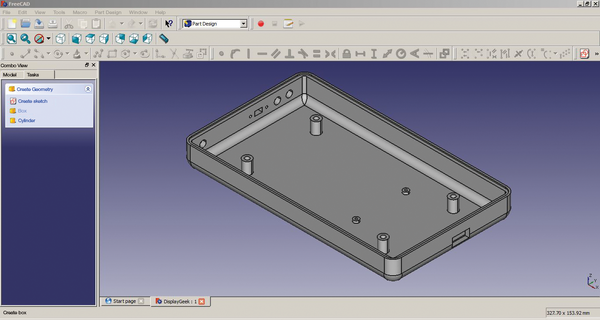 Figure 6: The completed case with supports for the display and notches for the Rasp Pi connectors.
3D Printing the Case
The 3D print services usually accept files in STL format [9]. This is no problem for FreeCAD. To export in STL format, you choose Edit | Select All to include all of the components; then, you export the data with File | Export, thus creating an STL file that can be uploaded to whatever online print service provider you prefer.
I transferred my tablet case to Rapidobject.com, Sculpteo.com, Trinckle.com, and Materialise.com. All four services display a preview and a price depending on the choice of materials. From my experience of transferring the model, I think it is a good idea always to use a preview to prevent pricing issues that might occur if a print service has accuracy problems with the STL file upload. For example, one of the printers contacted for this project came up with a EUR2,000 price tag.
The price for printing the case presented in this article came out to around EUR120 from all of the service providers I considered. This price included delivery, a choice of either black or white plastic, and no labor costs for reworking. The number of options for materials and additional steps is typically fairly large, so it can pay to compare prices among different providers. I chose Sculpteo for the trial print in white and Rapidobject for the trial print in black. Both services delivered the completed product one day early, and each case turned out well. They are expertly worked, stable, and within the small tolerances specified.
The material for the white case is a bit grainy and has a slightly porous surface (Figure 7). It probably wouldn't have been a bad idea to apply a light lacquer coating. The black case from Rapidobject had different issues. The case that arrived smelled strongly of outgassing, and remnants of the Styrofoam packaging stuck to the surface. Rapidobject apologized and promptly sent a replacement without errors.
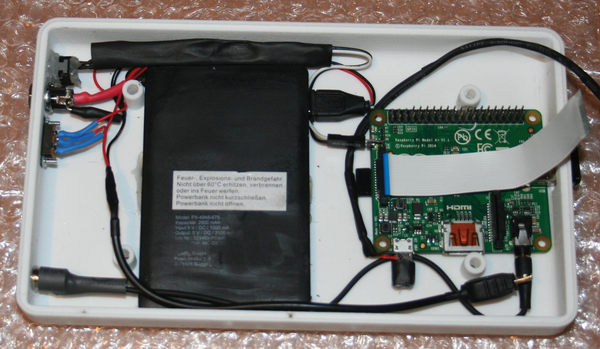 Figure 7: The case delivered by Sculpteo had a slightly porous surface, which could be smoothed out with the option of applying a lacquer.
I was able to use both cases immediately after making a few changes, and it was easy to put together the innards of a functioning tablet by using an old Raspberry Pi (Figure 8).
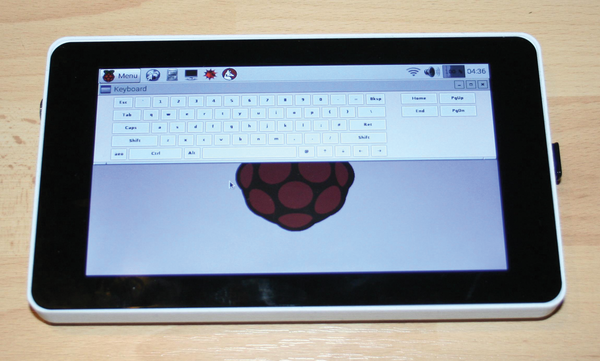 Figure 8: The finished Raspberry Pi laptop boots Raspbian "jessie".
« Previous 1 2 3 Next »
Buy this article as PDF
Pages: 6
(incl. VAT)
Buy Raspberry Pi Geek
US / Canada
UK / Australia
Related content
-
Welcome
Just more than four years ago the first Raspberry Pi was released to overwhelming response. Many people had to wait for their first-generation Pi while production was ramped up to meet the demand. Now you have an entire array of Pis from which to choose, and demand is still so high that you might have to wait for your computer on backorder immediately after a new model is released. Moreover, the quad-core Raspberry Pi 3 has broadened the possibilities of what you can accomplish with the little nanocomputer.
-
pi-top: Laptop made from a Raspberry Pi

The pi-top turns a Raspberry Pi into a mobile computing device that features a high-resolution display and long battery run times. In everyday use, however, this Rasp Pi laptop comes across as stubborn and in need of some fine tuning.
-
Create a customized, 3D-printed case for the Raspberry Pi

The standard Raspberry Pi cases sold in the marketplace do not include space for accessories and add-ons. A DIY case built using a 3D printing service offers a good solution, but some planning is in order.
-
Up close with the Banana Pi

The Raspberry Pi has spawned a new generation of imitators. One of the top contenders is the Banana Pi.
-
Introducing Raspberry Pi-Top

The Pi-Top kit comes with everything you need to build your own Raspberry Pi laptop.
