Installing WiFi on the Raspberry Pi

Lead Image © Zackery Blanton, 123RF.com

No Strings

Integrated Bluetooth and WiFi are important additions to the Raspberry Pi 3. We show you three different methods for adding your Pi to a wireless LAN.

The Raspberry Pi 3 (RPi3) has an integrated radio chip for WiFi and Bluetooth that includes the necessary antennae. This built-in wireless support saves the RPi3 user from the need to invest in a USB WiFi adapter. The antennae are located in a small component found on the upper side of the board, next to the display screen connection (Figure 1). Because of these new wireless components, the Raspberry Pi (Rasp Pi) designers have moved the three LEDs to a new location next to the USB power connection.

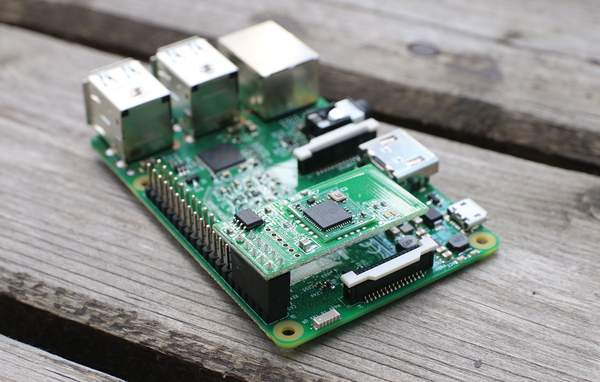
Figure 1: The RPi3 has integrated Bluetooth and WiFi.

Current Raspbian versions support the WiFi chip on the RPi3 without any additional tinkering. Even so, your Pi will need to find its way into your home WiFi setup. If you are running an older Pi system, you will need a USB wireless adapter to join a wireless network. In any case, you have several options for configuring wireless on a Rasp Pi. An easy GUI tool will help you set up your Pi on the home wireless network, but if you have configured your Pi to operate without a graphical interface, you will need different tools to set up the WiFi connection.

This article describes three different techniques for getting wireless networking running on your Rasp Pi:

  • GUI installation
  • manual installation with terminal commands
  • the Wicd-curses text-based configuration tool

Read on, and choose the method that works best for you and your network.

Installing LXDE

To set up your Rasp Pi for a wireless network, the first step is to make sure you have the latest release of Raspbian "jessie" [1], which includes a graphical interface for wireless configuration. When you start the system, the LXDE Desktop appears. The desktop comes with a graphical tool that manages network connections. The tool can also handle the WiFi chip on the RPi3 and also older Rasp Pis that have been outfitted with a suitable WiFi adapter (Figure 2).

Figure 2: Raspbian jessie supports the WiFi chip found on the RPi3 out-of-the-box.

Boot the Rasp Pi, select WiFi from the menu, enter the necessary access data, and the Rasp Pi will go online. The network manager saves the access data so that the system automatically logs onto the Internet in the future.

If you have a light version of Raspbian that comes without a graphical interface, you'll need to generate a WiFi Internet connection via the terminal. After you connect the keyboard and monitor to the Rasp Pi, you are ready to get started.

If you don't want to use a keyboard and mouse, you can temporarily connect the Rasp Pi to the LAN and then search on a Linux computer via arp-scan for the IP address of the headless Rasp Pi (Listing 1). Another way to go about this would be to search for the IP address via the web front end of the user's WiFi router, which usually has an overview of all devices currently active on the network.

Listing 1

arp-scan Search

$ sudo arp-scan --interface=net0 --localnet | grep Raspberry
192.168.178.33  b8:27:eb:e4:e1:30       Raspberry Pi Foundation
192.168.178.35  b8:27:eb:f3:c6:25       Raspberry Pi Foundation

Manual Installation

If you prefer the terminal, you can still get your wireless network up and running with a few simple commands. Start by installing all pending updates, and then restart the system using the apt command:

$ sudo apt update
$ sudo apt full-upgrade
$ sudo reboot

After restarting the Rasp Pi, log in via the terminal or via SSH and start setting up the WiFi connection. The first step is use iwlist scan to ensure the system has a WiFi adapter (Listing 2). The name of the network card for the Rasp Pi is wlan0. If you are using an older Rasp Pi with a USB WiFi adapter, you might see a different name depending on the card.

Listing 2

Looking for a WiFi Adapter

$ iwlist scan
wlan0  No scan results
lo     Interface doesn't support scanning.
eth0   Interface doesn't support scanning.

You can also use the iwlist scan command to search the environment for active WiFi networks. You'll need to call the command with root rights. The egrep command after the pipe symbol will filter the SSIDs for the WiFi networks together with their encryption methods (Listing 3).

Listing 3

Looking for Networks

$ sudo iwlist wlan0 scan | egrep "(ESSID|IEEE)"
        ESSID:"Santa"
        IE: IEEE 802.11i/WPA2 Version 1
        ESSID:"Littlehelper"
        IE: IEEE 802.11i/WPA2 Version 1

In the following example, the Rasp Pi will log itself onto the WiFi network with the SSID Santa. Add the label to the user WiFi by opening the wpa_supplicant.conf file in the /etc/wpa_supplicant directory with root privileges in an editor. Then add the contents of Listing 4 to the end of the file, adapting the SSID and the password accordingly.

Listing 4

Adding a Network

network={
  ssid="Santa"
  psk="password"
}

The system should actually recognize the change to the wpa_supplicant.conf settings and automatically initiate the connection. If this does not work, turn off the WiFi card and then turn it back on:

$ sudo ifdown wlan0
$ sudo ifup wlan0

Afterwards, the WiFi adapter for the RPi3 should log onto the WiFi connection that you just specified and retrieve an IP address via DHCP from the router (Listing 5).

Listing 5

Retrieving an IP Address

$ ip addr show wlan0
3: wlan0: <BROADCAST,MULTICAST,UP,LOWER_UP> mtu 1500 qdisc pfifo_fast state UP group default qlen 1000
  link/ether b8:27:eb:23:4b:43 brd ff:ff:ff:ff:ff:ff
  inet 192.168.178.86/24 brd 192.168.178.255 scope global wlan0
     valid_lft forever preferred_lft forever
  inet6 fe80::ba27:ebff:fe23:4b43/64 scope link
     valid_lft forever preferred_lft forever

At this point, log out of the Rasp Pi, which is still connected via a cable, disconnect the cable, and then use the IP address assigned by ip a, which, in this example, is 192.168.178.86, to generate a new connection via SSH. The user can now log in as usual, but this time without a network cable.

Buy this article as PDF

Express-Checkout as PDF

Pages: 6

Price $2.95
(incl. VAT)

Buy Raspberry Pi Geek

SINGLE ISSUES
 
SUBSCRIPTIONS
 
TABLET & SMARTPHONE APPS
Get it on Google Play

US / Canada

Get it on Google Play

UK / Australia

Related content