Operating the Raspberry Pi 3 in 64-bit mode
Playing Your Cards
Installing the kernel, modules, and device tree is somewhat more complicated. We use a microSD card prepared with the "Xylnao System" [4] as our basis and insert it into the development computer. The Ubuntu we were running automatically mounts both of the card partitions (boot and root) under /media/<User>/. Figure 4 shows this with the output for the lsblk command.
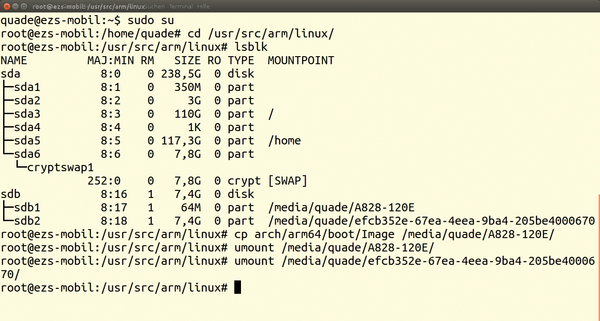 Figure 4: Here, Ubuntu has mounted the microSD card. The cp command only copies the kernel you have compiled yourself to the boot partition as an Image file. Then you can unmount the boot and root partitions again.
There are two possibilities for installing your own kernel: a method for impatient users and the professional method. Impatient users can simply copy the self-compiled kernel arch/arm64/boot/Image to the boot partition (Figure 4). The U-Boot script found on the boot partition will be waiting there under that name, thus saving the need for any modification to the configuration. If you want to make absolutely sure, you should save the 64-bit kernel with the same name that is on the SD card before you overwrite it with your own kernel.
The device tree that is also found on the SD card is suitable for the first test. Therefore you should unmount the card right after copying the kernel and insert it into the Rasp Pi. Once the power is turned on, the computer should boot the self-generated kernel.
How Professionals Configure U-Boot
The professional approach to installation involves copying the kernel under its own name to the microSD card, using the correct device tree, and most importantly, locating the kernel module on the root partition. However, the new names for the kernel and device tree will definitely require that U-Boot's bootloader configuration be modified [6].
Listing 3 shows the U-Boot script, boot.txt. The script gets a U-Boot header with the help of the Mkimage program from the u-boot-utils package (Listing 4). Upon completion of all of these preparations, you will have a fully functional system after unmounting both of the partitions again.
Listing 3
boot.txt
fatload mmc 0:1 ${fdt_addr_r} bcm2710-rpi-3-b.dtb
fatload mmc 0:1 ${kernel_addr_r} Image.4.8
setenv bootargs console=ttyS0,115200 root=/dev/mmcblk0p2 rootfstype=ext4 rootwait rw
booti ${kernel_addr_r} - ${fdt_addr_r}
Listing 4
u-boot-utils package
$ sudo su
# cd /usr/src/arm/linux
//Install Kernel and Device Tree
# cp arch/arm64/boot/Image /media/quade/A828-120E/Image.4.8
# cp arch/arm64/boot/dts/broadcom/bcm2710-rpi-3-b.dtb /media/quade/A828-120E/
//Install Kernel Module
# make CROSS_COMPILE=aarch64-linux-gnu- ARCH=arm64 \
  INSTALL_MOD_PATH=/media/quade/efcb352e-67ea-4eea-9ba4-205be4000670/ \
  modules_install
//Set up U-Boot Script
# cd /media/quade/A828-120E
# vim boot.txt
//Generate Bootloader Script
# apt-get install u-boot-tools
# mkimage -A arm64 -O linux -T script -C none -d boot.txt boot.scr.uimg
By the way, just as with the kernel, the U-Boot bootloader can also be easily generated as a 64-bit version. Download the Git source code on your home computer, set the generating variables ARCH and CROSS_COMPILE, configure U-Boot for the RPi3, and finally, let the boot launch with make.
After this operation is complete, the u-boot.bin file will be found along with others in the bootloader's source code directory. This file represents the prepared 64-bit executable version. To install, you should copy the file to the boot partition of the microSD card (see Table 1). In addition, you will need to modify the config.txt file (Listing 5) that loads in the relevant u-boot-stubbed.bin version. Listing 6 executes the necessary commands.
Listing 5
config.txt
# config.txt
enable_uart=1
# switch CPU into 64-Bit mode:
arm_control=0x200
kernel_old=1
#kernel=uboot-stubbed.bin
# Self generated Bootloader:
kernel=u-boot.bin
disable_commandline_tags=1
# set display Mode to 1920x1080
#hdmi_group=2
#hdmi_mode=82
Listing 6
Execution of config.txt
# export CROSS_COMPILE=aarch64-linux-gnu-
# export ARCH=arm64
# git clone git://git.denx.de/u-boot.git
# cd u-boot
# make rpi_3_defconfig
# make
# cp u-boot.bin /media/quade/A828-120E/
# vi /media/quade/A828-120E/config.txt
[... see Listing 5 ...]
Table 1
Boot Files on the Boot Partition
| File | Meaning |
|---|---|
| bootcode.bin |
Original Raspbian bootloader |
| config.txt |
See Listing 5 |
| bcm2710-rpi-3-b.dtb |
Device tree |
| Image |
64-bit kernel version 4.5 |
| Image.4.8 |
64-bit kernel version 4.8 |
| boot.scr.uimg |
Bootloader script for loading the kernel and device tree |
| uboot.bin |
64-bit bootloader |
Users who want their Rasp Pi to always run with a 64-bit system will need to figure out how to apply the kernel patches that occasionally get released. If you have used the build chain described here, the fix should be simple. The Rasp Pi owner can tap into the pertinent repository using git pull when an update is ready and then cross-compile the kernel again.
« Previous 1 2 3 4 Next »
Buy this article as PDF
Pages: 8
(incl. VAT)
Buy Raspberry Pi Geek
US / Canada
UK / Australia
Related content
-
Capemgr keeps track of the BeagleBone Black's expansion boards, known as capes

The BeagleBone Black offers many interfacing options, but how can you control which ones are used and how they are configured? We take a detailed look at the Black's Capemgr subsystem and the device tree data structure it manages.
-
Distributions for the Raspberry Pi at a glance

Several operating systems are designed to run on the Raspberry Pi. We look at some leading alternatives.
-
Raspberry Pi 1 and 2 compared

The Raspberry Pi 2 looks just like its predecessor, the Rasp Pi 1 B+, and has lots of similarities. However, the freshly hatched second generation is much faster.
-
Using the BMP180 to record air pressure and temperature

The kernel module simplifies access to the BMP180 sensor, allowing you to record the temperature and air pressure with shell commands.
-
Getting up close and personal with openSUSE 42.2

openSUSE is a Linux based, free and open source operating system sponsored by SUSE, the oldest Linux company in existence. You can now run openSUSE on your Pi. In this article you’ll learn how.
