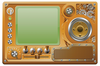
Hack your own Steampunk Arduino/LCD name badge
As a technology speaker, I spend a lot of time talking to people at conferences, and I like to have some gizmo to hand folks as a conversation starter. This works out well, because I'm frequently writing a story about or building a project with the device. Physical hardware and one-off gadgets are absolute geek magnets.
When I received a tiny color LCD display for Christmas, the idea of a programmable name badge immediately came to mind. An unusual name badge would certainly grab people's attention and could be made reconfigurable, so I could change my message, logo, or graphics as needed or even through sensor inputs. Building and using your own projects adds considerable credibility to your story.
I'm also a big fan of Steampunk, and what better way to stand out than to apply that aesthetic to a project? Steampunk encourages lots of creative freedom in the design, and combining Victorian-era elements with modern electronic technology is challenging and just good, clean fun.
[...]
Buy this article as PDF
Pages: 4
(incl. VAT)
Buy Raspberry Pi Geek
US / Canada
UK / Australia
Related content
-
Generation 2 of the Conference Presentation and Manipulation Apparatus
The doctor upgrades a conference slide projection apparatus and adds a retro-clicker with some Python code to keep his talks moving forward.
-
Create a wearable video with Kdenlive

Kdenlive is an easy-to-use Linux video editor with a ton of features that let you create a short video for your Rasp Pi wearable.
-
Display tiny movies on your Pi

Get a tiny color display working on a Raspberry Pi, so you can show your own movies.
-
The Pi Wire
Arduino’s “Invent Your Future” Contest; Fedora for Rasp Pi; New Raspberry Pi Kits for Windows IoT Core; micro:bit Education Foundation.
-
Digital – Analog – Mechanical

As innovative companies consistently push the envelope of progress, antiquated hardware nearly two years old falls by the wayside. We take an old iPad, an Arduino Mega, and various other materials to create an in-dash climate control app.
