Controlling the LM75 temperature sensor on the I2C bus

Lead Image © Mykhailo Ridkous, 123RF.com

Keep Your Cool

The programmable output port of the LM75 digital temperature sensor teams up with a Raspberry Pi to form a temperature monitoring system.

People speak of outdoor temperatures in terms of wind chill, heat index, and other perceived values, but Raspberry Pi fans can get hard facts about temperature with temperature sensors and a little program logic. As part of the ongoing series of articles on the I2C bus, in this article I address the LM75 temperature sensor. This digital sensor has a programmable output port that you can use to build simple systems for monitoring temperatures. This article builds on the basic knowledge presented in the first articles of the series [1] [2].

The LM75 sensor (Figure 1) used for this project is only available as an S08 (8-pin package) with short pins. The hobby-friendly DIL8 (dual-inline 8-pin) version is not available. The S08 has pins with a grid size of 1.27mm. (See the box titled "A Compact Class.") In any event, you will need a steady hand and a good soldering tip.

A Compact Class

A surface-mount device (SMD) is a circuit board with a high density of components achieved by soldering the components directly onto the board. As an added benefit, the entire underside of the board remains free and available for populating with other things.

SMD components use less space on the grid compared with standard electronic components and doesn't require connector pins, which makes construction cheaper. However, the soldering that SMD components require can present a challenge for the amateur. Surface tension that builds up in the solder makes it easy for small and lightweight components to stick to the soldering tip.

To keep the components in place, you can glue them onto the board before soldering, or you can hold them in place with a pair of tweezers. Specialty soldering pastes are commercially available that you can apply to the soldering points and then melt with a hair dryer. Even with this workaround, you will always have to glue the components to the board first before you begin soldering.

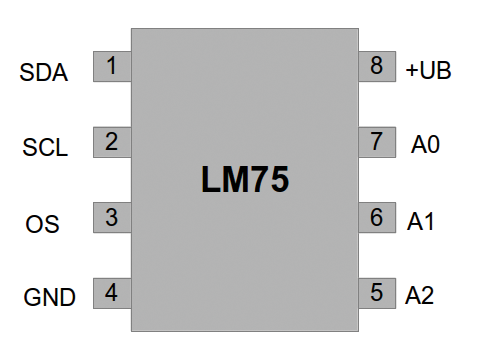
Figure 1: The pin assignment shows the LM75 pinout.

The sensor operates in the 3.3 to 5V range, so you should check the product data sheet before connecting it. The LM75 [3] has three address inputs; therefore, up to eight components can work on one shared bus. The addresses begin with 0x48h and ends at 0x4Fh.

When working on the project described here, it is a good idea to make sure the interrupt, or alarm, output delivers a clean logic level with additional pull-up resistance from an external source. Moreover, you should note that the factory setting for the output is "low active" and the output handles a maximum of 10mA. Therefore, you will need to make sure that the current flow is minimal. Every milliampere creates additional heat, which could potentially affect the validity of the measurements.

Setup

The temperature sensor in this project (Figure 2) acts as a regulator for a fan. When the values rise above a certain level, the sensor switches the fan on, which then runs until the temperature falls back below the level that caused the sensor to trigger it to begin with. To implement this functionality, you need to connect the LM75 with a couple of wires to a DIL8 socket, attach the power supply, and ground all of the address wiring.

Figure 2: A simple test setup is all you need to start working with the temperature sensor.

The SDA and SCL wires should be connected to the Rasp Pi. The LED attaches to the OS output with a 1K resistor to +UB (Figure 3). A small test using the i2cdetect command shows whether everything works properly (Listing 1). If an error occurs, you need to make sure you have installed wiringPi [4] and i2c-tools, as described in the first part of this series [1].

Listing 1

Output from i2cdetect

$ i2cdetect -y 1
     0  1  2  3  4  5  6  7  8  9  a  b  c  d  e  f
00:          -- -- -- -- -- -- -- -- -- -- -- -- --
10: -- -- -- -- -- -- -- -- -- -- -- -- -- -- -- --
20: -- -- -- -- -- -- -- -- -- -- -- -- -- -- -- --
30: -- -- -- -- -- -- -- -- -- -- -- -- -- -- -- --
40: -- -- -- -- -- -- -- -- 48 -- -- -- -- -- -- --
50: -- -- -- -- -- -- -- -- -- -- -- -- -- -- -- --
60: -- -- -- -- -- -- -- -- -- -- -- -- -- -- -- --
70: -- -- -- -- -- -- -- --
Figure 3: The circuit diagram for the LM75 module is comparatively simple.

The LM75 has four internal registers (Table 1). Aside from the configuration register, these include 16-bit registers. Although they can also work with 8 bits, this will reduce the accuracy of measurements by 0.5°C.

Table 1

LM75 Registers

Address

Function

0x00h

Temperature

0x01h

Configuration

0x02h

Temperature switch off value

0x03h

Temperature switch on value

Temperature Measurements

The first test program (lm75.c; Listing 2) reads the temperature from register 0 as a 16-bit register and displays it in the terminal. The low-order byte represents the temperature as an integer. The value in the high-order byte indicates that an additional 0.5°C should be added to the temperature. The source code for the programs in this article can be downloaded from the Raspberry Pi Geek anonymous FTP site [5]. You should compile it as follows:

$ cc lm75.c -lwiringPi

Listing 2

lm75.c

#include <wiringPiI2C.h>
#include <stdio.h>
int main (void) {
  int handle = wiringPiI2CSetup (0x48) ;
  int reg0=wiringPiI2CReadReg16(handle,0x00);
  int temp=reg0&0x00ff;
  int half=0;
  if(reg0&0xff00) half=5; else half=0;
  printf("Temp:%d.%d\n",temp,half);
  return 0 ;
}

To start the program, you enter ./a.out. Then, you should get output that looks like Temp:21.0.

Apparently, the wiringPiI2CWriteReg16() method rotates the 2 bytes. According to the data sheet, though, it should be the other way around, although it won't actually cause any problems.

Buy this article as PDF

Express-Checkout as PDF

Pages: 4

Price $2.95
(incl. VAT)

Buy Raspberry Pi Geek

SINGLE ISSUES
 
SUBSCRIPTIONS
 
TABLET & SMARTPHONE APPS
Get it on Google Play

US / Canada

Get it on Google Play

UK / Australia

Related content