Host a secret chat using Mesh

Secret Code

With Mesh, an unlimited number of Scratch projects can interact by using variables and broadcasts over a local network. We show how to communicate across Mesh by building a multiuser chat program.

Scratch has a secret feature called Mesh that enables multiple projects to interact with one another via broadcasts and variables. To demonstrate the feature, I'll show you how to create a simple chat program, as seen in Figure 1.

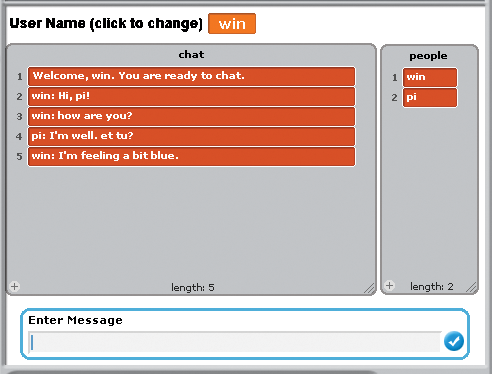
Figure 1: Enable the chat and people blocks to display on the stage and create the chat history.

Depending on your version of Scratch, Mesh might already be enabled. You can check by holding down the Shift key while clicking the Share menu. If you see additional menu items with the word Mesh, you're ready to go. If you do not have the Mesh options under the Share menu, then you need to enable it.

Enabling Mesh requires an edit to Scratch's System Browser. These instructions assume you're working on a Raspberry Pi or other Linux environment; however, the same instructions apply to Mac and Windows, except the running Scratch as root step.

  1. Close Scratch if it's open. Then, from a command line, run sudo scratch to open the application with root privileges.
  2. Shift-click the R in the Scratch logo.
  3. Select turn fill screen off.
  4. Click in the white area that appears at the bottom of the Scratch window, and choose open | browser. A System Browser with a green background displays.
  5. Select Scratch-UI-Panes | ScratchFrameMorph | menu/button actions | addServerCommandsTo.
  6. In the code, change t2 <-- true to t2 <-- false.
  7. Control-click (right-click on Windows; Opt-click on Mac) in the green system browser and click Accept.
  8. Type your initials in the box that appears and click Accept.
  9. Close the System Browser.
  10. Shift-click the R in the logo and choose turn fill screen on.
  11. To save the changes, shift-click the R and choose save image for end-user. If you are running Scratch as a non-root user on Linux, this step will produce an error, and the image will not save. Close Scratch and rerun the steps as root.
  12. When prompted to close Scratch, select yes. You can now run Scratch as the non-root user.

For the record, Mesh is not a feature in the newer, non-Pi Scratch 2.0 version. Scratch 2.0 introduced cloud variables, which provide some similar functionality and work over the Internet; however, chatting as this project demonstrates is banned by the Scratch Team.

Mesh, on the other hand, is designed for local area networks; it can be made to work over the Internet, but you'd need to forward port 42001 on your router to your Raspberry Pi. Port 42001 is the port Mesh uses to send and receive data.

For this project, I'll assume you're working with two or more Scratch projects on a local network. They can be of mixed operating systems. In my test, I used a Raspberry Pi and a Windows machine.

When you launch Scratch on the Rasp Pi after enabling Mesh, it will already be hosting a Mesh session. Other sessions will need your host IP address, which you can get by shift-clicking the Share menu and selecting Show IP address. Unfortunately, Scratch will show 127.0.0.1, which is the localhost IP; you need the IP address of the Rasp Pi. To get the IP address, open a terminal window and run the command ifconfig.

To join a Mesh session, shift-click the Share menu and select Join Mesh. Enter the IP address of the host session and click OK to connect. A Mesh session can host an unlimited number of projects.

To stop hosting a Mesh, shift-click the Share menu and select Stop Hosting Mesh. If you're connected to a Mesh and want to leave, select the Leave Mesh option. As you will see, the menu items you see depend on the status of your Mesh session.

If there was a problem connecting to the host session, Scratch will display an error message notifying you that a connection could not be made. Otherwise, you get no visual feedback in the Scratch interface. To test the connectivity, you need to do some programming.

Programming a Chat Client

Figure 2 shows the initialization script and provides insight into the variables that I chose for the program. The variables are user, message, and myLine. For the variables to work across the Mesh session, they need to be set up for all sprites. I created my scripts on the stage, which automatically creates global (for all sprites) variables. The script also uses two lists named chat and people.

Figure 2: Initialize the project and prompt the user for the text to enter into the chat.

To show the chat history, enable the stage monitor by placing a check next to the chat block in the Variable palette. You can resize the monitor to take up most of the stage, so that you'll have a larger viewing area. As users type messages, each new message will be added to the chat list, creating a history. See the project screenshot in Figure 1.

The second part of the script in Figure 2 uses a forever loop to continually run the ask() and wait text input box. This is the part that allows the user to enter a message for the chat, which can be seen at the bottom of the stage in Figure 1. When you capture input with the ask() and wait block, the information is stored in the built-in answer variable; the value of answer will change each time the user enters text.

After the script collects the user's message, I use nested join() blocks to create a chat syntax of user: <message> before adding the concatenated value to the chat list.

At this point in the script, the chat list on the sender's Scratch project is updated with the message. However, the other connected Mesh sessions will not see the updated chat list. To update the other sessions, take a look at the when I receive (messageSent) script in Figure 3.

Figure 3: Determine whether the chat history should be updated based on a local message or a message from a connected session.

Figure 3 includes some basic error checking to avoid posting duplicate entries to the chat. The first evaluation, if ((myLine) = (yes)), is checking the value of the myLine variable, which is set after the user enters a message. If the value is yes, that means the local Scratch session posted the message, and it's already been updated in the user's chat history. Therefore, the list doesn't need to be updated.

The script also eliminates duplicate posts from other session users, which is the if ((user) sensor value and (message) sensor value) evaluation shown in Figure 3. Note that the value in the sensor value block is user, the same name as the variable that's being used in the project. This sensing block introduces an important Mesh concept. All variable values in the Mesh session are accessible via the () sensor value block, assuming the projects have the same variable names and they're global.

The script relies on a broadcast message to signal the other sessions that there's a new message. All connected sessions receive the messageSent broadcast. Sharing broadcasts is the second way that projects can communicate via Mesh. Figures 2 and 3 show a broadcast in action. In Figure 2, the broadcast sends a message to notify the other sessions that a user joined the chat. It's not pictured, but that broadcast triggers a notification sound on each user's project and sends a broadcast (here) message that can be used to build a list of people in the chat. I'll come back to that later.

In Figure 2, the messageSent broadcast is the piece that notifies the other sessions about a new message to display in the chat. All the chat projects need to listen for the messageSent broadcast, including the user session that sent the message. That's why the error checking was implemented in Figure 3. It prevents reposting duplicate messages each time the messageSent broadcast is received.

Creating a List of People

In Figure 4, you see two scripts that create a list of users connected to the Mesh chat. Each session announces its presence every 60 seconds with a broadcast (here) block. By having each session broadcast its presence, an inclusive list eventually is built. The complete people list could lag by as much as 60 seconds, which is an arbitrary number; you can make the polling interval much less, if needed.

Figure 4: Report and update the list of people connected to the chat.

Is there a better way to obtain a list of people in the chat? Give it a try and find out.

Buy this article as PDF

Express-Checkout as PDF

Pages: 4

Price $2.95
(incl. VAT)

Buy Raspberry Pi Geek

SINGLE ISSUES
 
SUBSCRIPTIONS
 
TABLET & SMARTPHONE APPS
Get it on Google Play

US / Canada

Get it on Google Play

UK / Australia

Related content