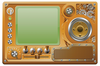
Hack your own Steampunk Arduino/LCD name badge
As a technology speaker, I spend a lot of time talking to people at conferences, and I like to have some gizmo to hand folks as a conversation starter. This works out well, because I'm frequently writing a story about or building a project with the device. Physical hardware and one-off gadgets are absolute geek magnets.
When I received a tiny color LCD display for Christmas, the idea of a programmable name badge immediately came to mind. An unusual name badge would certainly grab people's attention and could be made reconfigurable, so I could change my message, logo, or graphics as needed or even through sensor inputs. Building and using your own projects adds considerable credibility to your story.
I'm also a big fan of Steampunk, and what better way to stand out than to apply that aesthetic to a project? Steampunk encourages lots of creative freedom in the design, and combining Victorian-era elements with modern electronic technology is challenging and just good, clean fun.
[...]
Buy this article as PDF
Pages: 4
(incl. VAT)
Buy Raspberry Pi Geek
US / Canada
UK / Australia
Related content
-
Generation 2 of the Conference Presentation and Manipulation Apparatus
The doctor upgrades a conference slide projection apparatus and adds a retro-clicker with some Python code to keep his talks moving forward.
-
Create a wearable video with Kdenlive

Kdenlive is an easy-to-use Linux video editor with a ton of features that let you create a short video for your Rasp Pi wearable.
-
Display tiny movies on your Pi

Get a tiny color display working on a Raspberry Pi, so you can show your own movies.
-
The Pi Wire
Arduino’s “Invent Your Future” Contest; Fedora for Rasp Pi; New Raspberry Pi Kits for Windows IoT Core; micro:bit Education Foundation.
-
Play classic games on a Raspberry Pi in a Game Boy case

Nintendo's Game Boy was all the rage in the 1990s. Now you can use your Raspberry Pi to breathe life into those classic games.
