Use your smartphone to control an airboat

Lead Image © Elena Kozlova, 123RF.com

Ship Shape

, ,

We combine an Arduino, K'Nex construction pieces, plastic bottles, assorted electronics, and some duct tape to create an airboat that you can control with your smartphone via Bluetooth.

Our project for this issue of Raspberry Pi Geek is building an airboat connected to an Arduino, to which we send commands over Bluetooth from a smartphone. The electrical parts you'll need for this project are listed in the "Electronics" box.

Electronics

For this project, you need the following items:

  • 1x Arduino Uno [1]
  • 3x Fan modules for Arduino ($6 each) [2]
  • 6x AA battery case with power plug ($4)
  • 1x Prototype shield with breadboard ($5) [3]
  • 1x JY-MCU Bluetooth module ($7) [4]

For flotation, we used two medium-sized plastic bottles, and for the frame we used K'Nex pieces (Figure 1) [5]. Duct tape worked well to attach the K'Nex frame to the bottles. One of the fans had fan blades that were molded backward, which is why it is mounted on the back of the frame facing the opposite direction; otherwise, all three fans should face forward. The fans can be attached to the frame with wire or bolts and screws. To protect the Arduino, a plastic container can be taped to the middle of the frame.

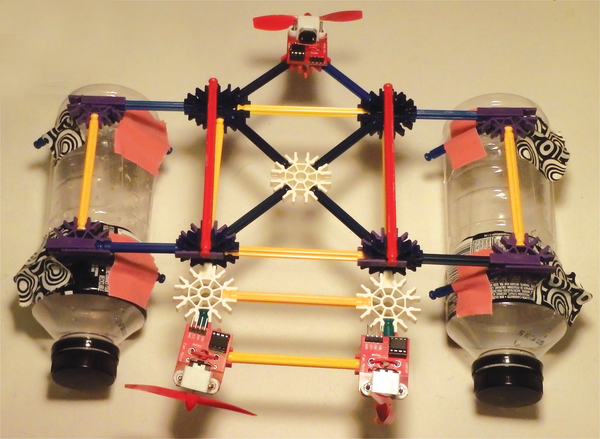
Figure 1: The airboat frame.

Fans

Four fan pins connect to the Arduino: 5V power, ground, and two digital PWM pins (Figure 2). To control the fans use the following settings:

  • INA HIGH and INB LOW = spin fan forward
  • INA LOW and INB HIGH = spin fan backward
  • INA HIGH and INB HIGH = no motion
  • INA LOW and INB LOW = stop forward
Figure 2: Test circuit for one fan.

The fans are powered directly from the Arduino 5V pin, so no extra batteries are needed. The program in Listing 1 is a simple test to ensure that the fan wiring works.

Listing 1

fantest.ino

01 // Test with 1 fan. Turn on, wait 1 second, turn off
02 int INA = 9;
03 int INB = 8;
04 void setup()
05 {
06   // define Fan pins for output
07   pinMode(INA,OUTPUT);
08   pinMode(INB,OUTPUT);
09 }
10 void loop()
11 {
12   // turn fan on
13   digitalWrite(INA,LOW);
14   digitalWrite(INB,HIGH);
15   delay(1000);
16   // turn fan off
17   digitalWrite(INA,LOW);
18   digitalWrite(INB,LOW);
19 }

Bluetooth

For the JY-MCU bluetooth module, you need to cross the TX and RX pins (Figure 3). TXD on the module goes to RX on the Arduino, and RXD on the module goes to TX on Arduino. Bluetooth modules have different default speeds; for us, a baud rate of 9600bps worked.

Figure 3: Arduino to Bluetooth module wiring.

To connect your phone to the Arduino project, you need to download a Bluetooth terminal app. For our Android phone, we got the "Bluetooth Terminal" from Qwerty [6], which is free and easy to use.

The following letters entered into the smartphone terminal will control the airboat:

  • g – go forward
  • s – stop
  • l – left turn
  • r – right turn

The small program in Listing 2 tests the Bluetooth Terminal-to-Arduino connection by echoing the airboat commands as they are entered into the Bluetooth Terminal.

Listing 2

bt_test.ino

01 // Bluetooth to phone test
02
03 char thekey;
04
05 void setup()
06 {
07   Serial.begin(9600); // this speed was our default
08 }
09 void loop()
10 {
11   if (Serial.available() > 0) {
12      thekey = Serial.read(); // get the key from the phone
13      if (thekey == 'g') {
14         Serial.println("Fans are going");
15     }
16     if (thekey == 's') {
17       Serial.println("Fans are stopped");
18     }
19      if (thekey == 'l') {
20       Serial.println("Turn left");
21     }
22      if (thekey == 'r') {
23       Serial.println("Turn right");
24     }
25   }
26 }

Once the Arduino program is running, you need to pair the phone with the Arduino. To do so, go into the Bluetooth Terminal options and select Connect a device – Secure. The phone will scan for devices (Figure 4), and you can select your Arduino device. Ours is called HC-06.

Figure 4: Scanning for Bluetooth devices.

After you select your device, a pairing request page comes up (Figure 5); enter 1234 for the PIN. After the phone and the Arduino are paired, the red light on the JY-MCU Bluetooth module stops blinking and turns solid red. At this point, you can enter g, s, l, or r on the phone and see the feedback (see Figure 6).

Figure 5: Bluetooth pairing request.
Figure 6: Commands that control the airboat echo to the smartphone screen.

Buy this article as PDF

Express-Checkout as PDF

Pages: 4

Price $2.95
(incl. VAT)

Buy Raspberry Pi Geek

SINGLE ISSUES
 
SUBSCRIPTIONS
 
TABLET & SMARTPHONE APPS
Get it on Google Play

US / Canada

Get it on Google Play

UK / Australia

Related content