Mix It Up
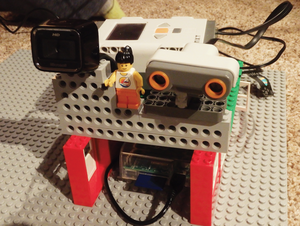
By combining your Lego Mindstorms NXT, a Raspberry Pi, and some stuff from around the house, you can make some cool projects.
The Lego Mindstorms NXT and NXT 2 kits contain software and hardware to create customizable, programmable robots. They include an intelligent brick computer, a set of sensors and motors, and Lego parts to build and support your creations. The Mindstorms NXT and NXT 2 models have been out for about 10 years, so my daughters and I were able to find a used set for about $120.
The first step is to install the Python NXT libraries:
wget https://nxt-python.googlecode.com/files/nxt-python-2.2.2.tar.gz tar -zxvf nxt-python-2.2.2.tar.gz cd nxt* sudo python setup.py install
The Python NXT libraries will work with either USB or Bluetooth. The USB will connect and communicate faster, but we prefer to use the Bluetooth connection because it allows us to work remotely.
The Lego NXT brick needs to have Bluetooth turned on (Figure 1). Check the top left corner of the Brick's screen to see if the Bluetooth symbol is showing. If it is not showing, go into the Bluetooth options and turn it on.
The next step is to ensure that the Raspberry Pi can see the Lego NXT. The Pi can scan Bluetooth devices with the command:
hcitool scan
If the Bluetooth is working, then you will see the Bluetooth address of the NXT. Using the NXT's Bluetooth address, you can pair the Pi and the Lego NXT with the following command:
sudo bluez-simple-agent hci0 <BluetoothAddr>
Use the Bluetooth address you found during your scan. For the pin code use the default 1234. The NXT will beep and prompt you for the pairing passkey (Figure 2).
After the Raspberry Pi is paired with the Lego NXT brick, you can use Python to read the NXT sensors and control the motors. No NXT coding is required. In the Python NXT
directory, you'll find some examples: mary.py
is a good test example because it does not require any sensors or motors.
We used a simple USB webcam connected to the Raspberry Pi to take pictures and the ultrasonic sensor on the Lego NXT to turn on the camera when an object was within range. A lot of options are available for webcam software; we find that fswebcam
is pretty easy to install and use:
sudo apt-get install fswebcam
If the webcam is working, the Python code shown in Listing 1 should create a picture.
Listing 1
Camera1.py
import os os.system('fswebcam -r 384x288 picture1.jpg')
The next step is to have the Pi communicate with the Lego NXT ultrasonic sensor. For this, we used port 4 on the NXT brick. The NXT sensor will return a value between 0 and 255cm. Listing 2 shows the ultrasonic test code.
Listing 2
ultrasonic.py
01 import os 02 import time 03 import nxt 04 from nxt.sensor import * 05 06 b = nxt.locator.find_one_brick() 07 08 while True: 09 distance = Ultrasonic(b, PORT_4,check_compatible=False).get_sample() 10 print 'Ultrasonic:', distance
Once the webcam and the ultrasonic code are working, you can put the two pieces together. For our setup, we put the CritterCam next to our cat feeder. You will need to set a distance that triggers the camera – for example, 50cm. We named the pictures 1.jpg
, 2.jpg
, and so on. Listing 3 shows our full CritterCam code, and Figure 3 shows our setup next to the cat feeder.
Listing 3
crittercam.py
01 #!/usr/bin/env python 02 import os 03 import time 04 import nxt 05 from nxt.sensor import * 06 07 print 'looking for NXT ... could take 15 seconds' 08 b = nxt.locator.find_one_brick() 09 10 filecnt=0 11 while True: 12 distance = Ultrasonic(b, PORT_4,check_compatible=False).get_sample() 13 14 if distance < 50 : 15 print 'You are close Iam going to take your picture' 16 filecnt = filecnt + 1 17 filename = str(filecnt) + '.jpg' 18 os.system('fswebcam -r 352x288 ' + filename) 19 time.sleep(1)
Some possible future CritterCam projects include sending an email or text message with a picture or creating a video rather than a picture.
Pages: 4
Price $15.99
(incl. VAT)