Green Garden
A greenhouse environment has to be just right. The temperature can't climb too high or sink too low, and the plants need water. Why not put your Raspberry Pi to work as the gardener?

Lead Image © Dietmar Hoepfl, 123RF.com
A greenhouse environment has to be just right. The temperature can't climb too high or sink too low, and the plants need water. Why not put your Raspberry Pi to work as the gardener?
We have a new greenhouse in the back yard, and I am singlemindedly thinking up new ideas to accomplish the daily tasks that go with operating it. Will I have to open and close windows and water plants manually? I had the bright idea of using a Raspberry Pi as the control unit for the greenhouse, with a few sensors and a solar panel to provide electricity (Figure 1).
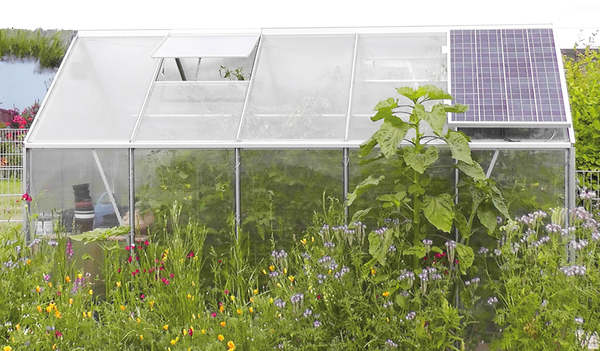 Figure 1: The finished Rasp Pi greenhouse with a solar panel on the roof.
The interior of a greenhouse is not supposed to overheat, especially in the middle of the summer. The need to provide summer cooling is one of the reasons that several vents are typically built into the roofs of greenhouses.
The first problem is a supply of power for the Rasp Pi. Because the Raspberry Pi only consumes about 3.5 watts, it should be possible to meet all of its power needs with solar energy. However, I can't count on a steady supply of sunshine. Sunlight is easy to find in the summertime, but gray winter skies are a problem where I live. The control system must provide a way for the greenhouse to continue operating, even in the complete absence of sunshine.
My approach to the design of a solar-powered electricity supply is that the system should be usable even in the depths of winter and during protracted periods of rainy weather. Moreover, the system should produce enough energy so that reserves are available for other projects. You are free to modify these goals as necessary to fit your own system.
I assume the Raspberry Pi needs 12W with all of the add-ons and losses. The actual amount is probably somewhat lower, but taking 12W as a suggested value makes the arithmetic easy because the battery provides 12V. Therefore, 1A of electricity gives a rate of power consumption of 12W. The following list shows that I come fairly close to actual values when using the 12W figure as an estimate:
In general, you need to assume a loss of 20-30 percent of the net power of the system (see the box titled "Power Loss").
Power Loss
Additionally, the life of the battery decreases more rapidly with deeper discharge. Therefore, it makes sense to get a slightly larger battery than necessarily needed for the design. You can use the formula P = U x I to compute the power (P, watts) from voltage (U, volts) and current (I, amperes).
You can figure out the capacity requirements of the battery from the length of time the Raspberry Pi needs to function without sunshine. A 12V battery with a 100Ah capacity provides 1A of electricity over a period of 100 hours. It therefore delivers 100 hours of the 12W that are required. This would suffice for four days of complete darkness, which should be more than enough.
The capacity required from the solar panel can be determined from the number of hours of sunlight during which the battery can be charged. A 120W solar panel at 12V delivers 10A per hour in maximum sunlight. Therefore, the panel can completely charge a battery having a 100Ah capacity in just under 10 hours. The amount of charge can be calculated using the formula W = P x t, where work (W, Amp*hours) is obtained from power (P, watts) and time (t, hours).
The Wp (watt peak) value assigned to solar panels approximates the so-called peak capacity (i.e., the maximum capacity possible under optimal conditions). Normal conditions of operation result in up to 20 percent less capacity. You must also take into consideration that the charge regulator needs to be able to tolerate the theoretical value.
After thoroughly researching the matter, I decided on a 100W solar panel with an 80Ah battery and a simple PWM charge regulator (see the "Warning" box). Batteries and solar panels of a smaller size are usually more expensive than those intended for use in home construction.
Warning
Twelve volts does not represent a physical danger for a human being; however, you should still exercise caution because a short circuit can cause a battery to deliver several hundred amperes of electricity. For this reason, powerful batteries always have very large terminals. The amount of electricity produced by a short circuit can cause the clamps on battery cables to start glowing. The inside of the battery also heats up significantly. When this happens, battery acid can leak out or the housing can burst. For all of these reasons, you should make sure that you connect the battery carefully and always use the correct terminals.
Using these component parts, I hope to be able to bring the system through the winter and plot temperatures for an entire year. As soon as the outside temperature drops, the fans should not require much energy at all. The electrical power generated by the solar panel should be sufficient for the operation of the Rasp Pi even during periods of little sunlight.
When wiring the solar electric power system, I made sure I used wires with a minimum diameter of 2.5mm2. I adopted the connection layout from the instructions for the charge regulator I selected. In turn, I protect the regulator and the wiring from rain and bad weather with a waterproof housing.
Once the solar electrical power system was in place, I put together the hardware that controls the greenhouse.
To avoid damage to the Raspberry Pi that might otherwise be caused by the greenhouse environment, I packed the computer and the electronic charging system into a waterproof housing. The handful of electronic components can be soldered onto an off-the-shelf circuit board. The circuit layout, which you can download from the Raspberry Pi Geek FTP site [1], provides an overview of how everything fits together.
Because the GPIO interface 3.3V is insufficient to start the switching action of the MOSFETS, I build a small preliminary stage via a photocoupler. This approach also saves the life of the Rasp Pi in the case of a surge in the power amplifier. The MOSFETS get mounted on cooling elements because they become very hot running in PWM mode. Running in pure switching mode would not require cooling.
To make the assembly easier in the greenhouse, I placed all connections on a terminal strip. As described in the box titled "Making 5 Out of 12," a DC to DC converter assumes the role of voltage supply. Figure 2 shows how the intelligent greenhouse control looks when assembly is finished and it is mounted in a waterproof housing.
Making 5 Out of 12
To get the 5V needed by the Raspberry Pi out of the 12V from the solar energy electrical system, I use a DC to DC converter TSR 1-2450 from the Traco Power company [2]. The converter works better than a linear voltage regulator because it has significantly less power loss. In this case, a linear regulator would convert more power into heat than the power the Rasp Pi needs to operate. The TSR 1-2450 achieves an efficiency factor of more than 90 percent in this project and produces almost no heat. With respect to voltage supply, it is possible to supply voltage to the Raspberry Pi over pin 2 (+5V) and pin 6 (0V) on the GPIO interface, so there is no need for a USB cable.
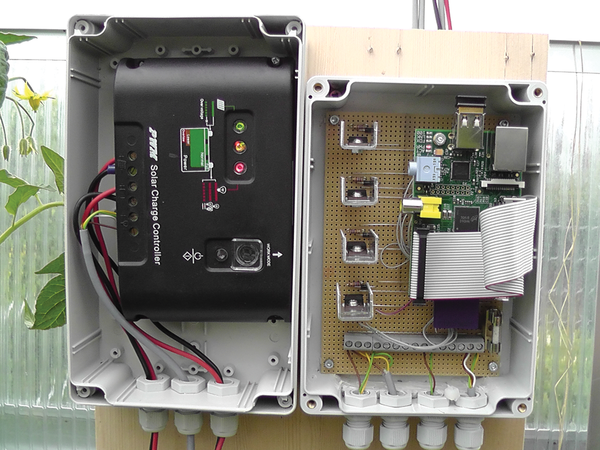 Figure 2: The greenhouse control board when completely assembled.
Don't place artificial limits on yourself when you implement your own system; however, you should remember the mundane and yet very necessary items like an on-off switch. The Raspberry Pi itself doesn't have one, and it's connected directly to the power supply. Figure 3 shows the pinouts of all the semiconductors that were used.
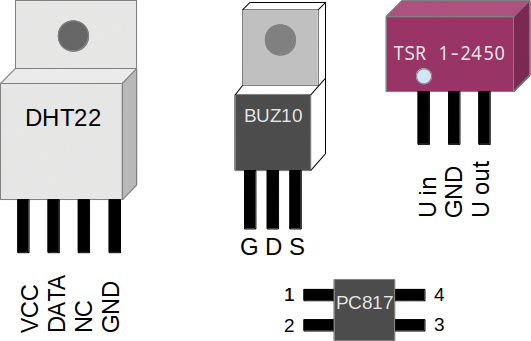 Figure 3: Knowledge of the pinouts is helpful when populating the circuit board.
The circuit layout in greenhouse_2.sch shows the disposition of the DHT22 [3] humidity and temperature probes, the ordinary PC fans used for ventilation, and a 12V submerged pump (available in home building supply stores) for watering the plants. A laboratory power supply replaces the battery and the solar panel during test mode.
An updated version of Raspbian on an SD memory card serves as the basis for the software. The card should have a minimum 8GB capacity for applications and data to plan for the long term. After installing the system, you should download several updates and install an Apache web server, a MySQL database, and the tools needed to compile the programs (Listing 1). When installing the database server, you will be asked to set a MySQL root password; remember it, because you need this password later.
Listing 1
Update and Install Software
$ sudo apt-get update && sudo apt-get dist-upgrade
$ sudo apt-get install apache2 mysql-server php5-mysql build-essential git-core
After installing the component parts of the server, you'll need the WiringPi library [4], which allows you to read the GPIO interface with a simple command:
$ git clone git://git.drogon.net/wiringPi
$ cd wiringPi
$ ./build
Compiling the program takes a while because the Rasp Pi does not exactly run like lightning. Once the build is finished, you should perform the first test and read the data from the GPIO ports with gpio readall (Listing 2).
Listing 2
Reading the GPIO Ports
$ gpio readall
+----------+-Rev2-+------+--------+------+-------+
| wiringPi | GPIO | Phys | Name   | Mode | Value |
+----------+------+------+--------+------+-------+
|      0   |  17  |  11  | GPIO 0 | IN   | Low   |
|      1   |  18  |  12  | GPIO 1 | IN   | Low   |
|                      [...]                     |
|     19   |  30  |   5  | GPIO10 | ALT2 | Low   |
|     20   |  31  |   6  | GPIO11 | ALT2 | Low   |
+----------+------+------+--------+------+-------+
Now the DHT22 temperature and humidity sensors need a driver, which is available from the developer's GitHub page [5]; build it according to Listing 3. This build process will also take some time. Once it is completed, you should read the two DHT22 sensors with loldht (you need root privileges):
Listing 3
DHT22 Drivers
$ git clone https://github.com/technion/lol_dht22
$ cd lol_dht22
$ ./configure
$ sudo make install
$ sudo loldht 8
$ sudo loldht 9
At this point, you can define sensor 8 for the interior of the greenhouse and sensor 9 for the exterior. I use the PWM output of the Rasp Pi for controlling the fans. Although these are not so easy to configure, you should not let this stand in the way of making an attempt. Pin 12 is intended for the PWM operation:
$ gpio mode 1 pwm
$ gpio pwm-bal
$ gpio pwmr 100000
$ gpio pwm 1 14000
For the fans used in this project, the values range between 14,000 and 17,000. The values vary from fan to fan; therefore, it is best to determine the upper and lower limits for each of the fans in use. You will need to enter these values in later scripts.
The data collected by the sensors is saved in a MySQL database to be evaluated later and displayed in a graph. The best way to install the database is to use the datalogger.sql SQL file downloaded from the FTP site:
$ mysql -u root -p < datalogger.sql
Otherwise, you will spend a lot of time typing.
The SQL script automatically sets up the username datalogger together with a database and password of the same name. The script creates the tables datalogger and history. You should make sure that mysql does not use the root password of the operating system but rather the root database user password that was chosen during the installation of the MySQL server. Using scripts, you can then log five values into the tables: date, sensor, temperature, humidity, and pwm.
The datalogger and history tables differ from one another by the column pwm, which appears only in the datalogger table. This column holds the values produced by the fan-regulating algorithm. Graphs generated from the history table show the course of changes in temperature and humidity, so you don't need the PWM data.
Apache serves as the webserver for our greenhouse. If you prefer a more lightweight server, then you can use Lighttpd or Cherokee. All that is necessary is that the webserver be able to execute PHP scripts. If you have followed the guidelines in this article, then Apache is installed along with MySQL.
To determine whether the Apache and PHP installation was successful, you should run a small test script:
$ echo '<?php phpinfo();?>' | sudo tee -a /var/www/phpinfo.php
Afterward, you can monitor the installation via http://<RaspPI-IP>/phpinfo.php. Either the ipconfig or, in a pinch, the information that comes up on the screen when Raspbian boots, will provide the IP address.
Now it is time to orchestrate a working relationship among all of the component parts. The PHP scripts are triggered by cron jobs. They assume the task of orchestrating a working relationship among the parts. You should copy these scripts into /var/www/.
The scripts I have developed include sensor.php, which reads sensor data and writes it into the database every 60 seconds, and fan.php, which another cron job calls up every five minutes to control the fans on the roof.
The algorithm works according to very simple logic: When the temperature in the greenhouse reaches a maximum value defined in the script, the fans start with a minimal rotation speed. If the temperature is still too high at the next iteration, the rotation speed increases. As soon as the temperature falls below the lower limit, the fans stop completely, because the greenhouse should not cool down too much.
You should enter the PWM values in fan.php that you found earlier when testing the fans. The critical temperature level at which the ventilators should start up should also be adapted to local conditions and the plants you are growing.
To keep the plants from dying of thirst, two additional cron jobs and accompanying scripts provide for regular watering. Executing pumpon.php every evening starts the pump, and pumpoff.php turns it off after a few minutes. The index.php script offers an overview of the data relating to the current environment in the greenhouse, as well as a small history of data from the preceding day.
Every night history.php starts via a final cron job. The script writes a dataset every hour of averages from the history database table. Afterward, it erases the original data that had been gathered every 60 seconds. This process reduces the number of datasets collected per sensor per day from 1,440 to 24 so that disk space on the Rasp Pi is not overwhelmed.
It is best to bundle the cron jobs together as raspi-greenhouse-cron under /etc/cron.d. Listing 4 moves the file into the correct folder and makes it executable. You should adapt the running times for your pump to the needs of your plants. Wikipedia does a good job of explaining the syntax of a cron job [6].
Listing 4
Bundling Cron Jobs
$ sudo mv raspi-greenhouse-cron /etc/cron.d
$ sudo chmod +x /etc/cron.d/raspi-greenhouse-cron
A more elegant solution would not use root rights for every call, because only loldht requires such rights; however, I am only controlling a home greenhouse, so this simplification is perfectly acceptable.
Once hardware and software are in harmony and your Raspberry Pi is able to display its green thumb, you might wonder how you can further develop your Rasp Pi greenhouse. For example, it should be possible to obtain more information about the status of the plants and the greenhouse. It would certainly not be a bad idea to monitor the rotation speed of the fan motors and generate a warning if one of the fans stops working. Also, a webcam could document the day-to-day growth of the plants.
Although you won't be able to get the Rasp Pi to pull weeds and hunt down slugs, who knows? Maybe a development in the future will take care of those problems.
Infos
[...]
Pages: 6
US / Canada
UK / Australia

Keeping up with a garden is a lot of work. Luckily, with a Raspberry Pi, you can automate your greenhouse.

A successful solar power project requires data analysis and the ability to modify the system to take advantage of prevailing weather conditions.

Take your first steps in building a solar-powered robot.
The past year has seen a continued emphasis on STEM (science, technology, engineering, and mathematics) education in English-speaking countries.

Your Android device can be a versatile companion for Raspberry Pi. We describe some useful apps to help you make this happen.

Price $15.99
(incl. VAT)