Build it and you will learn: Building an RPi2 cluster
Master Node
The master node is the heart of the system. It is the "director" of the cluster. On production systems, the master node doesn't usually run jobs or user applications, but on this low-cost cluster, I will run applications on the master node.
A number of Linux distributions are available for the Raspberry Pi; however, the Raspbian distribution, which is based on Debian, is the most popular. I will use Raspbian as the cluster OS.
It is a good idea to boot the master node to the command prompt and not a desktop – so memory isn't used for X or GUI tools – is desirable for an HPC system.
Be sure your Raspbian master node is connected to the Internet and install:
gfortran(for Fortran code)hwlocchkconfigtclandtcl-dev(needed by OpenLava)ncurses-common,ncurses-bin,ncurses-doc(needed by OpenLava)libncurses5-dev(needed by OpenLava)mailutils(needed by OpenLava)gkrellmluaandlua-dev(needed by Lmod)lua-filesystem(needed by Lmod)lua-posix(needed by Lmod)nfs-kernel(needed by NFS)nfs-common(needed by NFS)portmap(needed by NFS)
Raspbian uses the apt-get package manager. For example, to install Fortran, use the following command:
sudo apt-get install gfortran
Apt-get will ask if it's OK to install or not; enter y to continue. Install of all of the packages listed above in the same fashion, and you will have everything needed to build the cluster tools.
Network Configuration
Ideally, every node in the cluster should have a static IP address, especially the master node. A static IP allows you to associate an IP address with a particular physical server. If a problem pops up with the server or the IP address, you know where to go to investigate. Plus, it makes configuring a resource manager a bit easier.
Configuring a static IP on the Raspberry Pi with Raspbian is very easy. Several tutorials [2] explain how to do it.
The first step is to run the command ifconfig. Take note of the following information for eth0 (the built-in Ethernet port).
IP address (inet addr:)
Broadcast address (Bcast:)
Netmask (Mask:)
The next set of information needed can be obtained from the command netstat -nr. From the output, write down the following information:
Gateway address (first row under Gateway)
Destination (second row under Destination)
With these five bits of information, the static IP address of the master node can be set. The IP address can be changed, and the other information will have to change as well. For example, when the RPi2 first booted, it received IP 192.168.1.44 from the DHCP server. For the master node, I kept the same 192.168.1.x network and changed the other network information, as follows:
- IP address: 192.168.1.25 (my choice)
- Bcast: 192.168.1.255
- Netmask: 255.255.255.0 (allows up to 256 nodes)
- Gateway: 192.168.1.254
- Destination: 192.168.1.0
With this information, the next step is to edit the file /etc/network/interfaces. The line that begins iface eth0 inet should be changed to read
iface eth0 inet static
Next, erase or comment out the auto eth0 line in the file and add the preceding information to the file right after this line. The file should look something like Listing 1. Reboot the master node for the network changes to take effect.
Listing 1
/etc/network/interfaces for Master Node
pi@raspberrypi ~ $ more /etc/network/interfaces
auto lo
iface lo inet loopback
# auto eth0
allow-hotplug eth0
iface eth0 inet static
address   192.168.1.25
netmask   255.255.255.0
network   192.168.1.0
broadcast 192.168.1.255
gateway   192.168.1.254
auto wlan0
allow-hotplug wlan0
iface wlan0 inet manual
wpa-conf /etc/wpa_supplicant/wpa_supplicant.conf
After rebooting, check the network configuration with ifconfig. The output should look something like Figure 2. Now's a good time to check the web browser to make sure it can access the Internet.
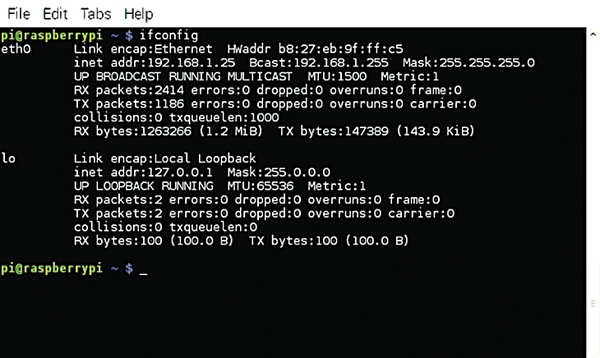 Figure 2: Example ifconfig output.
The master node will need to be on two networks. I'll use the built-in Ethernet port on the master node for accessing the world outside of the cluster, and I'll add a second Ethernet adapter to the master node to connect it to the computational network. I chose to use a USB Gigabit Ethernet adapter, even though the Rasp Pi cluster would not run at full Gigabit Ethernet speeds, because I could reuse the adapter at a later date (maybe when the Rasp Pi gets USB 3.0). The USB 2.0 found on the RPi2 isn't capable of Gigabit performance.
On this second network, I used a 10.0.1.0/24 CIDR block, and the master node eth1 interface was set to 10.0.1.25, similar to the master node's eth0, to separate the two networks from each other. Next, I edited the /etc/network/interfaces file and added the sections in Listing 2 for new Ethernet interface eth1 under the eth0 and wlan0 entries.
Listing 2
/etc/network/interfaces
[...]
allow-hotplug eth1
iface eth1 inet static
address   10.0.1.25
netmask   255.255.255.0
network   10.0.1.0
broadcast 10.0.1.255
gateway   10.0.1.254
[...]
auto wlan1
allow-hotplug wlan1
iface wlan1 inet manual
wpa-conf /etc/wpa_supplicant/wpa_supplicant.conf
The final network configuration step is to edit the file /etc/hosts to add the new interface to the list of hosts, as well as the new static IP for the primary interface. For the master node, the file /etc/hosts should look like Listing 3, except naming the hosts is up to you.
Listing 3
/etc/hosts
pi@raspberrypi ~ $ more /etc/hosts
127.0.0.1       localhost
::1             localhost ip6-localhost ip6-loopback
fe00::0         ip6-localnet
ff00::0         ip6-mcastprefix
ff02::1         ip6-allnodes
ff02::2         ip6-allrouters
192.168.1.25    raspberrypi
10.0.1.25       raspberrypi-master
The localhost line remains the same, but the two lines at the end are for the primary interface (192.168.1.25), which is left as raspberrypi, and the new interface (10.0.1.25), which is labeled raspberrypi-master to distinguish it from the compute nodes. These hostnames are arbitrary, but they really shouldn't be the same.
Before proceeding to configure the cluster tools, it is critically important that you should be able to SSH to/from the master node without passwords. This includes being able to SSH to the master node itself, which will allow parallel MPI applications to communicate with each other and for cluster tools such as pdsh and OpenLava to function correctly.
To get passwordless SSH working on the master node, first erase everything in the .ssh directory of user pi and create a new SSH key:
pi@raspberrypi ~ $ rm ~/.ssh/*
pi@raspberrypi ~ $ ssh-keygen -t rsa
Answer the questions, but be sure you just hit Enter for the password. By setting it up this way, you won't need a password for SSH. Now you should have two files in the .ssh directory: id_rsa and id_rsa.pub. The first file is the private key, and the second file is the public key.
At this point, you are almost done, but you need to copy the public key to two files in .ssh:
$ cp ida_rsa.pub authorized_keys
$ cp ida_rsa.pub authorized_keys2
The last step is to SSH from the master node to the master node. It will ask you if you want to add the node to the list of known_hosts. Just hit Enter to add the master node to the list of known hosts. From now on, you can SSH to the master node without a password.
Buy this article as PDF
Pages: 2
(incl. VAT)
Buy Raspberry Pi Geek
US / Canada
UK / Australia
Related content
-
Add some security to your projects

Blank RFID (Radio Frequency ID) cards along with a USB-based RFID card reader can offer an easy and low cost solution for your Pi security projects.
-
An experiment in creating clusters and distributing loads with Raspberry Pis

The Raspberry Pi makes an ideal LAN server; connect several Rasp Pis and a low-cost root server, and you have a cluster before you know it.
-
The Rasp Pi serves up a tempting web server

The Raspberry Pi is a great web development tool for building home web servers, allowing you to experiment with Linux packages and test scripts locally before moving them to a production server.
-
Monitoring Raspberry Pi temperatures

Retrofitting a Raspberry Pi with a cooling element does not cost much; however, does the Rasp Pi really need one?
-
Installing FHEM on the Raspberry Pi

The FHEM home automation software is not yet part of the Raspbian package sources. We show you how to install it manually on a fresh Raspbian system.
