Create a remote control motorized robot arm
Android Program
To control our robot we wrote an Android app using the free App Inventor package [7]. App Inventor is a web based application that runs on Windows, Mac, and Linux.
To use App Inventor, you need a Google account. For this we used the same Google account that we use with our Android phone, but you could use a separate Google account if you wish.
If you have an iOS device, check out the Kino App Inventor [8]; if you have a Windows phone, look at Windows Phone App Studio [9].
App Inventor has two screens for phone app creation. The first screen is accessed by pressing the Designer button in upper right corner. The Designer screen is used to create the layout and the look-and-feel of the application. For the second screen, click on the Blocks button. The Blocks screen is used to create the logic or program for your app. App Inventor programming is similar to programming in Scratch.
In the Designer screen, simply select the item that you want from the User Interface Palette and drop it into the middle Viewer screen. Once a component is put into the Viewer window, that component is given a default name and properties.
For our application we used the following visible components:
- 1 TableArrangement
- 1 Listpicker
- 15 Buttons
- 7 Labels
We also used the BluetoothClient non-visible component.
We used a TableArrangement component with 3 columns and 11 rows (Figure 5) to position all of the buttons and labels. After a component is positioned within the table, select the component and then use the Properties window to change its text, color, or sizing. The Components window is used to rename the component itself.
 Figure 5: AppInventor layout screen with our three column TableArrangement component.
In the Blocks screen, blocks are dragged from the left Blocks section to the main viewer section. For the robot app the following key blocks are used (upper left corner of Figure 6):
when Screen1.Initialize. This is called when the app is opened. It will show a list of all the phone's paired Bluetooth devices. This list is generated by connecting the blocks:BluetoothClient1.AddressesAndNamesto setListPicker1.Elementswhen ListPicker1.BeforePicking. This block is called after the JY-MCU Bluetooth module (typically HC-06) is selected. Inside this blockListPicker1.Selectionis an input to theCall BluetoothClient1.Connectblock.when <button>.Click. This block is called when a "command" button is clicked. This block will send the required Bluetooth text command, so for example g is sent to go forward, and s is sent to stop.
The complete Android application logic is shown in Figure 6.
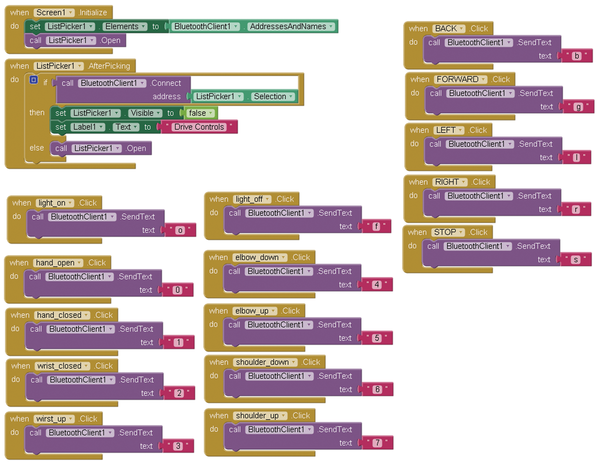 Figure 6: Complete App Inventor logic for the Android application.
To put your new app onto your Android device, you can either save it as an APK file (the native Android application file format), or you can download your app directly using a QR (Quick Response) code. You can select either option from the Build menu.
If you save your app as an APK file, you can email it to your friends or move your application to a microSD card. If you want to install your app with the QR code method, you'll need to install one of the many free QR code readers on your phone [9]. We found that the QR code method was the fastest and simplest approach.
Running the App
When you power up the Arduino project the Bluetooth module should be blinking red. The next step will be to pair your phone with the JY-MCU Bluetooth module. In your phone's Setup > Bluetooth Settings you will be able to scan for new available devices. If everything is working correctly you will see a new device. HC-06 is the default device name for the JY-MCU Bluetooth module.
Select the new HC-06 device and pair with it using the pairing code 1234. When your phone has completed the pairing process the Bluetooth module will stop flashing and turn a solid red.
Once the robot and the smart phone are paired you can run your new app. When the app is first opened a dialog will come up asking which device to connect to. Select your HC-06 device once again (Figure 7). After your Robot Control App has connected you will see your designer screen (Figure 8) and you will be able to fully control your mobile robot arm.
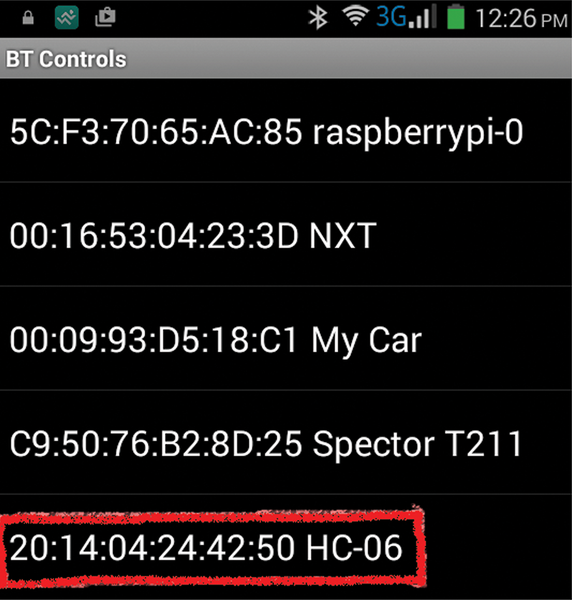 Figure 7: Connecting to your robot.
 Figure 8: Your Android robot control app.
« Previous 1 2 3 Next »
Buy this article as PDF
Pages: 5
(incl. VAT)
Buy Raspberry Pi Geek
US / Canada
UK / Australia
Related content
-
SunRover Part 2 – Solar Power Controller/Power System

Putting power in your robot is more than just running wires – you'll need to make sure the power supply doesn't cause interference that will disrupt other components. This article explores the problem of electrical noise and describes the design for a multiplexing solar power system.
-
Building the SunRover navigation system

The Switch Doc continues his effort to build a solar-powered robot. This month the emphasis is on the navigation system.
-
Digital – Analog – Mechanical

As innovative companies consistently push the envelope of progress, antiquated hardware nearly two years old falls by the wayside. We take an old iPad, an Arduino Mega, and various other materials to create an in-dash climate control app.
-
Building Rasp Pi into Mindstorms projects with BrickPi

BrickPi lets you build a Raspberry Pi into your Lego Mindstorms projects – you can even connect your Pi to Mindstorms sensors and motors.
-
Bring old toys back to life with Arduino: Part II

Robotics are all the rage, and those old high-tech toys you might have lying around are ideal candidates for the Frankenstein/Arduino treatment.
