A Scratch-like language for 3D
Basic Shapes
One of the cool things you can do with Beetle Blocks is draw a shape at the beetle's position. Open the Shapes category and drag out…

… then click on it. The beetle will draw a sphere. This may not sound like much, but think of the applications: this is probably the easiest way to draw and visualize 3D objects.
Take for example, the code, in Listing 1. It uses this technique of moving the beetle and drawing an object to generate a complex 3D function. It essentially consists of a loop within a loop, the innermost counts from -10 to 10 for y the position of the beetle.
Box 1
cos(y) * sin(x)
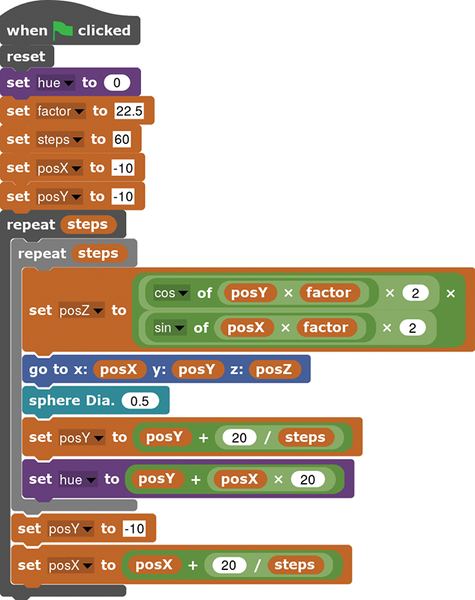
The outer does the same for the x position. z, the vertical position of the beetle, is the result of multiplying the cosine of y by the sine of x. You then use a go to block with your x, y and z values to simply draw a sphere.
This generates the rather marvelous-looking 3D graph shown in Figure 5.
 Figure 5: The cos(y) * sin(x) function shown in 3D.
The other thing you can do is extrude. This makes the beetle leave a 3D trail as it "walks". The program in Listing 2 shows how to do this and builds the "sausage pyramid" seen in Figure 6.
Box 2
sausage pyramid
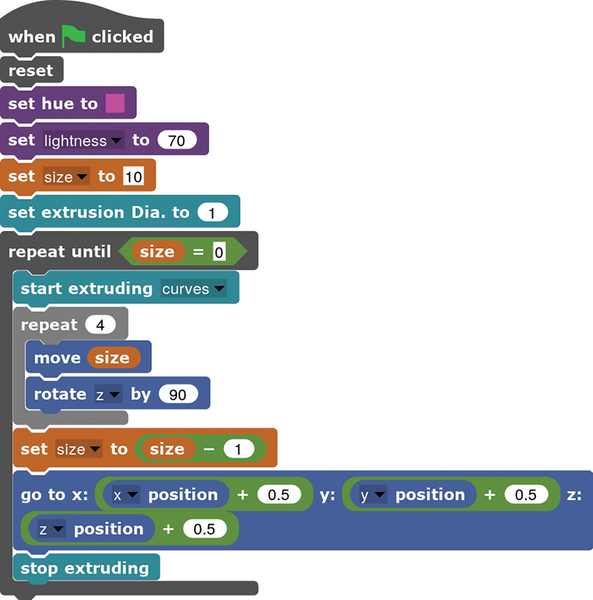
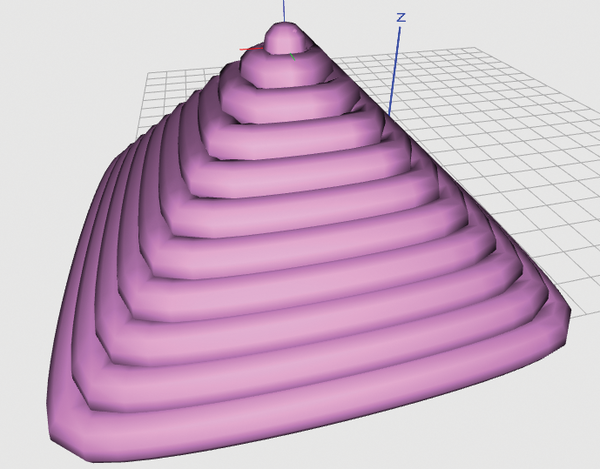 Figure 6: The rather unsettling "sausage pyramid" is created using Beetle Blocks' extrude feature.
Your own shapes
Beetle Blocks is based on Snap! [3] and, as we explained in issue 6 [4], this means you can combine blocks to build your own instructions. Right click on an empty region in the central workspace and a menu will pop-up. Choose Make a block and Beetle Blocks will then bring up a wizard which will allow you to create your own by combining several basic blocks. This means you can use the block editor to create more and more complex shapes from basic shapes and embed them in your own blocks to simplify your programs.
At some stage you will want to save your programs permanently to your hard disk. You can do this by clicking on the file icon in the upper toolbar and selecting Download project as…. You can then download your work as an XML file. You can open your program later in any other instance of Beetle Blocks by choosing Import project or blocks from the File menu. The XML file also saves all the custom blocks you may have created for the project.
You can also extract your custom blocks from the project and save them independently to re-use them later in other projects. Click on the File icon at the top of the screen and this time choose Download My Blocks as…. This will open a window showing the custom blocks you created for the project. You can then mark the ones you want to save. Import your blocks into a new project by selecting Importing project and blocks… from the File menu and the navigating to where you saved the XML file containing the blocks.
Another interesting entry within the File menu is the option to export your 3D object as an STL file. Click on File and go to Download 3D model as… and pick STL. STL is quickly becoming the standard file format used to exchange 3D objects between different applications (Figure 7). This has an exciting side effect; whatever you tell the beetle to draw can later be turned into a physical object thanks to the magic of home 3D printing.
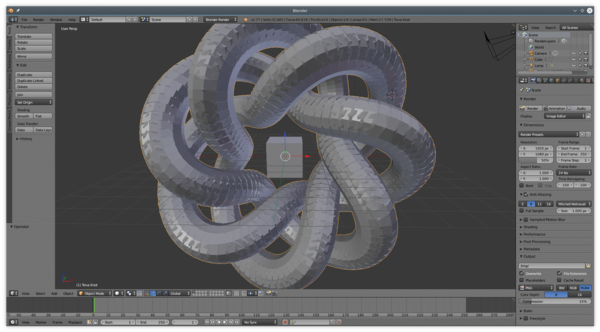 Figure 7: A torus knot, created with Beetle Blocks, edited in Blender.
« Previous 1 2 3 Next »
Buy this article as PDF
Pages: 4
(incl. VAT)
Buy Raspberry Pi Geek
US / Canada
UK / Australia
Related content
-
Six Scratch troubleshooting tips

When your script doesn't run as expected, Scratch offers some strategies for solving your problems.
-
Use Scratch's senses to design a game

To create a game with action and consequences, you need a tool that can sense information in real time. We show how to do this using the Scratch programming environment.
-
Using Scratch to explore turtle geometry

We show you how to use some simple Scratch concepts to create shapes and patterns.
-
Graphical, Scratch-like programming languages for Arduino

Getting a handle on Arduino boards can be difficult. Luckily, quite a few block-based, Scratch-like programming environments are at hand that make the learning curve easier to climb.
-
A web-based alternative to Scratch

Although Scratch is great, a lot can be said for Snap!, Scratch's cloned, web-based little brother. Written in JavaScript, Snap! can be run within a web browser and is easily extended with some XML and Python-Fu.
