Using the RPi Cam Web Interface

Lead Image © studiostoks, 123RF.com

Handy Cam

You can access and control the Raspberry Pi camera module from your favorite browser using the RPi Cam Web Interface software.

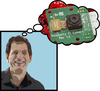
The Raspberry Pi camera module is a nifty peripheral that lets you put the tiny computer to a variety of practical and creative uses. To get the most out of the camera's functionality, however, you need to have at least a basic working knowledge of Bash or Python scripting. You can opt for a graphical application like RPICameraGUI [1], but what if you want to access and control the Raspberry Pi with the camera module remotely?

Although it's possible to use RPICameraGUI via an SSH connection, the RPi Cam Web Interface (RPCWI) software [2] makes a much better tool for the job. As the name suggests, this web application provides a user-friendly interface that lets you control practically all camera settings with a regular browser. Additionally, RPCWI offers several genuinely useful features that make it an ideal tool for working with the camera module. This includes the ability to preview, manage, and download saved photos and videos, support for time-lapse and scheduled shooting and recording, motion-triggered image capture, and much more.

Installing and Configuring RPi Cam Web Interface

RPCWI works on all Raspberry Pi models supported by the camera model, and the web application is designed to run on the Raspbian Linux distribution. Before you install RPCWI, it's a good idea to update Raspberry Pi's firmware, distribution, and all installed packages. This can be done by running:

sudo apt-get update && sudo apt-get dist-upgrade -y && sudo rpi-update

Next, make sure the Git software is installed on your Raspberry Pi by running

git --version

(it should return the version number of the installed Git package). If necessary, install Git using:

sudo apt-get install git-core

Of course, you need to connect the camera module to the Raspberry Pi, too. If you are new to the camera module, check the camera module setup page [3] for easy-to-follow instructions on how to connect the camera module to a Raspberry Pi.

Grab the latest release of RPCWI by cloning the project's GitHub repository with:

git clone https://github.com/silvanmelchior/RPi_Cam_Web_Interface.git

The software comes with the RPi_Cam_Web_Interface_Installer.sh script and a handful of helper scripts that automate the RPCWI installation and perform several important maintenance tasks. For these scripts to work, you need to make them executable using:

cd RPi_Cam_Web_Interface
chmod u+x *.sh

Now you are ready to install RPCWI. In the terminal, run:

./RPi_Cam_Web_Interface_Installer.sh

If the script detects missing packages, it automatically installs them, then presents a graphical dialog that lets you perform several important tasks. True to its name, the script makes it possible to install RPCWI, and it lets you choose between two web servers that power the application: Apache and Nginx.

Both servers have advantages and drawbacks, but it doesn't make a huge difference which one you choose for use with RPCWI. Nginx is considered somewhat lighter on resources, so if you plan to run RPCWI on a Raspberry Pi Model A, then it probably makes better sense to use Nginx instead of Apache. The rest of the article, however, assumes that you are running RPCWI on Apache. The script automates the entire installation procedure (Figure 1), so all you need to do is select the desired installation option, press OK, and wait until the script is finished. You'll then be prompted to reboot the Raspberry Pi, and once you've done that, RPCWI is ready to go.

Figure 1: A dedicated graphical tool helps install and configure the RPi Cam Web Interface app.

Before you launch the application, though, you might want to configure a couple of options. To do this, run

./RPi_Cam_Web_Interface_Installer.sh

and use the configure menu item to display the available configuration options. By default, anyone can freely access your RPCWI instance. That means everybody can view the live video feed, take photos, record videos, and perform other supported actions. This might not be a big issue if your Raspberry Pi sits on a local network behind a firewall, but if the machine is accessible from the web, it would be prudent to enable password protection.

Next, select apache_security, type yes in the Enable field, specify the desired username and password, then hit OK (Figure 2). RPCWI runs on port 80, so if you already have web applications installed on the Raspberry Pi, you need to reconfigure RPCWI to run on a different port – the apache_port option allows you to do that. If you want to start RPCWI automatically when the Raspberry Pi boots, use the autostart item to enable this option.

Figure 2: Enabling password protection.

The backup_restore item can be used to back up the RPCWI configuration and restore it later. Finally, the update and upgrade items let you update the installer script and the RPCWI installation.

Now you are ready to launch RPCWI. Switch to the main menu, select the start item, and press OK. Point your browser to http://127.0.0.1/ (replace 127.0.0.1 with the IP address or domain name of the Rasp Pi running RPCWI and specify the current port, if necessary). You should see RPCWI interface in all its beauty, complete with the live video stream from the camera module (Figure 3).

Figure 3: RPCWI in all its spartan glory.

Using RPCWI

Thanks to the dedicated buttons below the live feed, you can start using RPCWI right away. The record video and record image buttons can be used to record a video or take a photo, whereas the Download Videos and Images button opens a simple file browser that lets you preview saved photos and video files, as well as download them to your computer (Figure 4). The file browser features several creature comforts that can help you manage files. You can specify the desired size for preview images and thumbnails and switch between ascending and descending sorting orders. The File Types drop-down list lets you specify which files to display.

Figure 4: The app manages and download saved photos and videos.

In addition to doing simple image capture and video recording, RPCWI also makes it easy to generate time-lapse videos (Figure 5). Hit the timelapse start button and let the time-lapse session run for the desired period of time. Press the timeplase stop button to stop the session. Switch to the file manager, and you should see the time-lapse session image stack identifiable by the clock icon. (Note that the number in parentheses indicates the number of photos in the stack.) Normally, you'd need to convert the time-lapse stack into a video, but RPCWI can take care of that, too. Press on the stack thumbnail, and hit the Start Convert button to generate a time-lapse video. The default conversion settings do a good job, but you can tweak them to your liking, too.

Figure 5: RPCWI can create a time-lapse video from a sequence of images.

Motion detection is another handy feature supported by RPCWI. When enabled, it automatically starts video recording when the camera detects motion (Figure 6). This functionality can come in particularly handy if you want to use the Raspberry Pi and RPCWI combo as a security camera and home surveillance system. Like everything else in RPCWI, this feature is straightforward in use. Press motion detection start to enable the motion detection feature.

Figure 6: The app supports motion detection and a range of options.

When the camera detects motion, it starts recording video. The recording session stops automatically when motion is no longer detected. It couldn't be more simple than that. Experienced users can tweak the motion detection default settings. With the motion detection enabled, press Edit motion settings and modify the settings at will.

RPCWI also allows you to configure scheduled image capturing and video recording. Press the Edit schedule settings button to switch to the scheduling interface that offers a wide range of configurable options. Although at first the interface may seem a bit confusing, configuring the basic schedule is not too difficult. To schedule a one-time image capture at the specified time, select the Fixed Times item from the Select Mode drop-down list. In the scheduling table, specify the desired time in the Period column, and enter the im image capture command in the Period Start column. Press Save Settings to save the schedule.

The scheduling functionality supports a long list of commands (Figure 7). To view them along with their brief descriptions, expand the Command reference section. Using the supported commands, you can configure advanced schedules that can record videos when motion is detected during a specified period of time, automatically trigger time-lapse sessions depending on dawn and dusk hours, and much more.

Figure 7: RPCWI boasts powerful scheduling capabilities.

As you would expect, RPCWI can be used to adjust camera settings, and the application lets you control practically any aspect of the camera module (Figure 8). Expand the Camera Settings section on the main page to view a list of all adjustable camera settings. Here you can easily modify anything: from resolution and overlay annotation text, to exposure settings (shutter speed, ISO, metering mode, white balance, exposure compensation) and everything in between. When you modify certain settings like white balance or annotation text, all changes are applied to the current live stream, so you can immediately preview the result of the adjustments.

Figure 8: You can adjust practically any camera setting using RPCWI.

Buy this article as PDF

Express-Checkout as PDF

Pages: 6

Price $2.95
(incl. VAT)

Buy Raspberry Pi Geek

SINGLE ISSUES
 
SUBSCRIPTIONS
 
TABLET & SMARTPHONE APPS
Get it on Google Play

US / Canada

Get it on Google Play

UK / Australia

Related content

  • Working with the Raspberry Pi camera module

    The amazing Raspberry Pi camera module opens into a whole new world of useful projects. We'll show you how to use the Pi camera for time-lapse photography, and we'll even help you set up a motion-detecting surveillance camera.

  • Snapshot

    The remarkable Raspberry Pi has spawned a myriad of supporting projects – Android apps, program libraries, specialized Linux distributions, and an assortment of hardware accessories. The rapid changes within these projects is testament to the excitement and enthusiasm that developers around the world have given to the Raspberry Pi.

  • SunRover Part 4 – Adding a Pi Camera and Diagnostics System

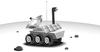
    A Raspberry Pi Camera module and a diagnostics system allows SunRover to see and check that all systems are go.

  • The Pi Wire

    Read all about the Pi as Droid, Raspberry Pi seismograph, your Pi on Docker, and PiCapture video hardware. 

  • Building a Motion Detector using Scratch GPIO server

    As of the Raspbian Jessie release, Scratch provides easy access to the Raspberry Pi's GPIO pins. This project incorporates the new GPIO server to build a motion detector.