Connecting a weather station to your Arduino
Building the WeatherArduino PCB
Building prototype boards (wire wrap, point to point, breadboards, etc.) by hand is always a time-consuming process prone to error and reliability issues. The last significant prototype boards I built were for Project Curaçao to interface to the I2C devices, solar cells, wind turbines, and computers. They were hand-wired and took a significant amount of time and rework to get solid enough to put in a box and send 3,500 miles.
After deciding I had had enough of the old way, I set out to build my first PCB for a project since graduate school. A number of the tools for this purpose – from Fritzing to ExpressPCB to PCBWeb – I found to be either too clumsy, too expensive, or too lacking in parts libraries and documentation.
Finally, I settled on the free version of the Eagle schematic capture and board layout software [8] for three reasons:
- 1. Standardization. All the foundries seemed to accept Gerber files generated from Eagle.
- 2. Tutorials. The Eagle System comes with good documentation and tutorials.
- 3. Parts libraries. The Eagle system has lots of sources for parts placement and various physical sizes for PCBs. SparkFun, for example, has practically their entire parts library in Eagle format.
Following several tutorials over three days got me to the point where I thought I could ship a board to a foundry. The first board I built was the MouseAir Version 2 connections board (more on that in another article). Then, I started looking at possible foundries. My board was only going to be 2 inches (5cm) on a side, so I had a lot of options. I finally settled on testing two foundries: DFRobot [9] for the WeatherArduino board and TinySine [10] for the MouseAir V2 board. Both foundries provided a good quality product in a timely fashion and at a reasonable cost. I was exceptionally pleased.
When I sat down to do the WeatherArduino board, I finished the design in about three hours. It was an excellent experience, although the Eagle tools take some getting used to. Most of the things that irritated me with the first board (e.g., the way to place text) turned out to be good methods once I was familiar with the work flow.
Figures 4 and 5 show the WeatherArduino schematic and resulting boards. If you don't want to make your own (see Table 2 for the parts list), the WeatherArduino PCB is available on Amazon.com from SwitchDoc Labs [12]. When the boards were delivered, I was very pleased with the quality (Figure 6). The WeatherArduino board was built and tested in just a few hours, everything worked, and it was much easier and more reliable than my hand-wired boards.
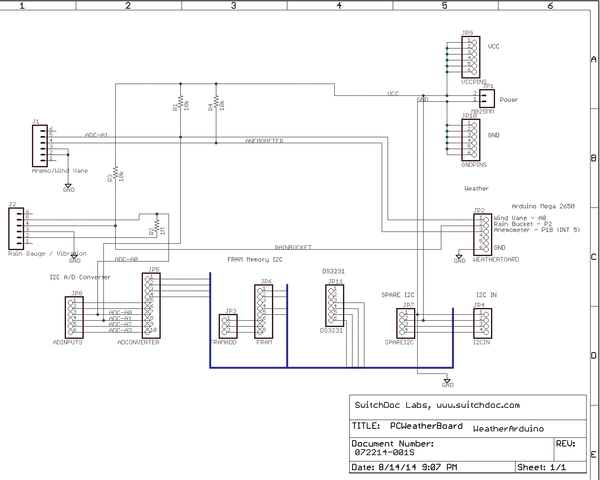 Figure 4: WeatherArduino board schematic. The WeatherArduino assembly manual is available online [11].
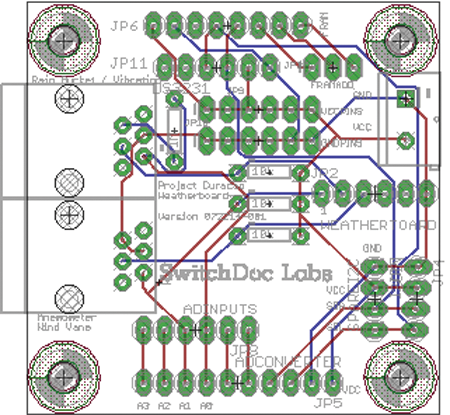 Figure 5: Layout of WeatherArduino board.
Table 2
Parts for the WeatherArduino PCB
| Schematic | Label Description | Qty | PartNumber | Source |
|---|---|---|---|---|
| JP1 |
Screw terminals, 5mm pitch (2-pin) |
1 |
PRT-08432 |
SparkFun |
| R1, R2, R4 |
Resistor, 10kohm, 1/6W PTH |
3 |
COM-08374 |
SparkFun |
| JP2 to JP5, JP7 to JP10 |
Breakaway headers, straight (40-pin) |
2 |
PRT-00116 |
SparkFun |
| JP11 |
Female headers |
1 |
PRT-00115 |
SparkFun |
| J1, J2 |
RJ11 6-pin connector |
2 |
PRT-00132 |
SparkFun |
| Connects to J1/J2 |
Weather meters |
1 |
SEN-08942 |
SparkFun |
| JP11 (in female header) |
Optional DS3231 plug in RTC I2C board |
- |
DS3231 |
Amazon.com |
| JP6 |
32KB FRAM I2C board |
- |
1895 |
Adafruit |
| R2 |
Resistor, 1.0Mohm, 1/4W PTH |
1 |
COM-11853 |
SparkFun |
| JP5 |
ADS1015 or ADS1115 |
1 |
1083 or 1085 |
Adafruit |
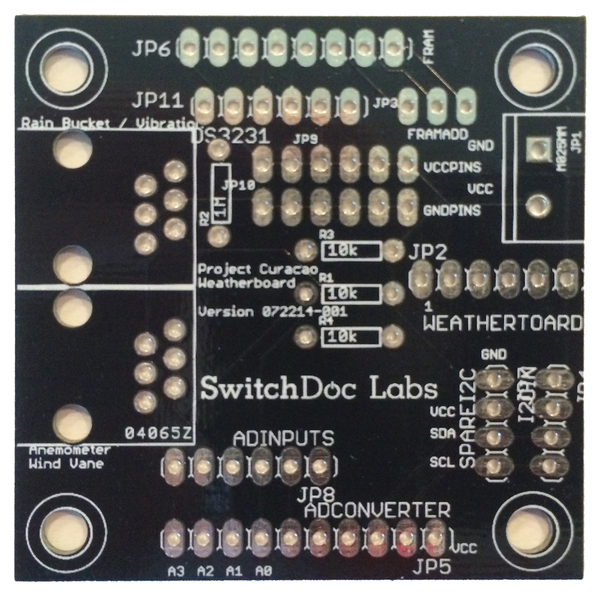 Figure 6: Manufactured WeatherArduino PCB.
Software Library
The software for interfacing the Arduino to the weather sensor package has some pretty complex aspects. The library is built as an Arduino C++ library class, but it is important to note that it is intended only to be used as a singleton. This means you can have only one WeatherArduino (SDL_Weather_80422) object in your file. You can't use this library (without modifications) to interface to two weather sensor packages at once, because the SDL_Weather_80422 library uses specific resources (interrupts, AD ports) that can't be shared. I have not tested interfacing to two sets of sensors from one Arduino, but you might be able to get it to work. You can use two different modes with the SDL_Weather_80422 library: SDL_MODE_SAMPLE and SDL_MODE_DELAY.
SDL_MODE_SAMPLE mode means return immediately after asking for the wind speed. The wind speed is averaged at sampleTime or since the last time asked, whichever is longer. If the sample time has not passed since the last call, the class returns the last calculated wind speed. Therefore, you will never see changes faster than the specified sample time, which means you do not have wait for the wind speed, you just grab the last valid reading.
SDL_MODE_DELAY mode means to wait for the set sample time to expire and return the average wind speed at the expiration. You would use this if you want to make sure you have the latest value and your program architecture allows you to pause for the sample time before continuing.
Which mode you use depends on the specific software architecture of your Arduino application. Typically, I use SDL_MODE_SAMPLE because I can tolerate not having the current wind speed value.
Wind gusts values are returned in either mode immediately. A wind gust returns the highest value since you last asked for a wind gust. If you want the highest gust every 10 seconds, then you need to ask every 10 seconds for a wind gust value. Listing 1 is the sample code you can use to get the software and hardware working. When the sample is run, your output should look something like Listing 2.
Listing 2
Output with SDL_MODE_SAMPLE
01 -----------
02
03 WeatherArduino SDL_Weather_80422 Class Test
04
05 Version 1.0
06
07 -----------
08
09 ----------------
10
11 rain_total=0.00 wind_speed=0.00MPH wind_gust=0.00MPH wind_direction=90.00
12
13 ----------------
14
15 rain_total=0.00 wind_speed=0.00MPH wind_gust=14.09MPH wind_direction=45.00
16
17 ----------------
18
19 rain_total=0.00 wind_speed=0.00MPH wind_gust=9.64MPH wind_direction=90.00
20
21 ----------------
22
23 rain_total=0.00 wind_speed=0.00MPH wind_gust=8.69MPH wind_direction=90.00
24
25 ----------------
26
27 rain_total=0.00 wind_speed=0.00MPH wind_gust=8.32MPH wind_direction=90.00
28
29 ----------------
30
31 rain_total=0.00 wind_speed=10.72MPH wind_gust=8.05MPH wind_direction=90.00
Listing 1
SDL_Weather_80422_Library.ino
01 /*
02   SDL_Weather_80422_Library.ino - Example for using SDL_Weather_80422 Library
03   For Weather Sensor Assembly 80422.
04   Imported by Argent Data Systems
05   Created by SwitchDoc Labs July 27, 2014.
06   Released into the public domain.
07 */
08 #include <Wire.h>
09 #include <Time.h>
10
11 #include "SDL_Weather_80422.h"
12
13 #define pinLED     13  // LED connected to digital pin 13
14 #define pinAnem    18  // Anenometer connected to pin 18 - Int 5
15 #define pinRain    2   // Rain Bucket connecto to pin 19 - Int 4
16 #define intAnem    5
17 #define intRain    0
18
19 // for mega, have to use Port B - only Port B works.
20 /*
21  Arduino Pins         PORT
22  ------------         ----
23  Digital 0-7          D
24  Digital 8-13         B
25  Analog  0-5          C
26 */
27
28 // initialize SDL_Weather_80422 library
29 SDL_Weather_80422 weatherStation(pinAnem, pinRain, intAnem, intRain, A0, SDL_MODE_INTERNAL_AD);
30
31 uint8_t i;
32
33 float currentWindSpeed;
34 float currentWindGust;
35 float totalRain;
36 void setup()
37 {
38     Serial.begin(57600);
39
40   Serial.println("-----------");
41   Serial.println("WeatherArduino SDL_Weater_80422 Class Test");
42   Serial.println("Version 1.1");
43   Serial.println("-----------");
44
45         weatherStation.setWindMode(SDL_MODE_SAMPLE, 5.0);
46         totalRain = 0.0;
47 }
48
49 void loop()
50 {
51     Serial.println("----------------");
52
53    currentWindSpeed = weatherStation.current_wind_speed()/1.6;
54     currentWindGust = weatherStation.get_wind_gust()/1.6;
55     totalRain = totalRain + weatherStation.get_current_rain_total()/25.4;
56     Serial.print("rain_total=");
57     Serial.print(totalRain);
58     Serial.print(""" wind_speed=");
59     Serial.print(currentWindSpeed);
60     Serial.print("MPH wind_gust=");
61     Serial.print(currentWindGust);
62     Serial.print("MPH wind_direction=");
63     Serial.println(weatherStation.current_wind_direction());
64
65     delay(1000);
66
67 }
Because I am running in SDL_MODE_SAMPLE mode, I only see changes in the wind speed every 5.0 seconds (see the setWindMode statement in Listing 1, line 45). Other values from the weather station are reported immediately.
If you wanted to use SDL_MODE_DELAY, you would change the setWindMode statement to:
weatherStation.setWindMode(SDL_MODE_DELAY, 5.0);
Now, if you run the sketch, you will see output like that in Listing 3. Note that wind_speed changes with each reading; however, the delay between each reading is six seconds (5.0 second sample time + 1.0 second from the delay statement).
Listing 3
Output with SDL_MODE_DELAY
01 -----------
02
03 WeatherArduino SDL_Weather_80422 Class Test
04
05 Version 1.0
06
07 -----------
08
09 ----------------
10
11 rain_total=0.00 wind_speed=13.20MPH wind_gust=12.40MPH wind_direction=90.00
12
13 ----------------
14
15 rain_total=0.00 wind_speed=9.60MPH wind_gust=9.48MPH wind_direction=90.00
16
17 ----------------
18
19 rain_total=0.00 wind_speed=10.20MPH wind_gust=9.23MPH wind_direction=90.00
20
21 ----------------
22
23 rain_total=0.00 wind_speed=11.10MPH wind_gust=9.84MPH wind_direction=90.00
The SDL_Weather_80422 class [13] is pretty straightforward to understand, but I want to talk about the two most complex aspects of the class to help those who want to write this kind of interrupt-driven software.
Buy this article as PDF
(incl. VAT)
Buy Raspberry Pi Geek
US / Canada
UK / Australia
Related content
-
Mixing wind turbines with the tropics

We describe the further saga of Project Curaçao, a Raspberry Pi-based weather station powered by wind and sun.
-
Erratum: WeatherArduino
Issue: Raspberry Pi Geek 07Article: WeatherArduino
Page: 62
-
Sending your data through the air

Build a low-powered wireless system for your outdoor weather station using inexpensive hardware.
-
Protect your electronics from lightning strikes

Add a lightning detector to your vulnerable projects via the I2C bus to protect them from electrical storms.
-
Sizing a wind turbine to power your Raspberry Pi

Got a special project for your Raspberry Pi that requires it to operate off the electrical grid? If solar power doesn't provide enough juice, add some wind to the mix with an inexpensive wind turbine.
